Azure Storage Explorer
How to navigate and use Azure Storage Explorer for data ingress/egress
Setting up Azure Storage Explorer
The default method of loading data to SEAD is to use Microsoft Azure Storage Explorer, which will need to be setup and managed by your organisations ICT department. Ensure that when you are arranging access to Azure Storage Explorer (ASE) that you have access to V1.36 or later available. To open Azure Storage Explorer, search for the application in the start menu of your virtual machine, then click open.
NOTE: If users/analysts are using Azure Data Lake containers with Databricks, Azure Storage Explorer is available inside user's VM's as an alternative to AzCopy to manage and transfer their files between your file share drives (output, project, etc) and blob storage. Users can refer to the 'Azure Storage Explorer User Guide' in the shared library drive for more information. Users/analysts do not have access to upload or download data via Azure Storage Explorer outside of their virtual machine. Data ingress and egress to SEAD is managed by data administrators only.
Fig. 1. Opening Azure Storage Explorer
Configuring Proxy
Some organisations may require users to configure a proxy for web connections. Relevant organisation ICT support may need to provide the following to SEAD owners to configure the proxy settings in ASE:
- a proxy address and port to allow ASE to reach the internet.
- If the proxy requires authentication, the credentials that should be used to log in.
If unsure, contact your relevant organisation ICT support to assist.
To configure proxy settings in ASE, from the options menu select 'Edit' and 'Configure Proxy':
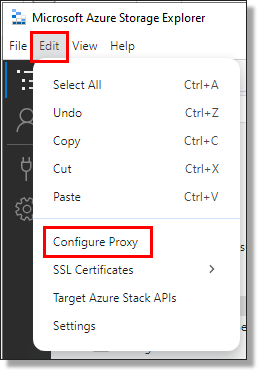
Fig. 1. Configure proxy in ASE
From the proxy settings, depending on your organisations requirements you will need to select the Source, URL, Port, and if required, a username and password. Then select 'Done'.
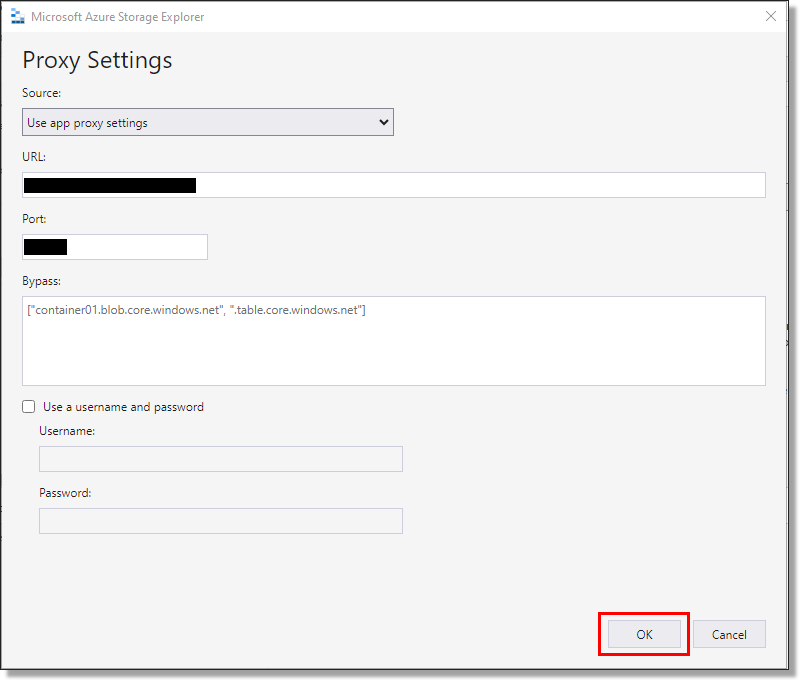
Fig. 2. Setting Azure Storage Explorer proxy settings
If you are having issues authenticating or accessing the storage accounts after configuring the proxy settings you can try to configure the proxy through the settings menu, ensuring that the 'Auto manage proxy settings' option is disabled.
To access proxy configuration from the settings menu, select the Settings cog and locate the Proxy details from the application settings:
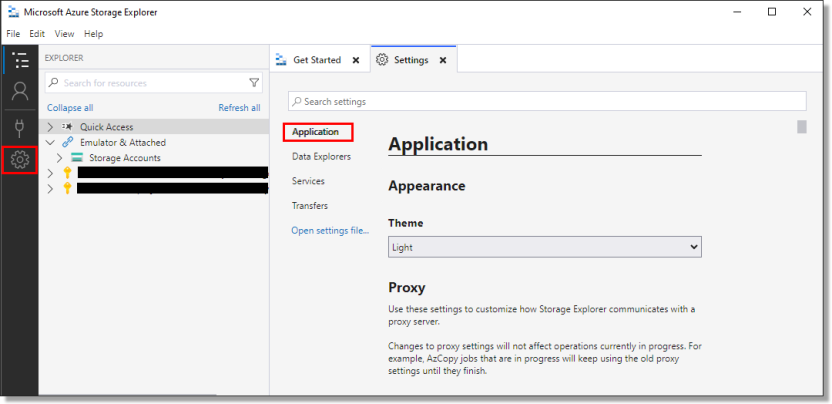
Fig. 3. Configuring proxy from the settings menu
Logging into Azure Storage Explorer
Within the application, click on the person icon on the top left of your side menu bar and select ‘Add an account’.
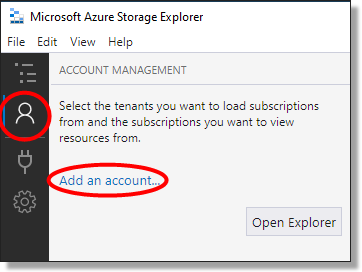
Fig. 1. Add an account button
On the following ‘Select Resource’ window, select ‘Subscription’.
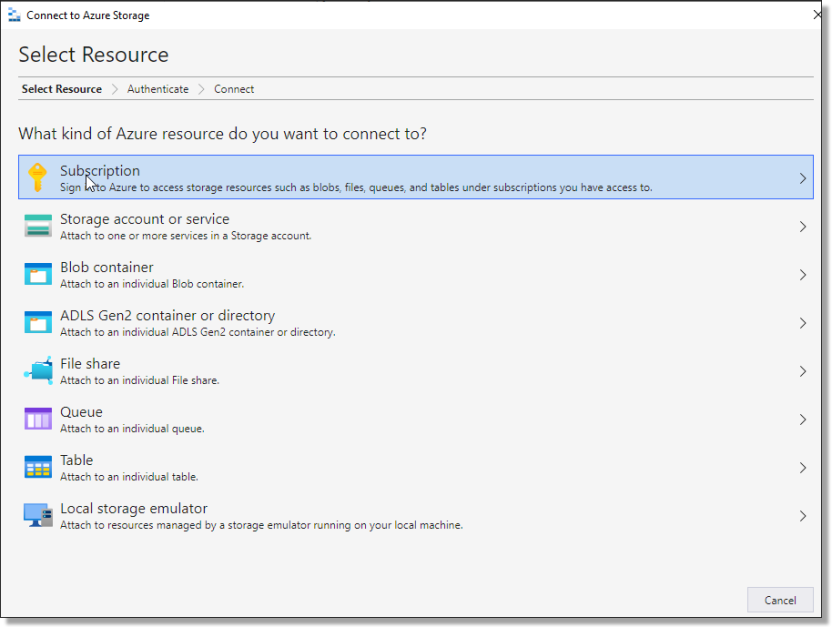
Fig. 2. Select Resource
On the following ‘Select Azure Environment’ window, select ‘Azure’ then press ‘Next’.
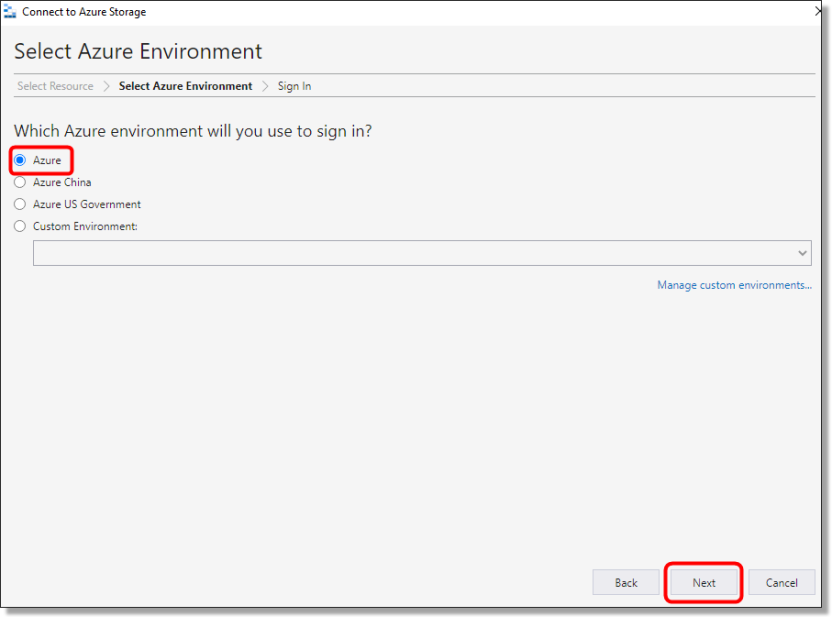
Fig. 3. Select Azure Environment
The system will redirect to a browser window.
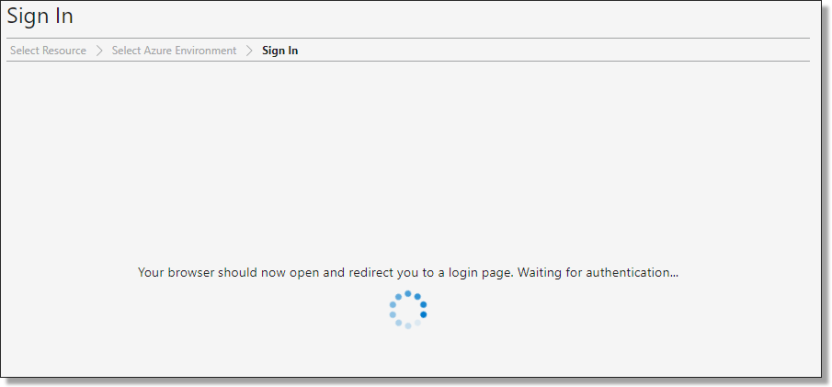
Fig. 4. Browser window loading
Enter your mydata.abs.gov.au username/or select your account.

Fig. 5. Azure account login
Log in, then return to Azure Storage Explorer. You will now have your account added and you can access the SEAD products and project files.

Fig. 6. Successful login
Authentication
The below message appears when you have been timed out of the system:
Follow this path also if you can’t see any of the files/file containers after logging in, your session may have timed out and you need to re-authenticate.
To manage this, select ‘Manage Accounts’ from the reauthentication notification at the top of your screen.

Fig. 1. Reauthentication notification
Then select the profile (person icon) from the menu bar on the left and select 'Reauthenticate now' beneath the account you are reauthenticating.
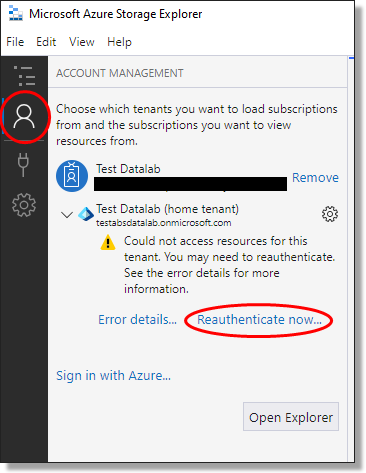
Fig. 2. Reauthenticate now
Follow the prompts for username and password.
Once authenticated, the browser will display the following message:

Fig. 3. Authentication successful
NOTE: In some cases, you may receive a notification stating that the page cannot be reached. If this occurs, close the window and return to Azure Storage Explorer where your account will be active. If it is not active, refresh your view.
Identifying storage accounts
NOTE: It is the responsibility of the SEADpod Project Owner to ensure compliance with the Project Owner’s legal requirements, rules and obligations pertaining to data input and outputs.
Storage Accounts are accessible under the 'DataLab-Prod' subscriptions to authenticated administrators. There may be multiple DataLab subscriptions visible to SEAD Administrators Azure Storage Explorer, each containing different storage accounts. Storage accounts are spread across multiple subscriptions because of load-balancing mechanisms in place to manage Azure limitations. SEAD administrators do not have permission to move projects to specific subscriptions.
There are five types of 'Storage Accounts' in ASE:
- Gateway storage account, prefixed with ‘gateway’. There will be one gateway storage account per SEADpod used to upload data via folder name and destination codes (refer to gateway storage accounts below).
- Product storage account, identified by the storage accounts starting 'prdct'. There will only be one Product storage account per SEADpod. This storage account lists all available products in the SEADpod. Users are not able to write to this drive in their VM.
- Project storage, identified in Azure starting with the ProjectID. There will be one storage account in ASE per Project created in the SEAD portal. The Project storage account allows access to the Projects and Outputs Drive for that project.
- Pod Library drive, is accessible to SEAD data administrators. The contents of this storage account is accessible to all users within their SEADpod.
- Library drive, which is only accessible for loading to by ABS administrators.

Fig. 1. Listed Storage accounts in Azure Storage Explorer (example image)
Gateway storage accounts
Gateway storage accounts scan all ingressed data to block malicious files. Administrators upload through the gateway, and safe files are automatically transferred to the destination account. Malicious files remain quarantined. If this happens contact your ABS system administrators at sead.support@abs.gov.au.
Note: Any files exceeding 50GB will not be scanned and will remain in the gateway container for 24 hours before being deleted.
There is one gateway storage account for each SEADpod. Within the gateway, all file shares and datalake containers for the SEADpod will be listed as a separate folder and the type of file share or datalake container denoted by one of the following destination codes:
- r = product fileshare folder
- a = product “datalake” Azure data lake storage container
- p = project "project" fileshare folder
- o = project "output" fileshare folder
- d = project "datalake" Azure data lake storage container
- x = pod library fileshare folder
To quickly find the right storage account in ASE, use the new “Manage Files” button in the SEAD admin portal. It gives you direct shortcuts to the correct gateway folder, file share, or data lake container.
On the projects interface, select the project you want to upload or manage files for and select the ‘Manage Files’ button.

Fig. 1. 'Manage files' button on the project interface
This will open the projects ASE manager menu which provides accessible shortcuts to the project, output, and data lake container's gateway folder or file shares.
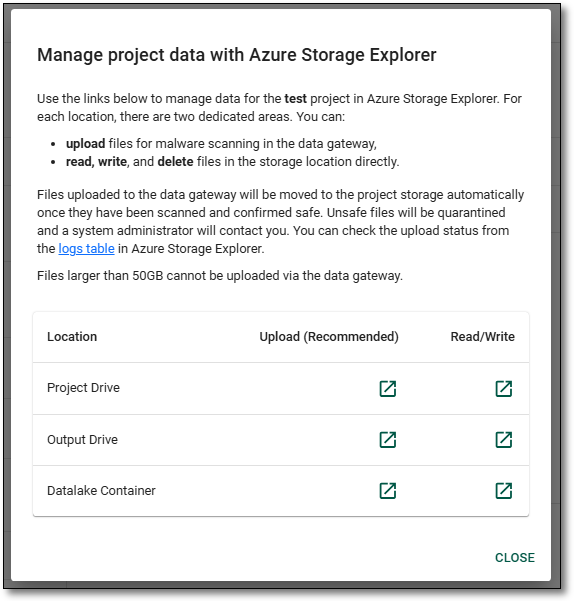
Fig. 2. Manage project data with Azure Storage Explorer
On the Products interface select the Actions button for the product you are wanting to upload or manage files for and select ‘Manage Files’.

Fig. 3. 'Manage files' button on the product interface
This will open the products ASE manager menu which provides accessible shortcuts to the product's file share and data lake container.

Fig. 4. Manage product data with Azure Storage Explorer
The gateway container can be accessed for the relevant product or project by selecting the ‘Upload’ shortcut for the location you are wanting to upload data to. The file shares can also be accessed directly by selecting the relevant ‘Read/Write’ shortcut.
To access the pod library you will need to go through ASE directly as there are currently no direct links available on the SEAD portal. The gateway container for the pod library can be identified as x-podlibrary (highlighted red in the image below). The podlibrary file share is accessible under the ‘prdct’ storage container (highlighted blue).

Fig. 5. Accessing the podlibrary containers in Azure Storage Explorer
Uploading files through the gateway
Firstly, as per usual practice you must create a product shell (refer to ‘Creating Products’) or a project shell (refer to 'Creating new projects’) from the SEAD administrator interface. Creating the required shell from the SEAD web portal will enable an Access Control List (ACL) in ASE. ACL's specify who can access a resource and the actions they are able to perform. To see the newly created shell in ASE, data administrators will have to log out and back in again for access control lists to refresh. Product and project folders created directly in Azure Storage Explorer are not configured with ACL protection and will not be accessible to end users.
After creating your shell, ensure your Azure account is activated (refer to Setting up Azure Storage Explorer) and you have the data administrator role.
Using the 'Manage Files' button found on the ‘Products’ or ‘Projects’ interface within the SEAD portal, then select the desired location’s (file share or data lake container) ‘Upload’ button.
This will prompt you to open Azure Storage Explorer. Select 'Open'. If the pop-up menu does not appear after clicking the shortcut link, check that pop-ups are enabled in your browser settings and are not blocking the popup.

Fig. 1. Open azure Storage Explorer pop-up
Note: It is recommended that you open the Azure Storage Explorer application and authenticate your account before using the shortcuts in the SEAD admin portal. If ASE does not launch after clicking the shortcut, check that you have authenticated to ASE and try again.
When you are directed to the storage account in ASE you will be asked to choose how you would like to open the direct link. You will need to select ‘Navigate to Container’.
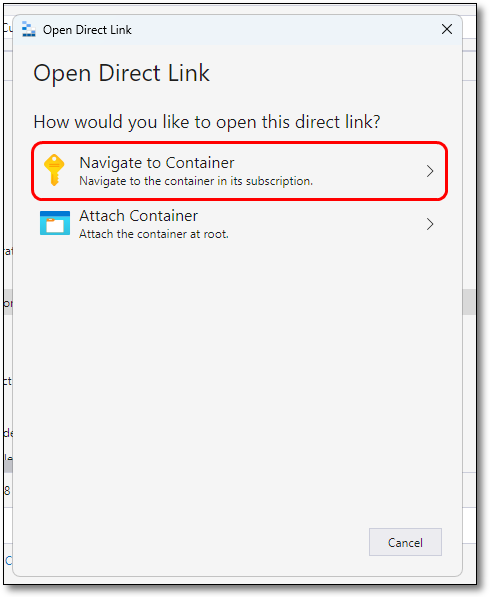
Fig. 2. Navigate to the Azure Storage Explorer container subscription
You will then be directed to the selected gateway folder or file share container.
If accessing the gateway container directly through ASE, open the SEADpod’s gateway container and under the ‘gateway’ storage account and open the ‘Blob Containers’ file share. You will need to locate the Product or Project’s file share from the list of folders. This will be the name of the product or project and the corresponding destination code. Refer to gateway storage accounts for information on the destination codes.
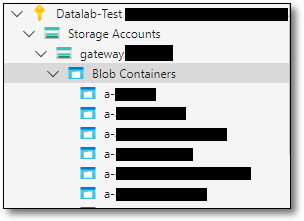
Fig. 3. Accessing the Gateway container in ASE
Tip: Right-click on a storage account and select 'Pin to Quick Access' to allow you to quickly locate the storage account instead of searching through the list of storage accounts.
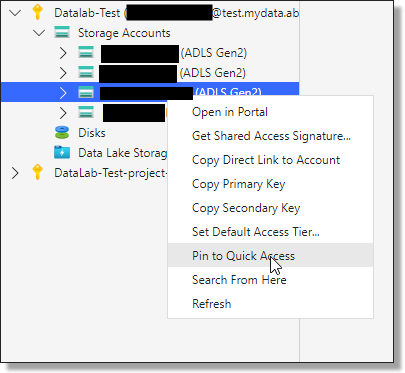
Fig. 4. Pinning Product folder to Quick Access
On the gateway storage account you can select 'view all' which open the full list of gateway folders and corresponding destination codes.
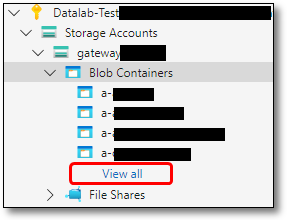
Fig. 5. View all gateway storage account folders
To locate the destination folder, start by inputting the short name in the bar (recommended if the SEADpod has a large number of folders), or scrolling through the list until you find the desired folder.
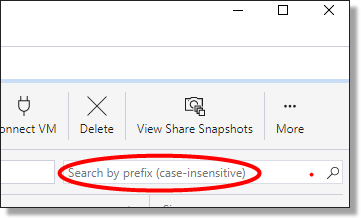
Fig. 6. Product search in Azure Storage Explorer
To add data, either drag and drop the files into the intended gateway folder, or select the ‘Upload’ button, ensuring you have the correct gateway folder selected.
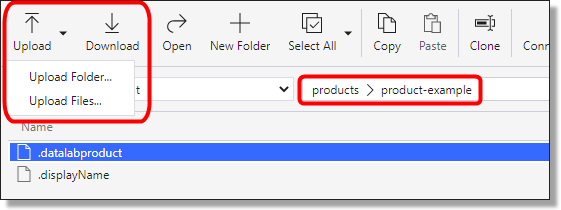
Fig. 7. Uploading data
After selecting Upload Folder or Upload Files, on the following window, Select the three dots to locate the required folders or files.
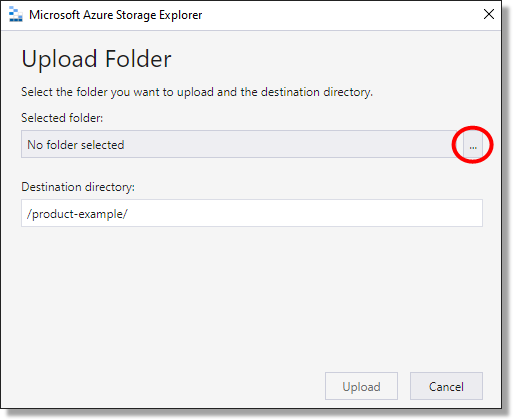
Fig. 8. Upload data continued
Select the product folder or file name and press ‘Select Folder’.
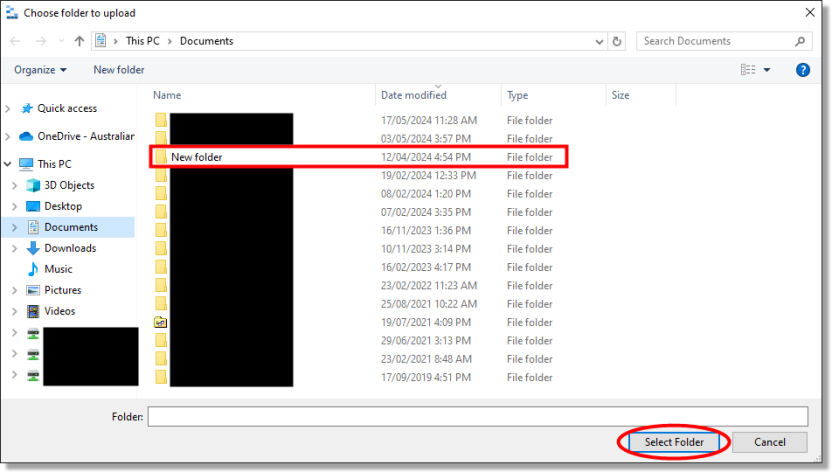
Fig. 9. Upload data continued
On the following window, check the upload paths are correct and at the appropriate file/location level. If correct, select Upload.
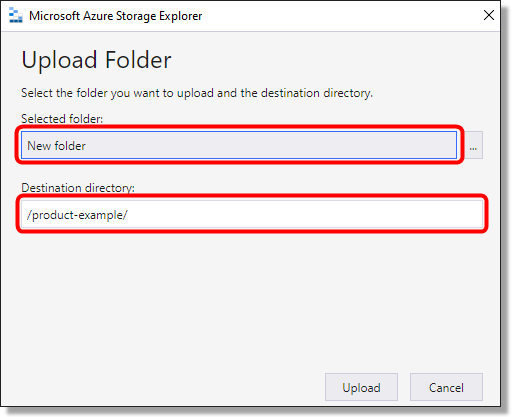
Fig. 10. Upload data continued
NOTE: Only data administrators within your SEADpod can view objects in Azure Storage Explorer. Azure denies authentication to administrators who do not have the data administrator role within the SEADpod.
After being successfully scanned, at the bottom of the screen from your Azure Storage Explorer app, the Activities box will indicate if the upload has been successful. If the upload has failed, retry the above steps.
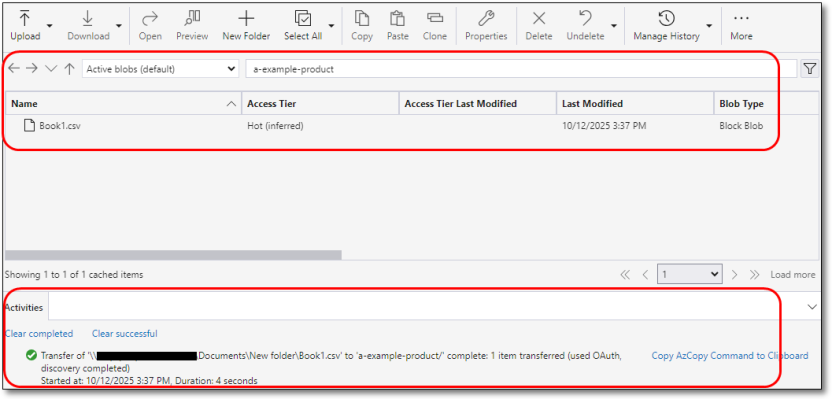
Fig. 11. Checking file upload success
Checking gateway logs
Files that have been uploaded through the gateway container will automatically be transferred to the destination storage account once they have been confirmed safe. To check that this has been successful, under the ‘gateway’ storage account open the ‘Tables’ folder and open the ‘GatewayLogs’ where you will be able to see the upload status of your files.
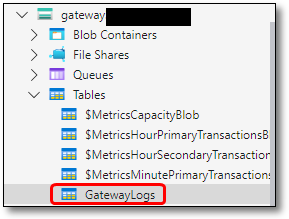
Fig. 1. Accessing gateway logs in Azure Storage Explorer
You are also able to use the ASE manager menu after selecting the 'Manage Files' button, on either the Product or Project page within the portal which contains a shortcut to link to the GatewayLogs table.
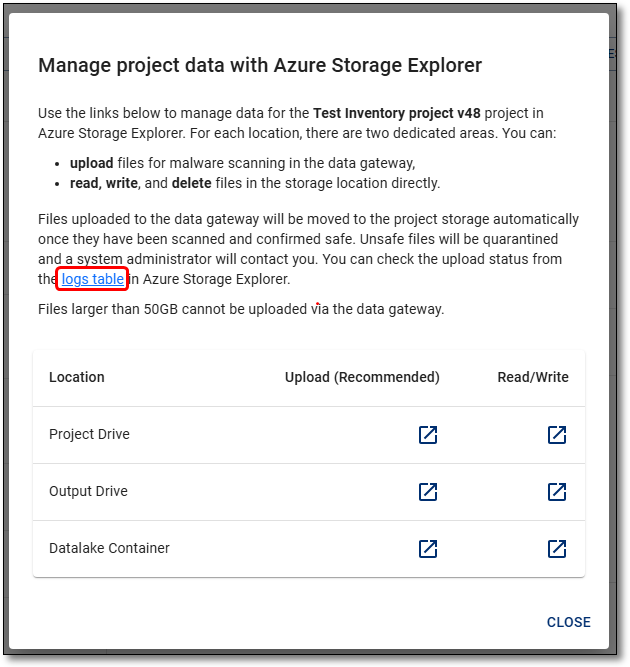
Fig. 2. Gateway logs table shortcut from the SEAD portal
Next, quality check the file upload by ensuring the transfer of the files from the gateway to the destination storage account on the gateway logs table. The gateway logs table contains information on the file upload, including the partition key (folder name and destination code), destination container, file name, information, status (complete, failed, in progress), and time stamp.
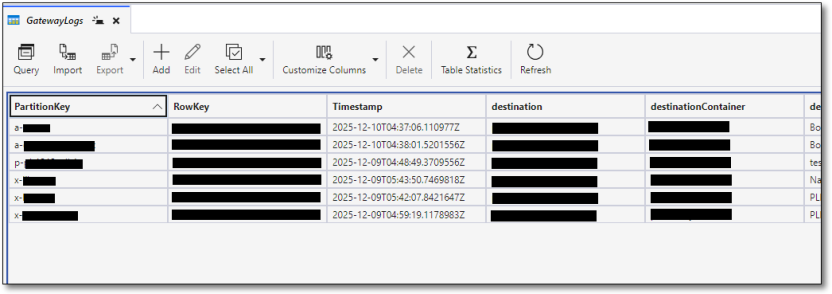
Fig. 3. Gateway logs table in Azure Storage Explorer
Viewing and downloading files
To view the data that is currently available to your end users, or to download/egress data from SEAD, you will need to navigate to the file shares directly, rather than the gateway storage account.
To do this, access the product or projects storage account directly in ASE.
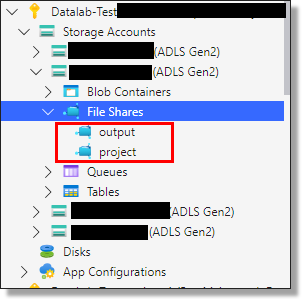
Fig. 1. Locating the Projects and Output folders from the Project storage account directly in ASE
Or, from the ASE managers menu in the SEAD portal, select the desired location’s (file share or data lake container) ‘Read/Write’ shortcut. This will direct you to the selected file share or data lake container where you will be able to see the files currently available to your end users.
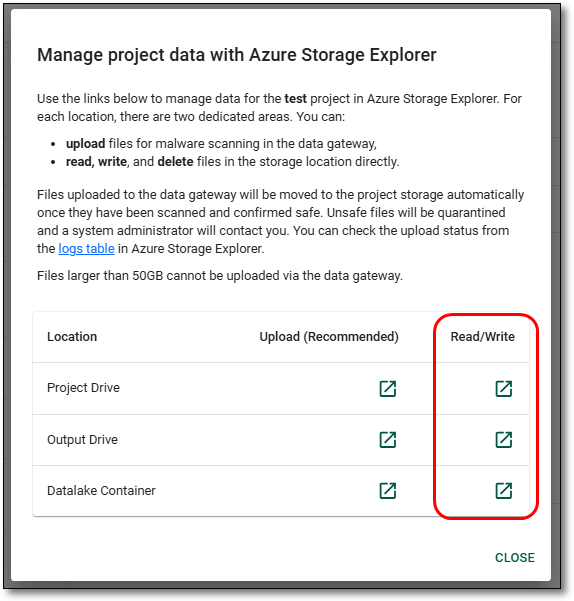
Fig. 2. Manage project data Azure Storage Explorer Read/Write shortcuts.
From here you can download/egress the files out of ASE. Use the download function (beside the upload button) in ASE to download data from ASE to your local organisations data store.
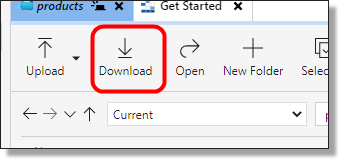
Fig. 3. Download function
NOTES:
- Reminder, SEAD users/researchers are unable to load data or egress it from SEAD, as they do not have access to Azure Storage Explorer. Users have read and write access to any files made available to them in the 'My Products' folder, and Project/Output folders that are linked to their project from their workspace, so they can delete files in these folders.
- If the folder in the Azure Storage Explorer directory is empty, the files meant for upload may not have been loaded. Attempt to check through Azure Storage Explorer, ensure files have actual content (size should not be 0 KB). Also be aware that the size of files uploaded to SEAD are smaller, due to compression. For some files, the CONTENT-MD5 may be blank. This is because CONTENT-MD5 is specifically related to Azure Blob Storage and since the storage in SEAD is Azure Files/file share based, it is unused/blank.
- Blob containers are also accessible in Azure Storage Explorer as an alternative for file shares, primarily used with Azure Databricks enabled VM's.
Restore files from backup
Administrators can restore files that have been backed up within the last 14 days. To do this, navigate to the project share for the relevant project and click on the drop down ‘Current’ or ‘View Share Snapshots’ buttons.
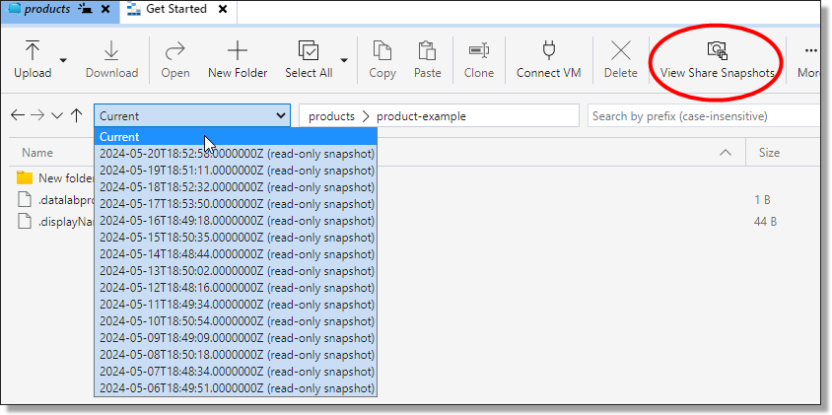
Fig. 1. Project Share Backed Up Files
Here you can view backup snapshots for the last 14 days, the timestamps are in UTC time zone which equates to 5AM the following day AEST. E.g. 2023-05-01T18:47:05.0000000Z equates to 2023-05-02 4:47 AM AEST.
If the file you are restoring still exists in the Current snapshot and you don’t want to overwrite it from the restore point, create a backup folder and copy the file into it.

Fig. 2. Backup Folder
Select the time of the backup to restore, right click the file and select Restore Snapshot.
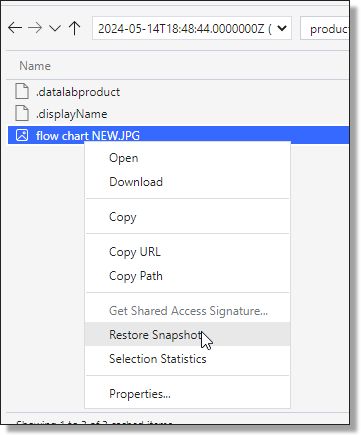
Fig. 3. Restoring a File
Confirm the restore.
NOTE: If you haven’t renamed or moved the Current version of the file into a folder it will be overwritten.
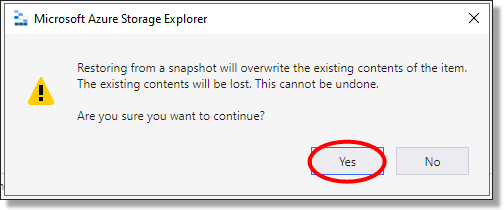
Fig. 4. Confirm the Restore
Verify the restore completed successfully in the activity log.

Fig. 5. Verify Restore
Managing the pod library
Each SEADpod will have access to their own ‘Pod Library’ which will be managed by a Data administrator through Azure Storage Explorer. All files that are added to the Pod Library will be accessible to all end users in the SEADpod, regardless of the project they are on, as an additional network drive (Z:). Users will have read only access to the Pod Library drive in their VM.
The Pod Library is separate from the existing Library drive (L:) which is shared across all SEADpods and is available to all users. The Library drive will continue to be managed by the ABS and will continue to host system documentation and usage instructions.
Unlike the Projects and Products, there are no shortcuts to ASE from within the SEAD portal. To locate the Pod library drive in ASE, the file shares will be located under the product (‘prdct’) storage account. From the file share you will be able to view or delete the contents of the Pod Library. To add files to the Pod Library, in the gateway container the Pod Library destination code and folder name is x-podlibrary.
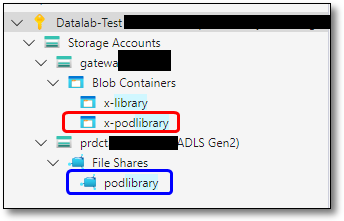
Fig. 1. Accessing the PodLibrary containers in Azure Storage Explorer
The contents of the Pod Library is at the discretion of the SEADpod and your requirements around files being accessible to all projects. Keep in mind the ABS guidance around safe access and management of code, packages, and software being uploaded to SEAD. Refer to code and package load for more information.
Troubleshooting
The ‘Manage File’ links on the admin portal do not connect to ASE
Check that your installation of ASE is version 1.36 at minimum. You can also login directly into ASE from your desktop.
Why can’t I see storage containers in my ASE account
Check that you have ticked all subscription boxes against your login credentials in Account Management settings. You may also need to reauthenticate your ASE credentials, or confirm your proxy settings with your local organisations ICT administrator.
My file is not in the intended location after sending it through the gateway
Check the Gateway Logs to verify the transfer status and location of your file.
My file got sent to quarantine
An ABS system administrator will contact you. If the file is larger than 50GB, you will need to chunk it up before sending it through the gateway again. It is the responsibility of the file owner to ensure that files ingressed are free of malware.