Temporary passwords issued to users by administrators are valid for up to 90 days.
SEAD administrators instruction guide
Information and instructions on the tasks and responsibilities of SEAD partner pod owners and administrators
Released
13/05/2024
Introduction
All administrators and analysts accessing the Secure Environment for Analysing Data (SEAD) are required to carefully read the SEAD privacy notice and conditions of use.
Access to this guide is not available through the ABS website or internet search engines. Administrators are advised to bookmark this webpage for future reference and access.
If you encounter any issues or have questions that are not covered by this guide, please contact the ABS at sead.support@abs.gov.au.
The SEAD service enables government agencies engaging this service (referred to as ‘SEAD partners’), to inherit a self-contained environment, known as a 'SEADpod' within the cloud infrastructure that also underpins the ABS DataLab. Through self-service features, SEAD partners gain exclusive administrative control over this self-contained environment.
This guide is specifically tailored for SEAD administrators. Its purpose is to provide assistance in managing SEADpods by covering essential functions required for effective administration.
For information on the capabilities of SEAD user analysts in accessing and navigating the SEAD system, please consult the SEAD user guide.
Note: The ABS does not provide guidance on how to conduct data analysis or modelling, or how to utilise the statistical tools available.
Responsibilities of partner administrators:
- Partner pod owners and administrators bear the responsibility of ensuring that the data used within SEAD is strictly for authorised purposes.
- Partner pod owners and administrators are expected to inform their SEADpod users about their obligations under relevant legislation.
- For users and administrators handling ‘Protected’ level data, holding at least a baseline security clearance is mandatory. Note: While it is not obligatory for SEAD users and administrators dealing with ‘Official’ and ‘Sensitive’ level data, the ABS recommends that all SEAD partner administrators obtain at least a baseline security clearance.
Privacy
A Privacy Impact Assessment (PIA) has been conducted for SEAD and considers the potential impacts on people whose personal information may be used in a SEADpod. This information includes statistical records and microdata stored or analysed in a SEADpod, along with the personal information of SEADpod system administrators and users. The PIA determined that sufficient protections are in place to safeguard the privacy of SEAD users and the Australian community.
Upgrades and enhancements
ABS led security testing and patching is undertaken at 8-12 week intervals, alongside feature and performance enhancements. Consequently, approximately every 8-12 weeks, scheduled administrator outages occur. As part of this ongoing process, the ABS communicates with SEAD administrators via email to provide updates on system maintenance and enhancements. During these outages, certain administrative tasks may be restricted, but administrators will still have access to ingress and egress data. The ABS ensures that SEAD partners receive advance notice of up to 10 days regarding these planned outages. For further details, please consult the system security documentation.
The ABS will send important messages, notifications, and reminders to SEAD partners via email and will use the global banner messaging system within SEAD for communication. However, the ABS typically does not contact SEAD users directly, except through banner messages on the SEAD portal. It is essential that any necessary communications are relayed to SEAD users by their administrators. Users and administrators should check the 'What’s New' section of the SEAD web portal regularly for information on the most recent updates and enhancements.
Five safes framework
The Five Safes Framework (Five Safes) is a multi-dimensional approach to managing disclosure risks. It presents specific questions to help assess each risk aspect (safe) in a qualitative way. The ABS uses the Five Safes to inform disclosure assessments for all data, including detailed microdata to evaluate whether a particular method of data access meets confidentiality and privacy requirements.
The Five Safes splits data access questions into five elements of control:
- Safe settings - Does the access environment limit unauthorised use?
- Safe people - Is the researcher authorised to access and use the data appropriately?
- Safe projects - Is the data to be used for an appropriate purpose?
- Safe data - Has appropriate and sufficient protection been applied to the data?
- Safe outputs - Are the statistical results non-disclosive?
SEAD enables partners to leverage the existing Safe settings protections maintained by the ABS, through the provision of a secure analytical cloud environment for access and storage of data. As a SEAD partner administrator, the remaining Five Safes controls fall within your responsibility and must be upheld through the following suggested mechanisms:
Safe people
Users provisioned with microdata access should be approved by the relevant administrators, governing bodies, or data custodians. Receiving appropriate training (including the ABS provided user guide) and agreement against designated conditions of access.
Safe projects
Projects should be accompanied by appropriate proposals, and agreements provided to administrators. Outlining public interest, business use and expectations for research and/or statistical purposes.
Safe data
Appropriate confidentialisation and treatments are applied to any form of data, code or packages, before made accessible to approved users.
Safe outputs
All outputs are validated prior to release from the system, against organisational tolerances, to ensure appropriate governance and legal obligations are adhered to (for example, re-identification of an individual or organisation).
System security
The ABS upholds its Safe settings through extensive security protocols that keep personal information safe and secure. ABS systems that store and process statistical data comply with the Australian Signals Directorate's (ASD) Information Security Manual and are subject to Independent Security Registered Assessors Program (IRAP) certifications, ongoing security audits and robust IT security testing and patching.
The SEAD system is hosted in Microsoft Azure and meets ‘Protected’ level security standards in line with the ABS System Security Plan. Microsoft is a trusted provider of cloud storage and analytics services and has been engaged by the ABS. For SEAD, the Microsoft arrangement ensures the ABS retains effective control of all microdata and user information.
The SEAD system uses closed network virtual machines (VMs) and cloud storage services to provide secure, isolated research spaces for the analysis of microdata. The technology underpinning the SEADpod includes data encryption at rest to mitigate against unauthorised access to microdata, Azure Storage Accounts to securely hold individual research products and allow querying from authorised users, and cloud servers (including backup servers) hosted exclusively onshore with no intention of being hosted internationally. Access to the system is only authorised for use in Australia unless approved by the ABS. Data is also backed up regularly (frequency dependant on the system, detailed throughout these instructions) to ensure appropriate recovery protocols in the event of an interruption to services.
The SEAD Product Storage Account is protected with Microsoft Defender for Storage which provides:
- Threat detection / malicious/unusual behaviour detection, such as data exfiltration attempts.
- Machine learning based and behavioural models.
- Activity monitoring.
- Credentials theft, lateral movement attempts.
- Access token leakage, scanning by third parties.
The ABS also uses the Cloud Security Posture Management (CSPM) tool – InsightCloudSec, which provides information about potential misconfigurations, configuration drift and any security issues following deployment of resources. Main focus areas are:
- Publicly accessible storage.
- Insecure/high risk network configurations (e.g., ingress from high risk ports, deprecated versions of TLS).
- Disabled security configurations (e.g., logging not enabled, encryption of data at rest, soft delete and purge protection status).
Although the SEAD system is contained within the cloud environment that underpins the ABS DataLab, it is separate to the ABS DataLab. ABS System Administrators will only interact with the SEADpod where required to practically deliver infrastructure services, but will not provide support on the use of analytical products.
Note: Security testing and patching is undertaken at 8-12 week intervals alongside feature and performance updates. This is accompanied by an outage to the administrator interface that is expected to last for several hours. The ABS will inform SEADpod owners of the outage date up to 10 days in advance. Administrators can still view the SEAD administrator portal as well as ingress and egress data to pre-existing product shells, but will be unable to edit or create users, projects, products or organisations during the outage. Users should remain unaffected throughout, however, precautions should still be taken.
Remote access
SEAD should be utilised in a secure and safe setting, with remote access permitted under the following conditions:
- It must be used in a work or private location.
- The screen must be protected from oversight by any other person. This includes locking and password-protecting your screen, should you move away from your computer.
- A secure internet connection must be used:
- A secure internet connection means any Wi-Fi that is password protected (e.g. work, home, your hotel room, hotspotting from your phone).
- A non-secure internet connection means an open or public connection like a restaurant/cafe, airport, public transport, hotel lobby or shopping mall.
- Overseas access to SEAD is not permitted under any circumstances without written approval from the ABS.
- Working in the SEAD from home is supported by the ABS but you are responsible for checking and complying with your organisation's requirements for working from home.
- Do not use any type of internal messaging system which may have external server connections, or attempt to remove or copy data out of the system without the consent of your organisation.
- The SEAD screens are to be kept secure at all times whether you are working within your organisation or from home.
SEAD project object roadmap
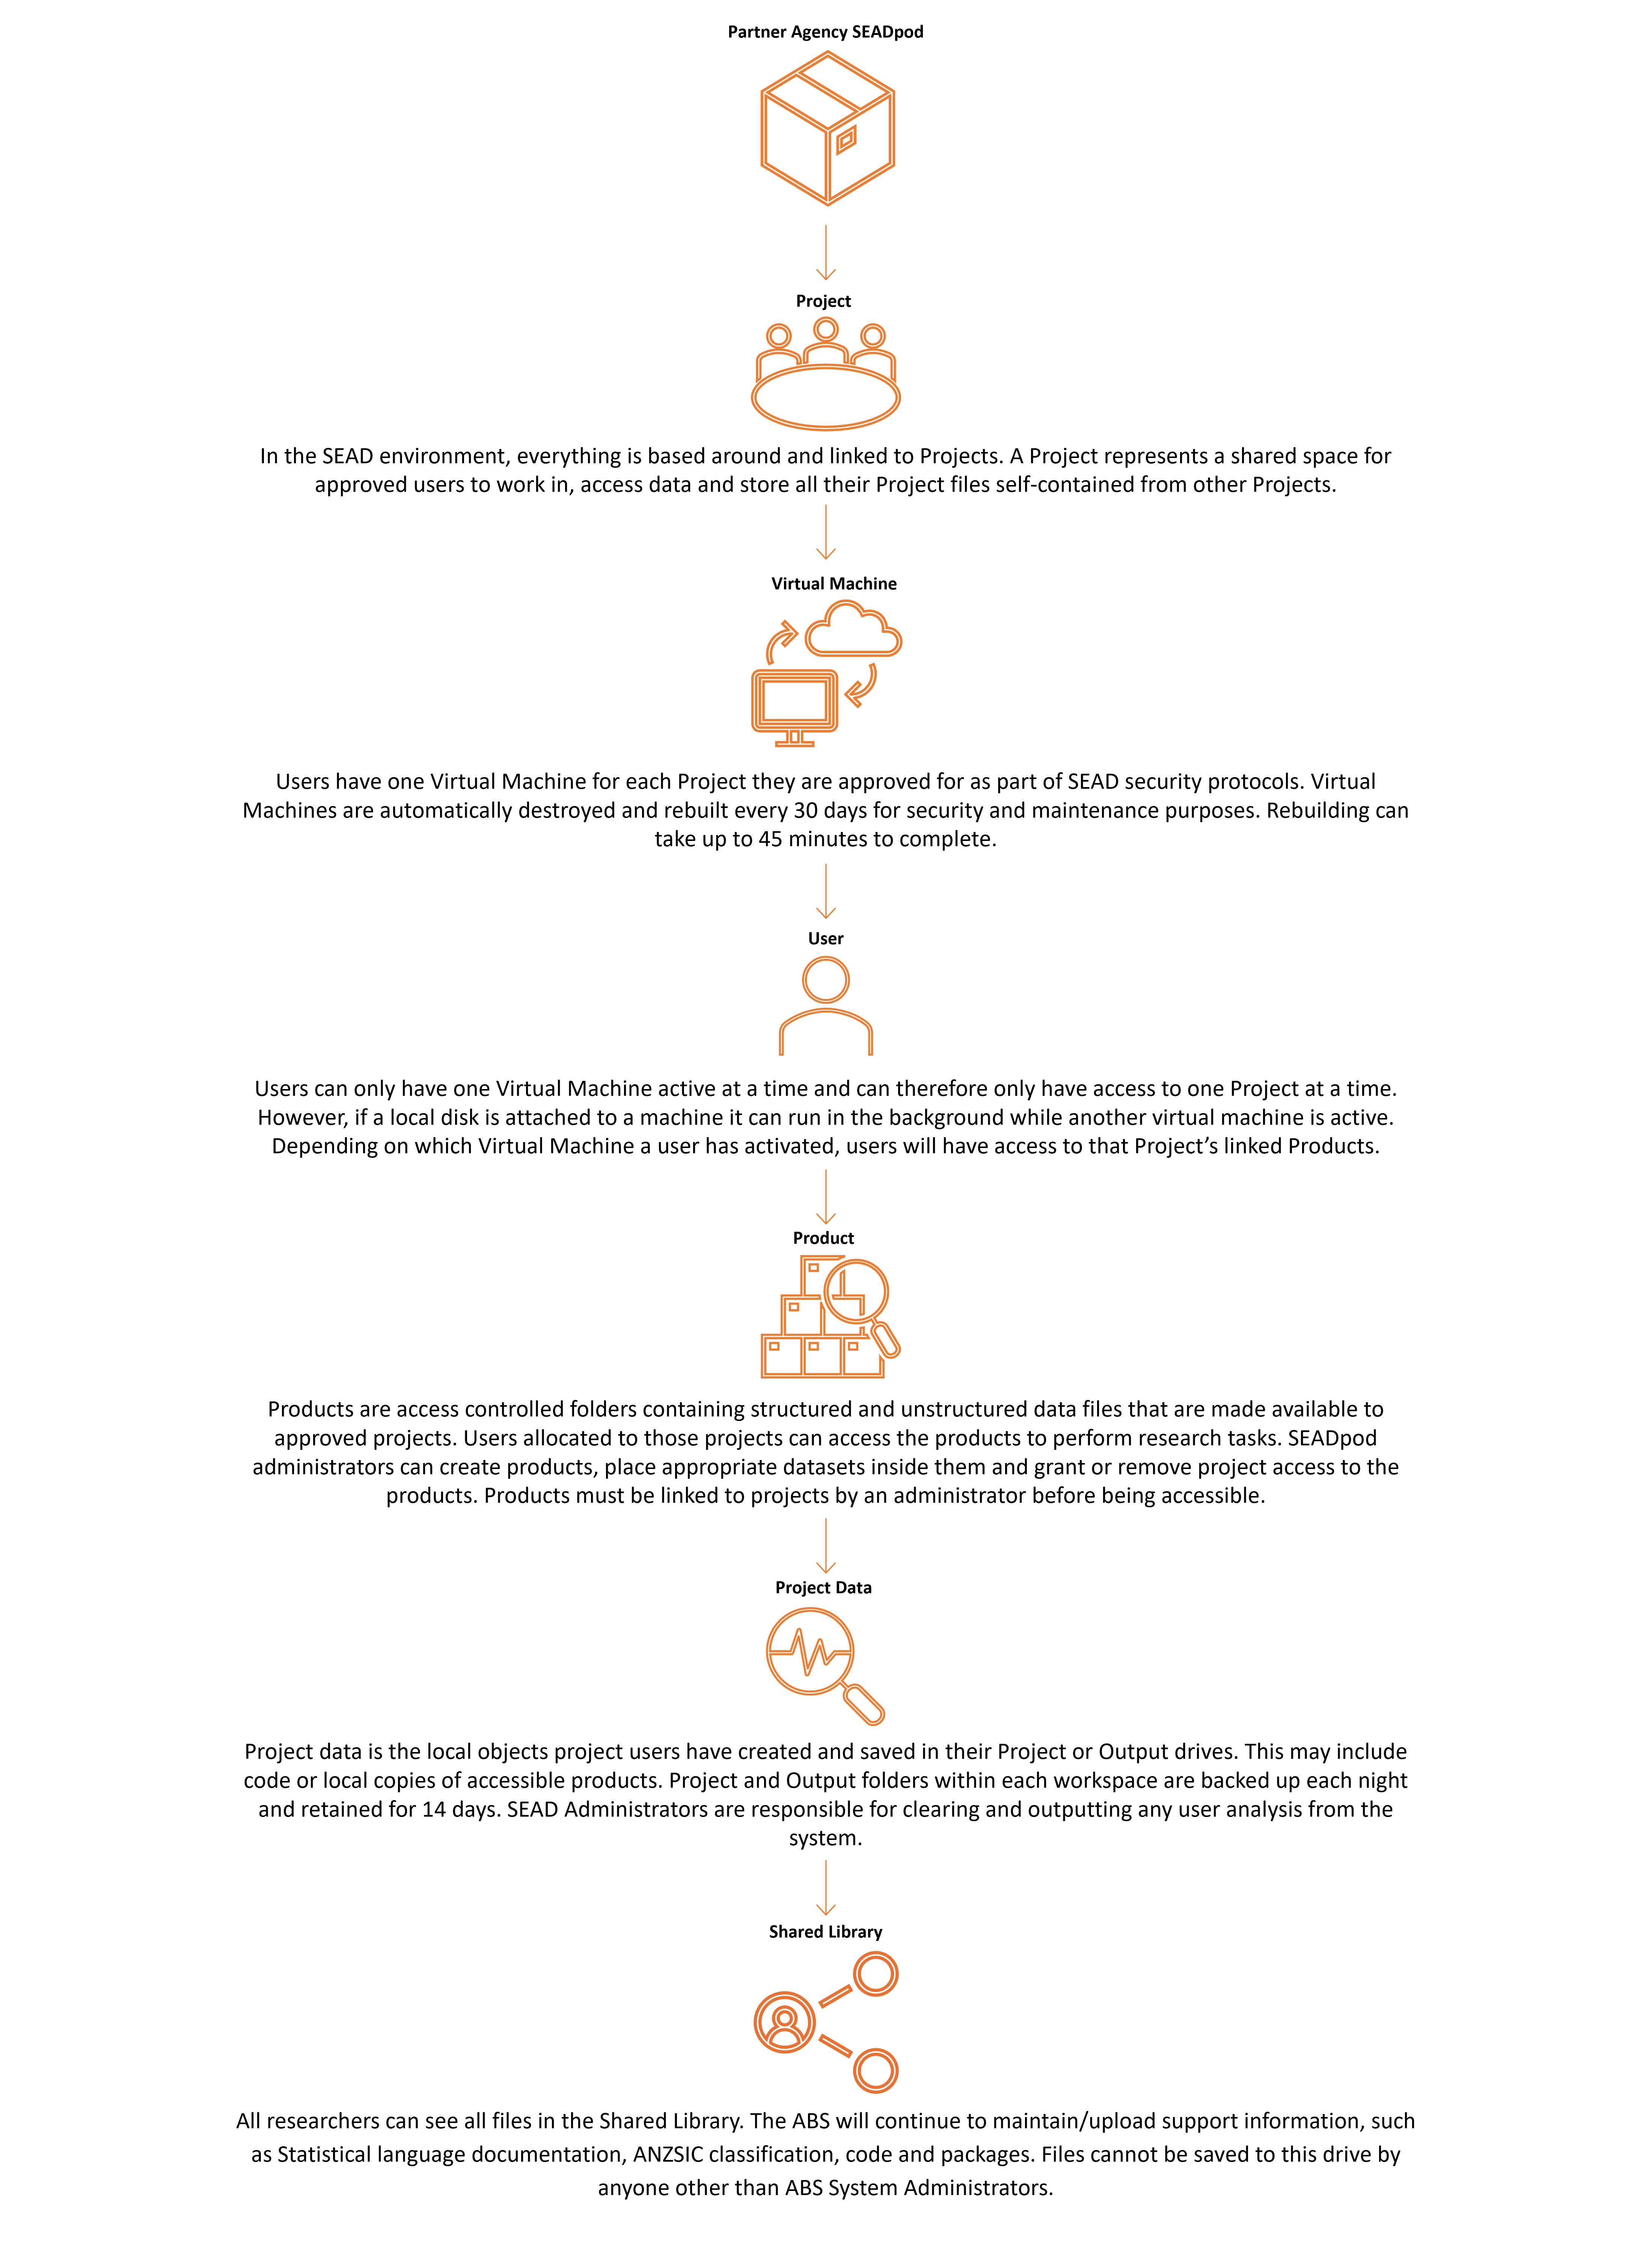
The project - The SEAD environment, everything is based around and linked to Projects. A Project represents a shared space for approved users to work in, access data and store all their Project files self-contained from other Projects.
Virtual Machine - Users have one Virtual Machine for each Project they are approved for as part of SEAD security protocols. Virtual Machines are automatically destroyed and rebuilt every 30 days for security and maintenance purposes. Rebuilding can take up to 45 minutes to complete.
Users - Can only have one Virtual Machine active at a time and can therefore only have access to one Project at a time. However, if a local disk is attached to a machine it can run in the background while another virtual machine is active. Depending on which Virtual Machine a user has activated, users will have access to that Project’s linked Products.
Products - Are access controlled folders containing structured and unstructured data files that are made available to approved projects. Users allocated to those projects can access the products to perform research tasks. SEADpod administrators can create products, place appropriate datasets inside them and grant or remove project access to the products. Products must be linked to projects by an administrator before being accessible.
Project data - Is the local objects project users have created and saved in their Project or Output drives. This may include code or local copies of accessible products. Project and Output folders within each workspace are backed up each night and retained for 14 days. SEAD Administrators are responsible for clearing and outputting any user analysis from the system.
Shared library - All researchers can see all files in the Shared Library. The ABS will continue to maintain/upload support information, such as Statistical language documentation, ANZSIC classification, code and packages. Files cannot be saved to this drive by anyone other than ABS System Administrators.
Administrator roles
To view a full breakdown of SEAD roles, refer to Administrator functions on the SEAD website.
The Pod administrator role is functionally separated into 4 distinct roles:
- Reader administrator - Has read-only permissions in the SEAD administrators interface meaning they have no access to editing functionality.
- Project administrator - Manages research projects for the pod, creates/closes/assigns users to projects in their Pod, link data products to projects.
- Data administrator - Creates or deletes products, uploads data to or removes data from product containers in the SEADpod's storage account, download analyst results or outputs from a projects Output or Project drive.
- User administrators - Registers and removes User accounts, can manage accounts like reset password, reset MFA.
Administrators are Reader administrators by default. Pod owners are able to assign administrators to any combination of the latter 3 roles in the SEAD portal. Information on viewing and editing administrator roles can be found under Managing administrators in the Pod owner actions page.
ABS system administrators hold an overarching administrator role but will not access partner SEADpods unless requested.
To contact ABS system administrators please email sead.support@abs.gov.au.
Technical specifications
SEAD Web app and desktop access requirements
SEAD is enabled by Azure cloud infrastructure, which may be blocked by some organisations’ firewall settings.
ABS cannot make changes to external organisations' infrastructure. SEADpod owners need to supply the information below to their organisation’s ICT department. If required, a Letter of Compliance can be supplied by the ABS upon request.
Network/Cyber Security departments in each organisation need to review and may need to make changes to allow access. This only needs to be done once.
Contact sead.support@abs.gov.au if further assistance is required.
1. Enable authentication to the tenant
Users need to authenticate to one of ABS' Azure Active Directory tenants, which may be strictly controlled by government agencies and academic workplaces. If your environment implements Azure Tenant restrictions (using the Restrict-Access-To-Tenants header insertion) then you need to include the ABS SEAD Tenant:
Tenant ID
30be94bc-7211-46d1-a5a0-705e859fa489
Primary domain
absmydata.onmicrosoft.com
2. Allow user access to application URLs
Users will need to access the following URLs:
- Azure Active Directory: login.microsoftonline.com, go.microsoft.com
- SEAD line of business application: sead.abs.gov.au
3. Enable Desktop brokering HTTPS connections
Configuration to your organisation's network is needed to allow outbound connections to the following addresses required for Azure Virtual Desktop (AVD):
- login.microsoftonline.com
- *.wvd.microsoft.com
- *.servicebus.windows.net
- go.microsoft.com
- aka.ms
- learn.microsoft.com
- privacy.microsoft.com
- query.prod.cms.rt.microsoft.com
All addresses utilise the TCP protocol and outbound port 443 for communication.
To use the Desktop version of AVD, IT administrators may need to enable the 'Remote Desktop Client'. For further information on using AVD, please refer to 'Accessing your project workspace' in the SEAD user guide.
Storage requirements
For uploading and downloading from Azure Files storage (for SEAD products and Project file shares). Some organisations choose to limit network access to a dedicated subnet/jumphost. ABS requires an IPv4 range to apply to the storage firewalls, which can match the organisations chosen location for upload/download to ensure security. Transfers can go via Azure Express Route Circuit if the organisation has configured a peering to this service, otherwise the traffic will traverse public internet. ExpressRoute, enables the creation of a defined route between Azure and your on-premises network that doesn't traverse the internet. Because ExpressRoute provides a dedicated path between your on-premises datacentre and Azure, ExpressRoute may be useful when network performance is a consideration. ExpressRoute is also a good option when your organization's policy or regulatory requirements require a deterministic path to your resources in the cloud.
Organisations can choose their preferred storage client such as Azure Storage Explorer (ASE) or AzCopy. However, the ABS does not provide support for the installation of client installed software, and will provide only limited network troubleshooting. Suggested communication requirements for ASE and AzCopy are listed below.
IMPORTANT: If the network you are connecting from is peered with an Azure VNET that is connected to an Azure Private DNS Zone for privatelink.file.core.windows.net, there is known limitation that will cause DNS resolution to fail. Contact your SEAD account manager to discuss alternative solutions.
- Enable authentication to the tenant
Users need to authenticate to one of ABS' Azure Active Directory tenants, which may be strictly controlled by government agencies and academic workplaces. If your environment implements Azure Tenant restrictions (using the Restrict-Access-To-Tenants header insertion) then they need to add the ABS SEAD Tenant:
Tenant ID
30be94bc-7211-46d1-a5a0-705e859fa489
Primary domain
absmydata.onmicrosoft.com
2. Allow user access to URLs for Azure Storage Explorer / AzCopy
Required hosts:
- *.file.core.windows.net
- *.blob.core.windows.net
- *.dfs.core.windows.net
- login.microsoftonline.com
- go.microsoft.com
- management.azure.com
Storage specifications
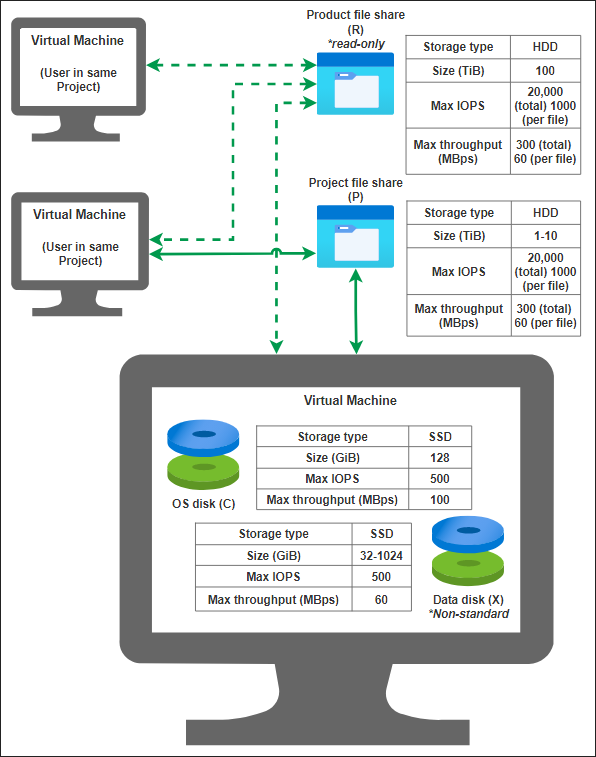
This image is an infographic of SEAD storage specifications that details virtual machine storage type, size, max IOPS and max throughput across the Product (R:) and Project (P:) file shares, OS disk (C:) and data disk (X:).
Note: Performance is not guaranteed due to factors such as network latency, bandwidth, and application behaviour.
SEAD administrators interface
Provides an overview of the SEAD portal home page and available administrator functions
Released
13/05/2024
SEAD web portal overview
The SEAD administrator interface is the primary platform for all SEAD administrators. Depending on the provisioned level of the person accessing SEAD (i.e. Pod Owner, Administrator, Read-Only Administrator), the navigation objects available will look slightly different as each role enables varying levels of accessibility to certain functions (e.g. Pod Owners will also have a Banner Messages and Administrators tab).
To access the SEAD portal, follow the instructions provided in the user guide.

This image provides an overview of the SEAD interface for administrators.
Information centre, global Links and account: Links to SEAD conditions of use, What's New (recent system updates), About (links to the SEAD website), Privacy Notice and account details information, including the email address, pod name, assigned roles and log out button.
Navigation panel: Links to accessible SEAD operations in the portal. These operations will change depending on the administrators assigned roles.
Quick search bar: Filter search results on the from a free text field. This search bar is available on most operations in the portal.
Filters: Allows attribute-based filtration to be applied to the operation.
New project button: takes you to the create new project form where additional projects can be added to the SEADpod
Export button: downloads a CSV report of the project details
List of existing projects: Contains the Project ID, name, storage size, organisation, status, start and end date, closed date, users, Databricks and tags of existing projects in the SEADpod
Expand/collapse navigation panel button: allows you to expand or collapse the navigation panel
As an administrator, your interface will enable you access to information about the various operational objects in the system: Projects, Products, Users, Virtual Machines, Packages, Organisations, Desktop Sessions and Tags. The Projects page is the default starting page.
You can view the actions performed in the user interface by clicking the ‘Action Log’ tab from the navigation panel. You can also download CSV reports for each object page (Indicated above).
Note: The Package Manager is read only to SEAD administrators, as this is managed by the ABS. For more information refer to Code and Package Loads.
Managing organisations
How to create new organisations
Released
13/05/2024
Creating a new organisation
NOTE: An organisation must be created before new projects are created, or new users can be registered in SEAD.
To create a new Organisation, select the ‘Organisations’ tab from the side navigation panel.
Fig. 1. Organisations tab
From the Organisations page, click on the ‘NEW ORGANISATION’ button presented at the top of your screen

Fig. 2. ‘NEW ORGANISATION’ button
This will direct you to the New Organisation Form. All fields are mandatory, with the exception of tags.

Fig. 3. New Organisation Form
Once you have completed the New Organisation Form, click on the green ‘SUBMIT’ button presented on the bottom of your screen.
Once you have pressed ‘SUBMIT’, you will be asked to confirm that you wish to create a new organisation, proceed by clicking ‘Yes’.

Fig. 4. New organisation confirmation
The system will then begin to create your new organisation. You can view the progress of the task via the Action Log.
Deleting organisations
To delete an organisation, locate the organisation from the Organisations page then click the Actions icon (three dots) along the same row as the organisation you are wanting to remove and select 'Delete'.

Fig. 1. Delete organisation action button
You will be asked to confirm the action. If deleting the organisation is your intention, proceed by clicking ‘Yes’ on the following window.
Fig. 2. Confirmation message
Editing organisations
To edit an organisation, locate the organisation from the Organisations page then click the Actions icon (three dots) along the same row as the organisation you are wanting to update and select 'Edit'.

Fig. 1. Menu icon for editing organisations
This will redirect you to the Update Organisations page. You can change the organisations name, ABN, and the associated tags. Once you have made your updates, click ‘Submit’.
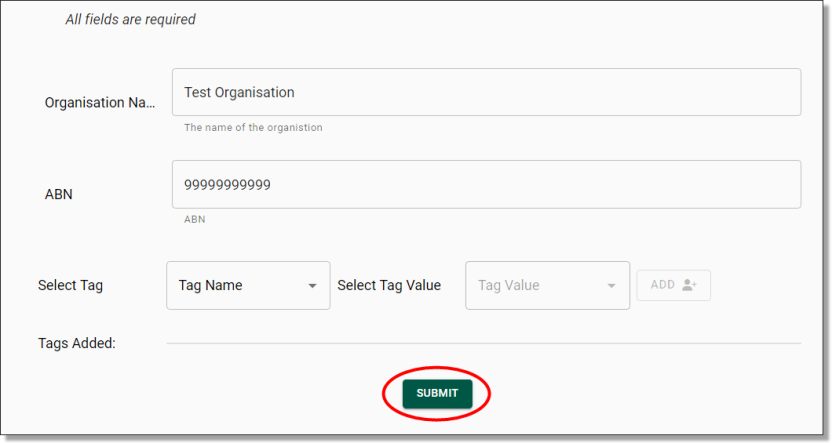
Fig. 2. Organisations update page
You will be asked to confirm the action, proceed by clicking ‘Yes’.
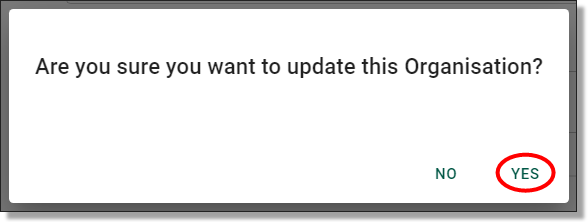
Fig. 3. Confirmation message
Managing users
How to register, edit, remove and restore users
Released
13/05/2024
Registering new users
As an administrator, you can register new users in SEAD. Administrators should create the user organisation before beginning this step. Start by clicking on the ‘Users’ tab from the side navigation panel on your left.
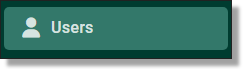
Fig. 1. Users tab
You will be presented with the Users page which showcases all registered users within your SEADpod. You can also download a CSV report of all registered users by clicking Export (circled red). To continue to the registration process, you will need to click on the ‘NEW USER’ button presented at the top of your Users screen.

Fig. 2. NEW USER button in Users page
You will be re-navigated to the new User Registration Form. All fields within the form are required to be populated with the exception of Tags. It is recommended to use a standardised format for the username i.e. firstname.lastname. A username cannot be used across multiple SEADpod's. If a user does require access to more than one SEADpod, they will need to be allocated a separate username. Once you have populated the registration form with the new user’s details, click ‘Submit’.
NOTE: Any leading or trailing spaces may cause the registration to fail.
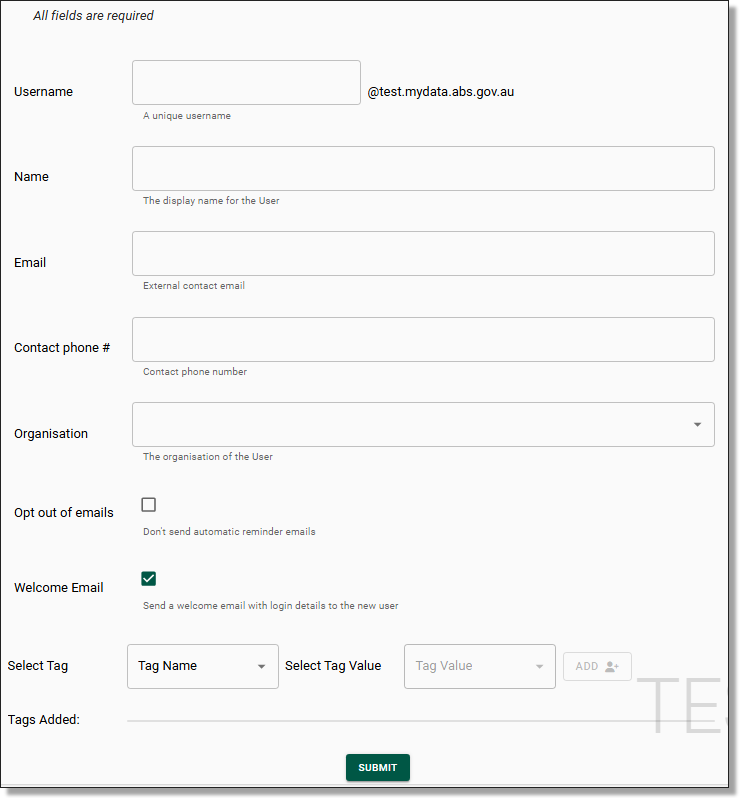
Fig. 3. New User registration form
Once you have pressed ‘Submit’, you will be asked to confirm that you wish to create a new user. If creating a new user is your intention, proceed by clicking ‘Yes’.
NOTE: The user registration form provides the opportunity to ‘opt out of emails’ , these emails are system generated emails that notify users of failed actions, impending rebuilds and other system related tasks. By default, users will receive these system emails.
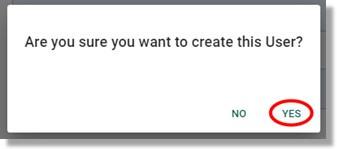
Fig. 4. ‘Are you sure you want to create this User?’ notification
After confirming that you are intending to create a new user, you will be met with a pop-up notification advising that the user creation is in progress and the users login details will be emailed to them via automated system notification. The user will shortly receive an email which contains their SEAD username and a temporary single use password that they will need to change on their initial login.
NOTE: If the 'Welcome Email' box is not selected during account creation, an email will not be generated. To send the welcome email to the user manually, administrators can navigate to the users profile and select the 'SEND WELCOME EMAIL' button. This email can only be delivered once.
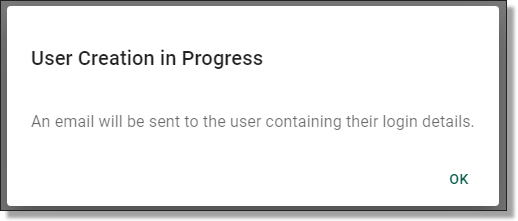
Fig. 5. User creation in progress pop-up
After confirming that you are intending to create a new user, the task will immediately begin initiating. You will be presented with a notification banner at the top right of your screen advising that the new user creation is in progress. You can follow the progress of this task by clicking the ‘LOGS’ button within the notification.

Fig. 6. Create user task in progress notification banner
The ‘LOGS’ button will redirect you to the Action Log which showcases all actions undertaken within the SEADpod. As you can see below, the create user action was successful after a few moments.

Fig. 7. Create user status in Action Log
NOTE: Login credentials are automatically delivered to new users. To access the system, users will need these details, and the supported multifactor authentication app, Microsoft Authenticator.
Edit existing users
The details of an existing user can be edited. All registration details for a user can be modified, with the exception of the username. This includes the user's name, email, contact number, organisation, and associated tags. To edit these details, navigate to the Users page by selecting the ‘Users’ tab from the side navigation panel. Once you are on the Users page, you will be able to select the user you wish to edit by clicking on their hyperlinked username. If the user is not immediately available, type their name into the search bar.
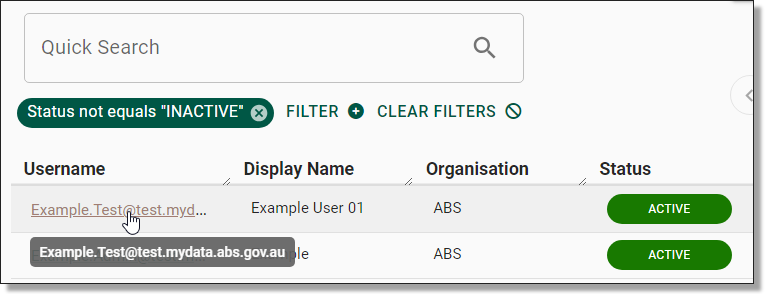
Fig. 1. Selecting the user
TIP: If you are having difficulty finding a user that has an existing account, try deselecting the ‘Status not equals ‘INACTIVE’’ search filter from beneath the search bar. By doing so, all users, irrespective of whether or not they are active will appear in your results.
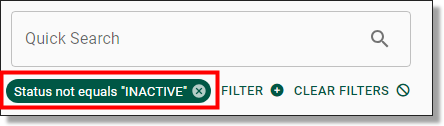
Fig. 2. Deselecting inactive users filter
Clicking on the hyperlinked username of your selected user will direct you to that specific user’s information page which showcases their basic attributes, virtual machines, account settings and associated tags. To edit this information, click on the ‘Edit’ button on the centre/top right of the page.

Fig. 3. Edit button on user page
Clicking on the Edit button will redirect you to the Update User page which follows the same template as the user registration form. As mentioned previously, all fields can be modified with the exception of the username. Make your updates, then click ‘Submit’.
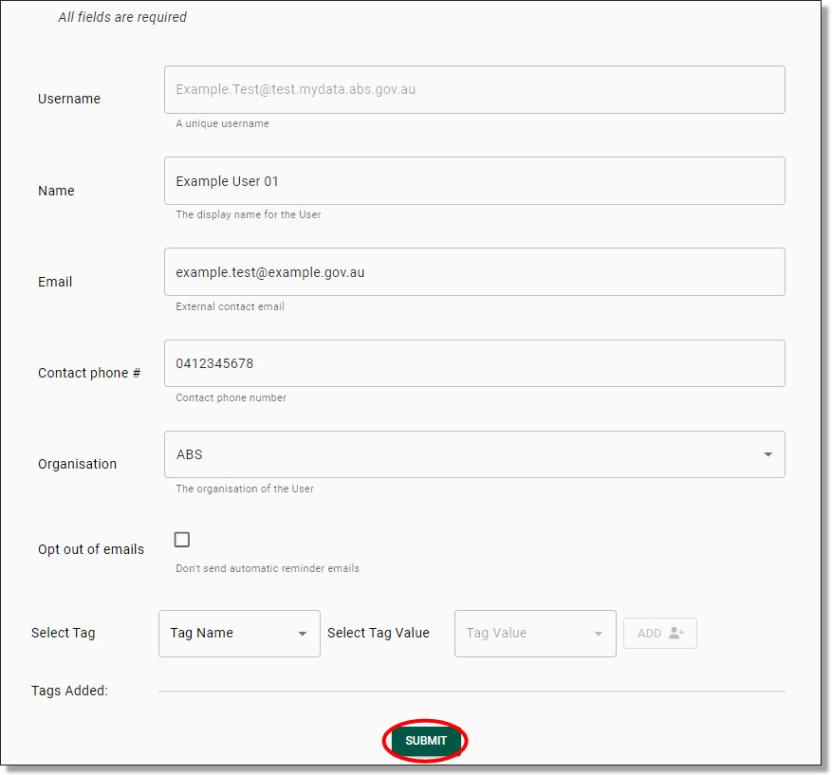
Fig. 4. Update user page
Once you’ve pressed ‘Submit’, you will be asked to confirm that you wish to update the user. If this is your intention, proceed by clicking ‘Yes’.
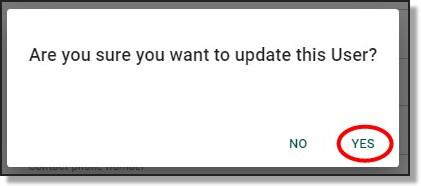
Fig. 5. ‘Are you sure you want to update this User?’ notification
Just like all actions undertaken within SEAD, a notification banner will appear in the top right advising that the requested task is in progress. In this instance, the task was completed instantly, and therefore, the notification advises that the task was successful. You can click the ‘Logs’ button within the notification to view the task in the Action Log.

Fig. 6. Task succeeded notification
Within the Action Log, you can view the changes made to the User by looking at the ‘Remarks’. You can also view the changes to the User’s information by navigating back to the User’s information page.

Fig. 7. Action Log remarks
Disable users
As an administrator, you can disable a user’s account. This removes their access to the SEAD environment and the user interface, while retaining the account information itself. Disabled accounts can be enabled later if needed (refer to Restore users). To disable a user’s account, navigate to the Users page by selecting the ‘Users’ tab from the side navigation panel. Once you are on the Users page, you will be able to select the user you want to disable by clicking on their hyperlinked username or typing their name in the search bar.
NOTE: A disabled account will still incur a license charge. It is therefore recommended that users are evicted (refer to Evict Users) rather than disabled. To understand the difference, refer to Frequently Asked Questions.
Clicking on the hyperlinked username of your selected user will direct you to that specific user’s information page which showcases their basic attributes, virtual machines, account settings and associated tags. To disable the user’s account, click on the ‘DISABLE’ button at the top/centre of the page.

Fig. 1. DISABLE User button
Once you have pressed ‘DISABLE’, you will be asked to confirm that you wish to disable the user. If disabling the user is your intention, proceed by clicking ‘Yes’.
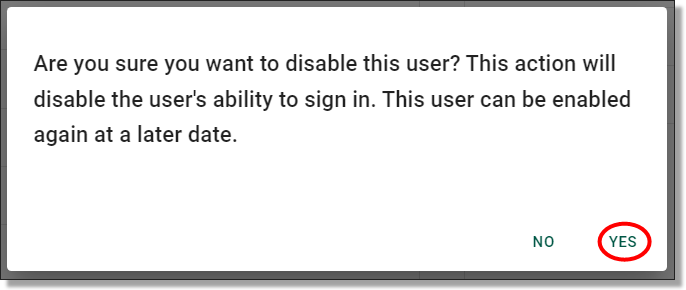
Fig. 2. ‘Are you sure you want to disable this User?’ notification
Just like all actions undertaken within SEAD, you will be presented with a notification banner on your top right advising that the requested task is in progress followed by a notification advising the completion status of the task.
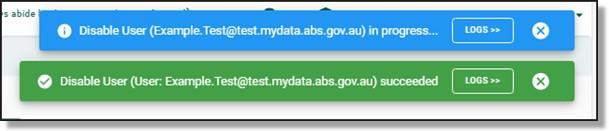
Fig. 3. Notification banners
Once a user account has been disabled, the user’s status will show as ‘DISABLED’ from the User’s page.

Fig. 4. Disabled user status
Evict users
As an administrator, you can evict a user. Evicting a user removes their access and closes their account. The account can be restored by the administrator, but the user will be required to go through account setup processes again i.e. password and authentication. To evict a User, navigate to the Users page by selecting the ‘Users’ tab from the side navigation panel. Once you are on the Users page, you will be able to select the user you want to evict by clicking on their hyperlinked username.
NOTE: A user must first be removed from all Projects before they can be successfully evicted from SEAD. To remove a user from all projects, refer to Removing users from a project.
Clicking on the hyperlinked username of your selected user will direct you to that specific user’s information page which showcases their basic attributes, virtual machines, account settings and associated tags. To evict the user, click on the 'EVICT’ button at the top/centre of the page.

Fig. 1. Evict a user button
Once you have pressed ‘EVICT’, you will be asked to confirm that you wish to evict the user. If evicting the user is your intention, proceed by clicking ‘Yes’.
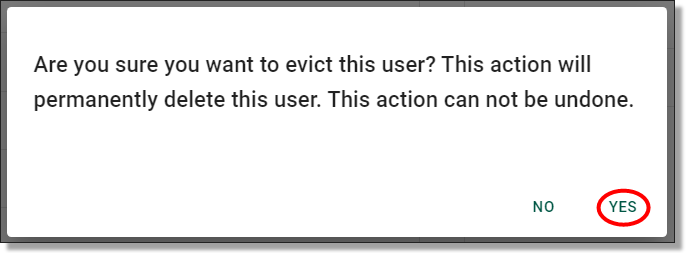
Fig. 2. Evict a user confirmation button
Just like all actions undertaken within SEAD, you will be presented with a notification banner on the top right of the screen advising that the requested task is in progress. In this instance, the task was completed instantly, and therefore, the notification advises that the task was successful. You can click the ‘Logs’ button within the notification to view the task in the Action Log.
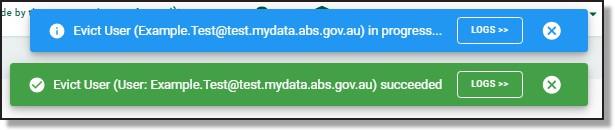
Fig. 3. Task succeeded notification
Once a user account has been evicted, their account will no longer be immediately visible from the User’s page. However, this does not mean that the record of their account has been permanently deleted. You can still find records for evicted users by searching for that user's name in the search bar. Be aware that in order to find the evicted user’s information, you will need to deselect the ‘Status not equals ‘INACTIVE’’ search filter from beneath the search bar.

Fig. 4. Deselecting inactive users filter
The user account status will show as ‘INACTIVE’ from the User’s page. You can still view the user’s information by clicking on their hyperlinked username.
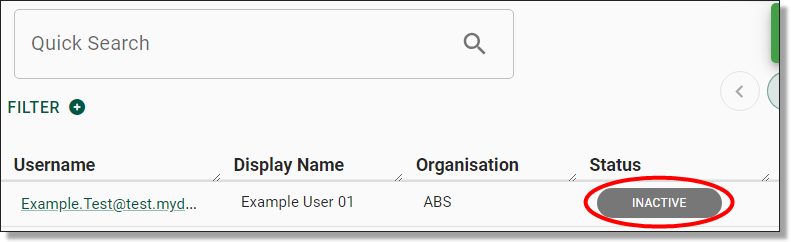
Fig. 5. Inactive user status
Restore users
As an administrator, you can restore the account of an evicted user. To restore an evicted user, navigate to the Users page by selecting the ‘Users’ tab from the side navigation panel. Once you are on the Users page, you can search for the evicted user via the search bar. In order to find the evicted user, you will need to deselect the ‘Status not equals ‘INACTIVE’’ search filter from beneath the search bar.

Fig. 1. Deselecting inactive users filter
Once you have located the evicted user, open their user information page by clicking on their hyperlinked username.

Fig. 2. Hyperlink to access user information
From within the user information page, you will see a button on the top/centre of the page that says ‘RESTORE’. Click this button.
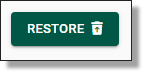
Fig. 3. ‘RESTORE’ button for evicted user
Once you have pressed ‘RESTORE’, you will be asked to confirm that you wish to restore the user. If restoring the user is your intention, proceed by clicking ‘Yes’.
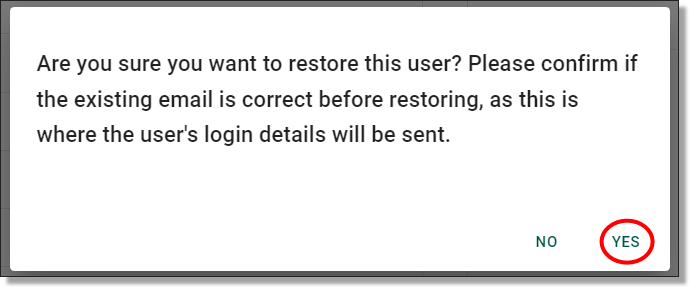
Fig. 4. Restore a user confirmation button
After confirming that you are intending to create a new user, you will be met with a pop-up notification advising that the user creation is in progress and the users login details will be emailed to them via automated system notification. The user will shortly receive an email which contains their SEAD username and a temporary single use password that they will need to change on their login.

Fig. 5. Restore user automatic email notification
Check that the restoration of the user account was successful by paying attention to the action status banners or checking the Action Log.

Fig. 6. Task status notification

Fig. 7. Action Log
The user account status will now show as ‘ACTIVE’ from the User’s page.

Fig. 8. Active user status
Enable users
Accounts that have been disabled by the administrator (refer to Disable users), or automatically disabled following 45 days of inactivity, will need to be enabled by the administrator.
To enable a disabled account, navigate to the Users page by selecting the ‘Users’ tab from the side navigation panel. Once you are on the Users page, you can search for the evicted user via the search bar. Once you are on the Users page, you will be able to select the user you want to enable by clicking on their hyperlinked username or typing their name in the search bar.
Clicking on the hyperlinked username of your selected user will direct you to that specific user’s information page which showcases their basic attributes, virtual machines, account settings and associated tags. To enable the user’s account, click on the ‘ENABLE’ button at the top/centre of the page.

Fig. 1. ENABLE user button
Once you’ve pressed ‘ENABLE’, you will be asked to confirm that you wish to enable the user. If enabling the user is your intention, proceed by clicking ‘Yes’.
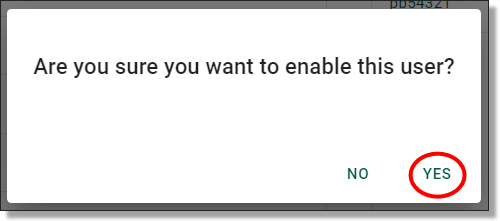
Fig. 2. Enable a user confirmation button
Just like all actions undertaken within SEAD, you will be presented with a notification banner on your top right advising that the requested task is in progress. The task was completed successfully and can be viewed from the Action Log by clicking the ‘Logs’ button within the notification.
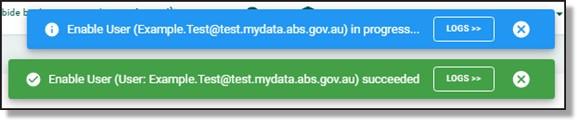
Fig. 3. Task status notification
Resetting user passwords
Administrators can reset passwords for SEAD users. Start by navigating to the Users page from the side navigation panel. Once you are on the Users page, you will be able to select the user whose password you want to reset by clicking on their hyperlinked username. If the user is not immediately available, type their name into the search bar.
NOTE: Pod Owners can reset administrator passwords using the following instructions but through the ‘Administrators’ tab rather than the ‘Users’ tab.

Fig. 1. Selecting the user
Clicking on the hyperlinked username of your selected user will direct you to that specific user’s information page which showcases their basic attributes, virtual machines, account settings and associated tags. To reset their password, click on the ‘’Reset Password” button on the centre/top of the page.

Fig. 2. Reset Password button
Clicking on ‘Reset Password’ will prompt a confirmation window, click ‘Yes’ to proceed.
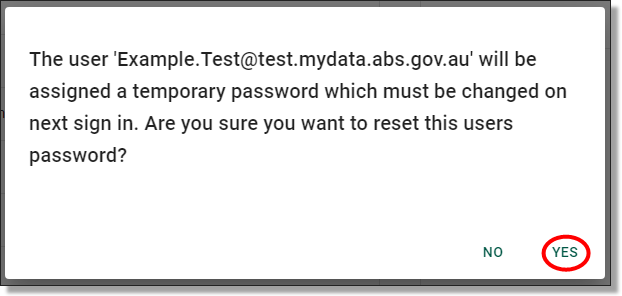
Fig. 3. Password reset confirmation window
You will then be met with a pop-up advising the password has been reset. The user will receive an email containing a temporary password which will need to be changed the next time they sign in.
NOTE: The temporary password is valid for 90 days

Fig. 4. User password has been reset notification

Fig. 5. Task status notification
Resetting user MFA
Administrators can reset the Multi-Factor Authentication (MFA) for SEAD users. The 'RESET AUTH METHODS' action will reset all authentication methods for the user, including their MFA and self-service password recovery options. To do this, navigate to the Users from the side navigation panel. Once you are on the Users page, you will be able to select the user whose authentication methods you want to reset by clicking on their hyperlinked username. If the user is not immediately available, type their name into the search bar. Once this action is complete, users will need to re-register their MFA and self-service password recovery details.
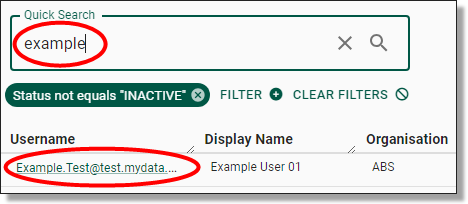
Fig. 1. Selecting the user
Clicking on the hyperlinked username of your selected user will direct you to that specific user’s information page which showcases their basic attributes, virtual machines, account settings and associated tags. To reset their MFA, click on the ‘’RESET AUTH METHODS” button on the centre/top of the page.

Fig. 2. Reset Auth Methods button
Clicking on ‘Reset Auth Methods’ will prompt a confirmation window, click ‘Yes’ to proceed.
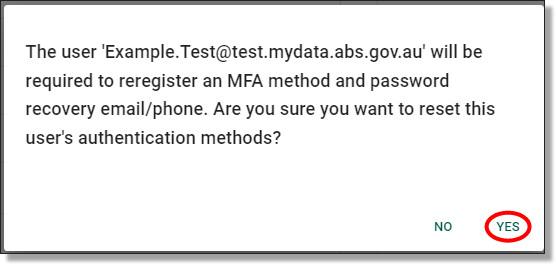
Fig. 3. MFA reset confirmation window
Unlike the process for resetting a user password, the system does not automatically notify the user that their authentication methods have been reset. Administrators will be required to let the user know this action has been taken. It is up to the user to then go through the steps for setting up their MFA.

Fig. 4. MFA reset complete
If users encounter issues authenticating their MFA, ask them to undertake the following troubleshooting steps:
- Ensure the phone is connected to the internet
- Turn off battery optimisation
- Restart phone
- Ensure push notifications are enabled on the users mobile device
- Ensure the use has the latest App version installed
- Ensure the user has the latest OS version installed
- Clear phone cache
Managing projects
How to view, create, and update new and existing projects. How to clone and close projects, and assigning and removing users from projects
Released
13/05/2024
Searching for existing projects
From the Projects page you can view a list of all projects ever created in the SEAD environment and basic details about them, such as their start and end dates, status, and a brief description of the project. You can adjust the filters (circled blue) to search for a specific project based on various criteria. You can also download a CSV report of all the listed projects by clicking Export (circled red). Clicking on a project ID (circled black) will take you to the project specific page where you can view the information about the project in more detail.

Fig. 1. Projects tab
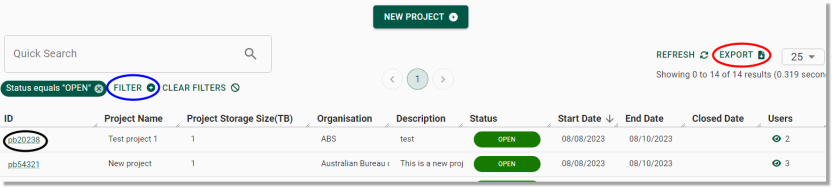
Fig. 2. Projects page
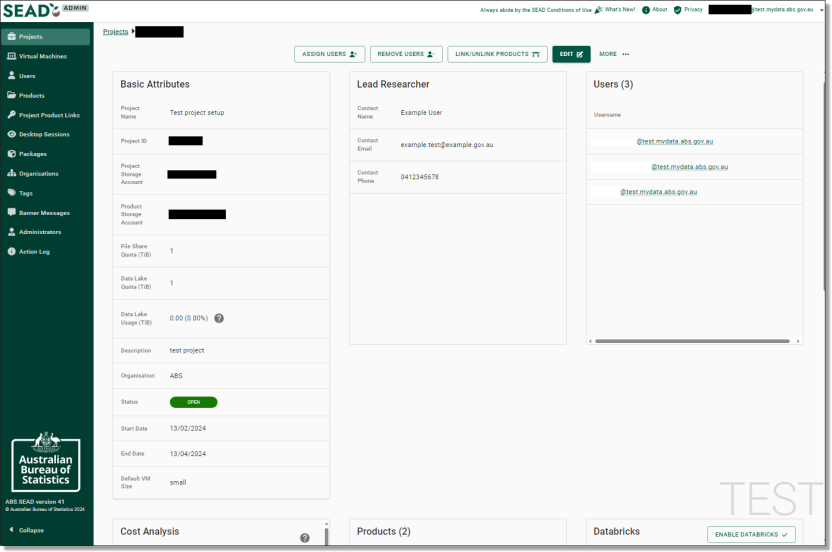
Fig. 3. Project specific page
NOTE: The Lead Researcher is simply a key contact for the project, they do not have different accesses, nor do they receive a VM.
The project specific page also contains a Cost Analysis field. The Cost Analysis field should be considered indicative only (as per Microsoft advice) as final billing is subject to change and may be latent or include charges that are not displayed. Cost data available to SEADpod administrators is at the Project level only, at monthly granularity, split between general usage (storage, VMs, networking) and Databricks usage (if applicable) and does not include broader licensing costs.
NOTE: ABS will also provide a 6 monthly summary snapshot, which will include system usage that is visible in the system, as outlined above (storage, VM’s, networking), along with broader licensing charges (inc. Microsoft & Azure Active Directory). Additional invoicing will be considered at this point, based on how you’re tracking with a final true-up invoice at the end of the year or credit carry over.
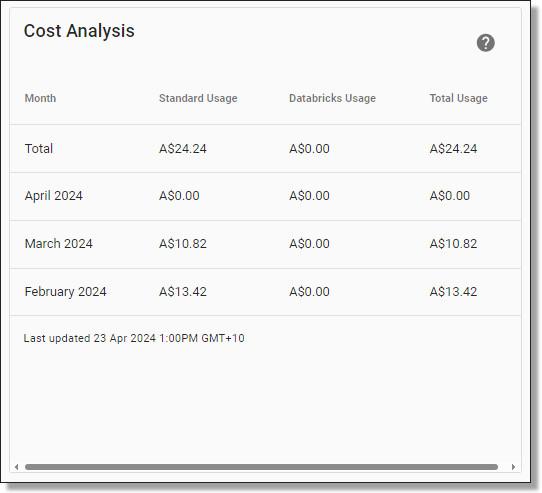
Fig. 4. Project Cost Analysis
Creating new projects
To create a new project, click on the ‘New Project’ button presented on the middle of the Projects page.
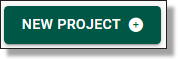
Fig. 1. ‘NEW PROJECT’ button
This will direct you to the New Project Form. The form contains four pages of required information spanning from Basics, Users, Products and Review. (Administrators should create dependant users or products before beginning this step). Once you have populated each page, navigate to the next page by clicking the ‘Next’ button on the bottom right of the screen. You can also navigate back to the previous page by clicking the ‘Back’ button beside it.
NOTE: Your Project ID should begin with your two or three letter (lowercase) SEADpod identifier (refer to Fig. 1.), followed by up to six spaces for your remaining numerical identifiers of choice (e.g. pb2332023)
Fig. 2. SEADpod Identifier location
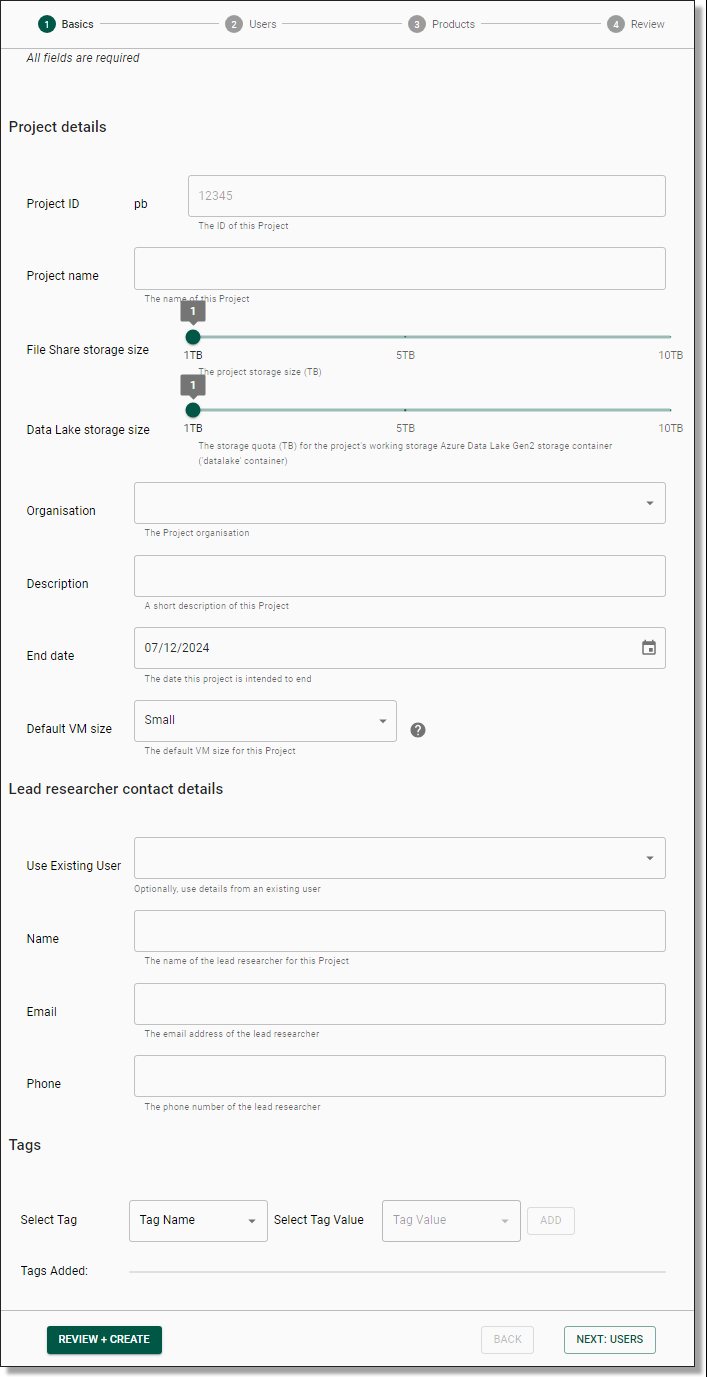
Fig. 3. New Project Form
NOTE: The Project ‘End-date’ is for management information only and does not impact user access post end-date.
Once you have progressed through the New Project Form, click on the ‘FINISH’ button that is now presented on the bottom right of your screen.
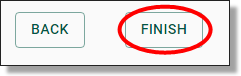
Fig. 4. New project finish button
Once you have pressed ‘FINISH’, you will be asked to confirm that you wish to create a new project, proceed by clicking ‘Yes’.
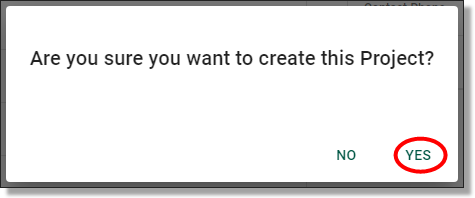
Fig. 5. New project confirmation
The system will then begin to create your new project, this may take up to 5 minutes to complete. You can view the progress of the task via the Action Log.
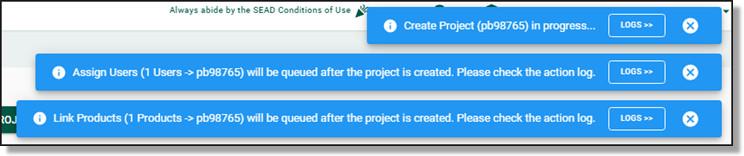
Fig. 6. Task action log
NOTE: Project folders are backed up each night and kept for 14 days.
Updating projects
You can modify a range of information about a project, including the default Virtual Machine size. To edit the information about a project, navigate to the projects tab and click on the hyperlinked project ID.
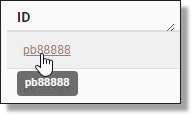
Fig. 1. Projects page hyperlink
Once you have clicked the hyperlinked project ID of the project you wish to edit, click on the green ‘EDIT’ button at the top of your screen.

Fig. 2. Project edit button
This will take you to the Update Project page where you can modify information about the project. Once you have completed your edits, click the ‘Save’ button to action these changes and update the project.
Fig. 3. ‘Save’ button from the project update page
Assigning users to a project
To assign a user to a project, navigate to that specific project’s page by clicking on the hyperlinked project ID.
Next, click the ‘ASSIGN USERS’ button at the top of the specific Project page.

Fig. 1. ‘ASSIGN USERS’ button
This will take you to the Assign User page, where you can add users to the project by selecting their accounts from the first drop-down menu (circled red). You can assign multiple users at once using the drop-down arrow (circled black). You will also need to select the size and type of the virtual machine for this user via the first (circled red) and second (circled blue) drop-down menus. You can select different VM versions (circled orange) depending on user specifications. Click the (?) icon next to each of these menus (circled green) for more information about the available sizes and types of machines available.
NOTE: The appropriate Virtual Machine size will depend on the needs of the user and the broader project requirements (e.g. whether SAS is needed, the number and complexity of the data files the user will be working with, etc.)
Fig. 2. Assigning users drop menu
Once you have selected the user and the appropriate virtual machine size and type, click the ‘ASSIGN USER(S)’ button at the bottom of the page to add this account to the project.
Fig. 3. ‘ASSIGN USER(S)’ button
Removing users from a project
Removing a user from a single project
To remove/unassign a user from a project, navigate to that specific project’s page by clicking on the hyperlinked project ID.
To unassign a user from a project, click the ‘REMOVE USERS’ button at the top of the specific project page.

Fig. 1. ‘REMOVE USERS’ button
This will take you to a drop-down menu where you can select the user you want to remove from the project. You can select multiple users at once. Once you’ve selected the user(s), click the ‘REMOVE USERS’ button below to detach the selected user(s) from the project.
Fig. 2. User removal drop menu
Once you have pressed ‘REMOVE USERS’, you will be asked to confirm that you wish to the user, proceed by clicking ‘Yes’.
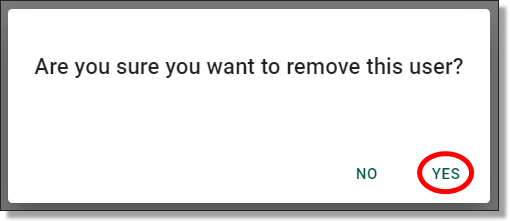
Fig. 3. Remove user confirmation
Removing a user from all projects
If a user is no longer required to have access to any projects, you can remove them from all projects. To do this, navigate to the Users page from the navigation panel on the left. A user must be removed from all projects before they can be evicted.

Fig. 4. Users navigation button
Locate the user from the existing list, or search from them using the search bar and clicking on the hyperlinked username which will direct you to that specific user’s information page.
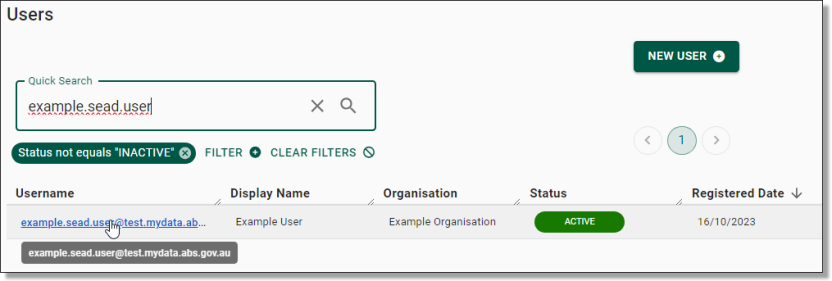
Fig. 5. Open user profile
To remove user from all projects, click on the ‘REMOVE FROM ALL PROJECTS’ button at the top/centre of the page.

Fig. 6. 'REMOVE FROM ALL PROJECTS' button
Once you have pressed ‘REMOVE FROM ALL PROJECTS’, you will be asked to confirm that you wish to remove the user from all projects. If removing the user from all projects is your intention, proceed by clicking ‘Yes’.

Fig. 7. remove user from all projects confirmation
Closing projects
To close a project, navigate to that specific project’s page by clicking on the hyperlinked project ID.
To close a project, click the ‘MORE…’ button next to the green ‘EDIT’ button at the top of the page and select ‘Close Project’. Ensure users on the project have requested clearance of all necessary files/data from their project before closing, refer to the note directly below regarding archiving and deletion.
NOTE: Closed Projects data will be archived after 30 days since their closed date and will continue to appear in Azure Storage Explorer during that time. After the 30 days, data from P: (Project) and O: (Output) file shares will be moved from the Project's storage account to a dedicated archive storage account. The Project's storage account will then be deleted, and the Project's status will be “ARCHIVED”. The ability to restore a Project will no longer be available after the 30 days grace period but archived data after the 30 days can be restored at a cost. Recovering archived data can only be performed by ABS System Administrators. Databricks Blob Storage will not be archived.
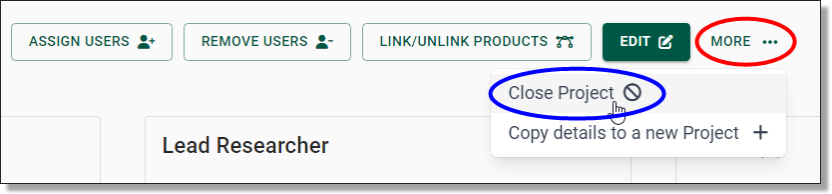
Fig. 1. ‘Close Project’ button
You will be asked to confirm that you wish to close the project, proceed by clicking ‘Yes’.
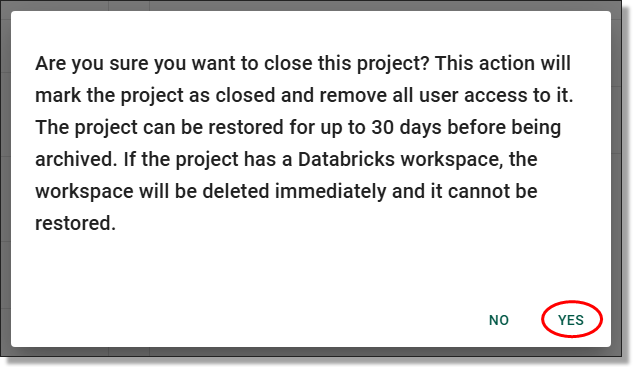
Fig. 2. Project closure confirmation
Cloning projects
You can start a new project based on an existing one by cloning the details and contents of it to a new one, saving time and effort. To do this, navigate to the project you wish to clone by clicking on the hyperlinked project ID.
To clone a project, click the ‘MORE…’ button next to the green ‘EDIT’ button at the top of the page and select ‘Copy details to a new Project’.
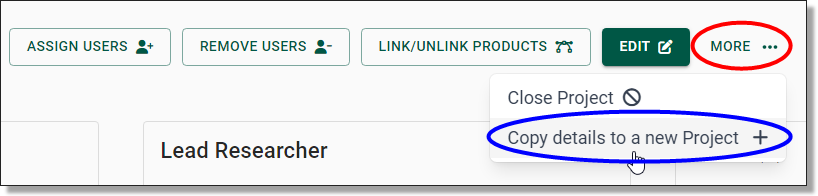
Fig. 1. ‘Copy details to a new Project’ button
This will direct you to a new project form which will be pre-filled with the selected project’s details. The only information that you will be required to update is the project ID, as the clone is simply a copy of an existing project, not a replacement.
Once you have progressed through the new project form, click on the ‘FINISH’ button that is now presented on the bottom right of your screen.
Once you have pressed ‘FINISH’, you will be asked to confirm that you wish to create this project, proceed by clicking ‘Yes’.
The system will then begin to create a new project encompassing all the details and contents of the cloned project. This may take up to 10-20 minutes to complete. You can view the progress of the task via the Action Log.
Managing products
How to create, delete and edit products. How to link/unlink products and projects
Released
13/05/2024
Viewing available products
To view products available for linking to Projects in SEAD, you will need to open the Products page by clicking on the ‘Products’ tab from the side navigation panel on your left.

Fig. 1. Products tab
On the Products page you can view a list of products available for linking (refer to Linking Products to Projects). You can adjust the filters (circled blue) to search a specific product based on various criteria. You can also download a CSV report of all products by clicking Export (circled red).

Fig. 2. Products page
Creating products
To create a new product shell in order to link data to projects, you will need to open the Products page by clicking on the ‘Products’ tab from the side navigation panel on your left.
To create a new product shell, click on the green 'NEW PRODUCT’ button at the top of the screen.
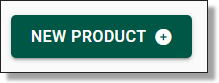
Fig. 1. Create a new product button
This will take you to the New Product page. Fill in the required information including any necessary tags, for the product shell you wish to create (in order to link data to) in the spaces indicated. Be aware that the short name for your product may only contain lower case characters, hyphens and numbers. Hyphens cannot be at the start or end of the name, or adjacent to another hyphen. Once complete, click Submit. This will prompt a confirmation with a pop up, and a green confirmation message at the top right of the previous screen once confirmed this can take a few moments – the completed action will also appear in the action log.
NOTE: This step will not make any data available yet, you will still need to link the created product to a project and add the data through Azure Storage Explorer to this data product shell, refer to ’Linking Products to Projects’ for how to do this.
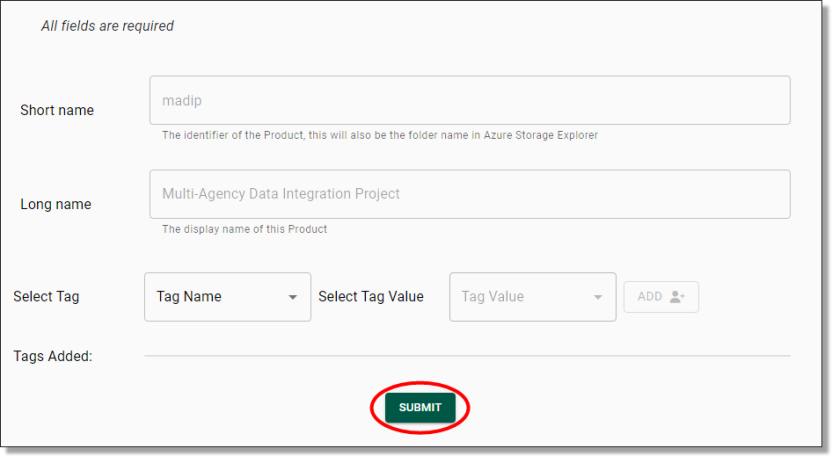
Fig. 2. New Product page, required fields and submit button
Deleting products
To delete a product, locate the product from the Products page then click the Actions icon (three dots) along the same row as the product you are wanting to remove and select 'Delete'.

Fig. 1. Delete product action button
You will be asked to confirm the action. If deleting the product shell is your intention, proceed by clicking ‘Yes’ on the following window.
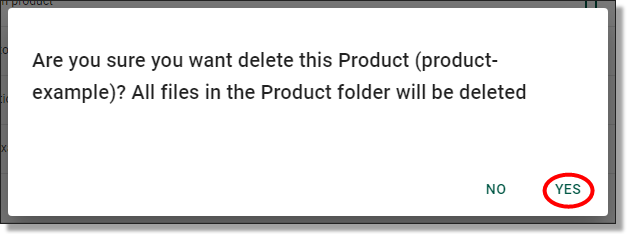
Fig. 2. Confirmation message
Editing products
To edit a product, locate the product from the Products page then click the Actions icon (three dots) on the same row as the product you are wanting to edit and select 'Edit'.

Fig. 1. Edit product action button
This will redirect you to the Update Product page. You cannot change the product short name or long name, only the associated tags. Once you have made your updates, click ‘Submit’.

Fig. 2. Product update page
You will be asked to confirm the action, proceed by clicking ‘Yes’.
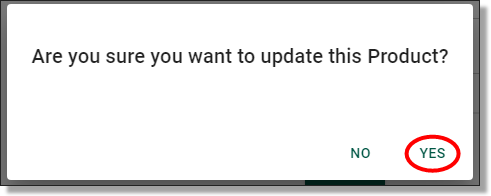
Fig. 3. Confirmation message
Unlocking a product
If a user has a file open while an administrator is attempting to modify or delete the product, they will receive an error advising that the product is locked by a user. Administrators can unlock a product which means to force remove any file handles on the files within the product.
To unlock a product, click the Actions icon along the same row as the product you are wanting to unlock and select 'Release file share locks'

Fig. 1. Release file share locks action button
This will present the following confirmation window. Be sure to warn the user ahead of unlocking the product as this will close their session. Once you are ready to proceed, click ‘Yes’.

Fig. 2. Confirmation message
Managing tags
How to create and use tags
Released
13/05/2024
Creating and using tags
Tagging allows administrators to create searchable tags and link them to objects from within each object interface (User, Project, Product, Organisation). To create tags, go to the tag tab in the Administrators portal from the left-hand navigation bar. Tags can assist in the management and navigation of these objects. Tags are not a necessary tool if you organisation does not wish to use them.
NOTE: Tags are not visible to users/analysts and only appear within the administrators portal/user interface.

Fig. 1. Navigating to the Tags page
From the Tags page, you can view and search all current tags. You can also download a CSV report of all tags by clicking Export (circled red). To create a new tag, click on the ‘NEW TAG’ button presented at the top of your screen.

Fig. 2. Tags page
Add the required ‘Tag Name’ and ‘Tag Values’, hitting ‘add’ on the right after each value is entered. The values will then appear beneath the ‘Tag Values’ field. Add as many values as needed, however, this should be a focused few variables. Values can be removed/deleted by hitting the grey ‘X’ beside the newly added values. Once you are satisfied with the variables added, hit ‘Submit’ which will prompt a confirmation with a pop up, and a green confirmation message at the top right of the previous screen once confirmed.

Fig. 3. Creating a new tag

Fig. 4. Tag creation confirmation
Tags can then also be edited and deleted after this step, by selecting either 'Delete' or 'Edit' from the Actions icon on the main ‘Tags’ interface.

Fig. 5. Editing tags
The created tag and desired values will then be available from either the ‘user’, ‘projects’, ‘products’ or ‘organisation’ objects tabs in the GUI when creating a new item or editing an item in each of the objects. Select the tag label created previously and select ‘Add’ on the right, similarly to when creating the tags to attach them to the object.

Fig. 6. Tag viewing in object creation
Once the object (user, project etc) has been created, when actually entering the particular object the tags will appear in the accompanying info.

Fig. 7. Tags as shown in project information
Created tags can then be filtered and searched as a variable in each of the object interfaces (user, project etc) as below.
NOTE: Any Tags on an object will appear on the front page view of the Projects page, as well as the exported CSV list of that particular view.
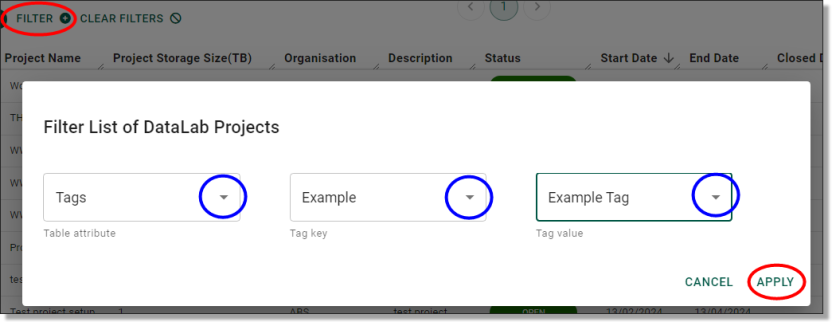
Fig. 8. Tags as a variable on object interfaces
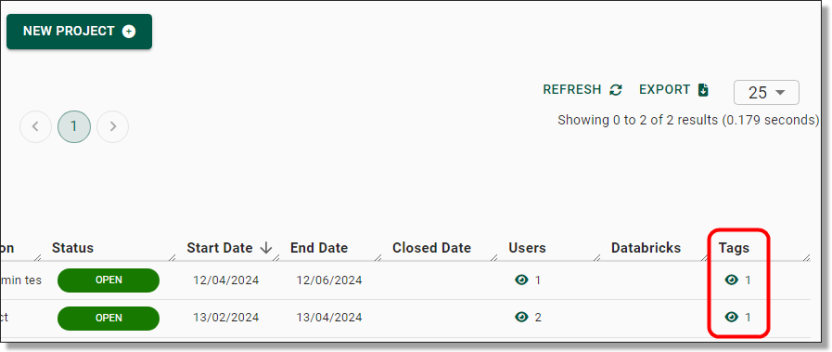
Fig. 9. Example: A filter and tag search applied in the Project interface
NOTE: You can hover your curser over the Tag icons for a glance view of what the linked Tags represent.
Azure Storage Explorer
How to navigate and use Azure Storage Explorer for data ingress/egress
Released
13/05/2024
Setting up Azure Storage Explorer
The default method of loading data to SEAD is to use Microsoft Azure Storage Explorer, which will need to be setup and managed by your organisations ICT department. Ensure that when you are arranging access to Azure Storage Explorer (ASE) that you have access to V1.36 or later available. To open Azure Storage Explorer, search for the application in the start menu of your virtual machine, then click open.
NOTE: If users/analysts are using Azure Data Lake containers with Databricks, Azure Storage Explorer is available inside user's VM's as an alternative to AzCopy to manage and transfer their files between your file share drives (output, project, etc) and blob storage. Users can refer to the 'Azure Storage Explorer User Guide' in the shared library drive for more information. Users/analysts do not have access to upload or download data via Azure Storage Explorer outside of their virtual machine. Data ingress and egress to SEAD is managed by data administrators only.
Fig. 1. Opening Azure Storage Explorer
Configuring Proxy
Some organisations may require users to configure a proxy for web connections. Relevant organisation ICT support may need to provide the following to SEAD owners to configure the proxy settings in ASE:
- a proxy address and port to allow ASE to reach the internet.
- If the proxy requires authentication, the credentials that should be used to log in.
If unsure, contact your relevant organisation ICT support to assist.
To configure proxy settings in ASE, from the options menu select 'Edit' and 'Configure Proxy':
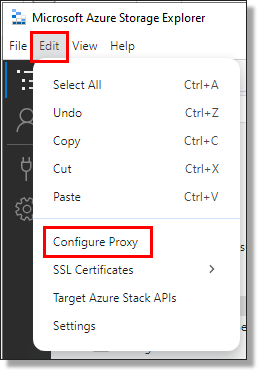
Fig. 1. Configure proxy in ASE
From the proxy settings, depending on your organisations requirements you will need to select the Source, URL, Port, and if required, a username and password. Then select 'Done'.
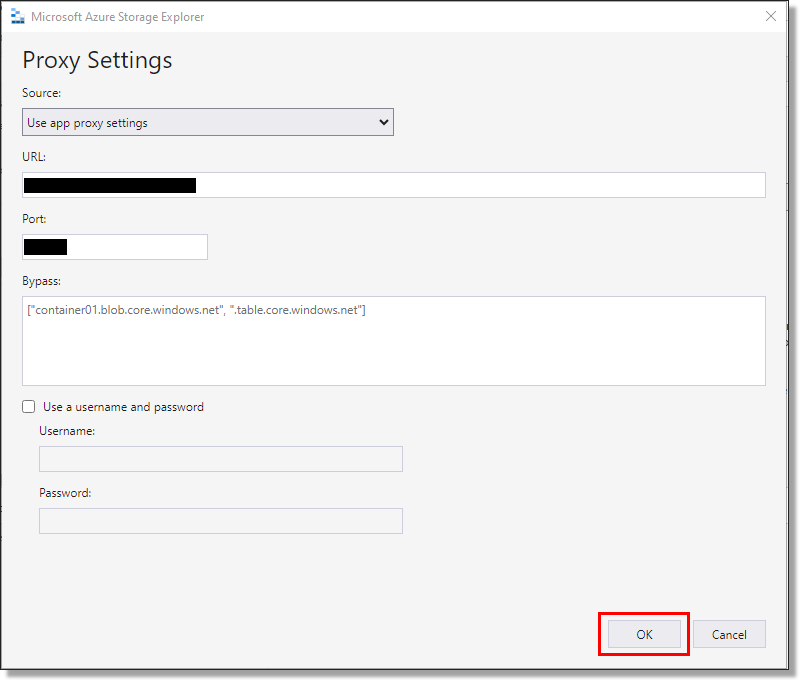
Fig. 2. Setting Azure Storage Explorer proxy settings
If you are having issues authenticating or accessing the storage accounts after configuring the proxy settings you can try to configure the proxy through the settings menu, ensuring that the 'Auto manage proxy settings' option is disabled.
To access proxy configuration from the settings menu, select the Settings cog and locate the Proxy details from the application settings:
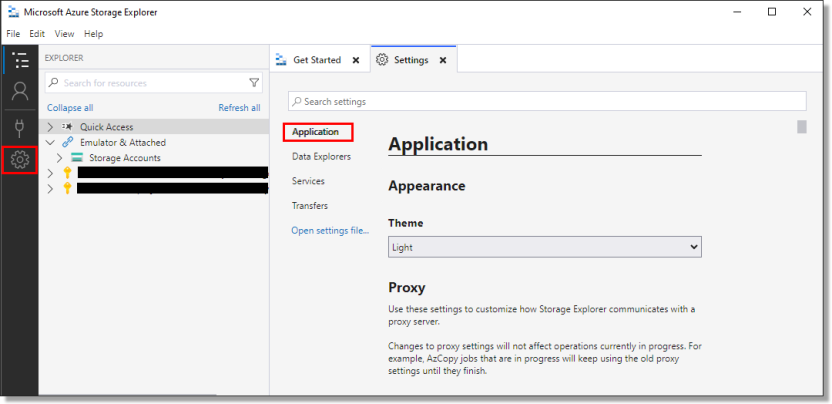
Fig. 3. Configuring proxy from the settings menu
Logging into Azure Storage Explorer
Within the application, click on the person icon on the top left of your side menu bar and select ‘Add an account’.
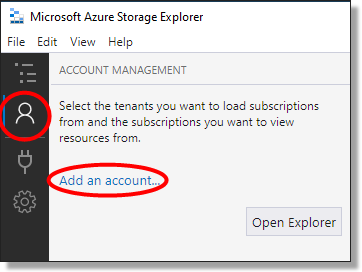
Fig. 1. Add an account button
On the following ‘Select Resource’ window, select ‘Subscription’.
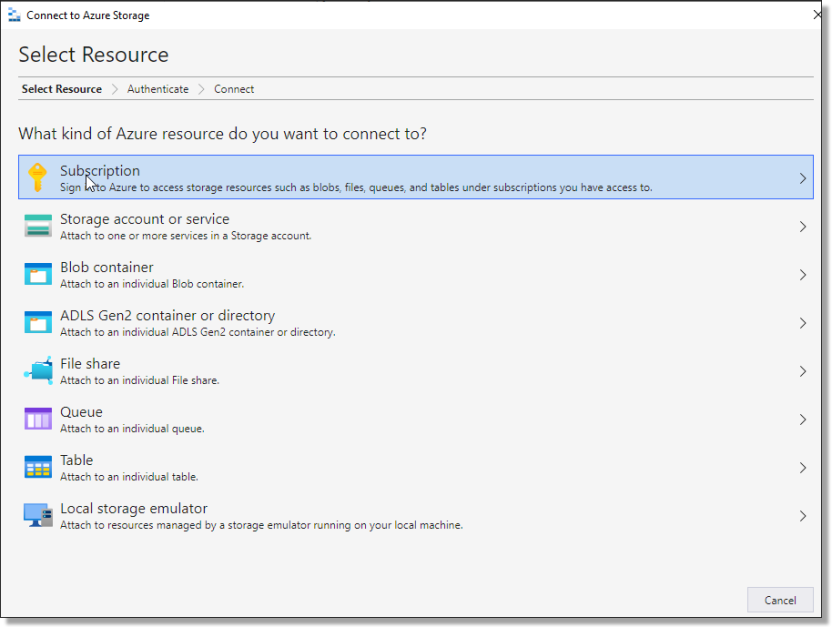
Fig. 2. Select Resource
On the following ‘Select Azure Environment’ window, select ‘Azure’ then press ‘Next’.
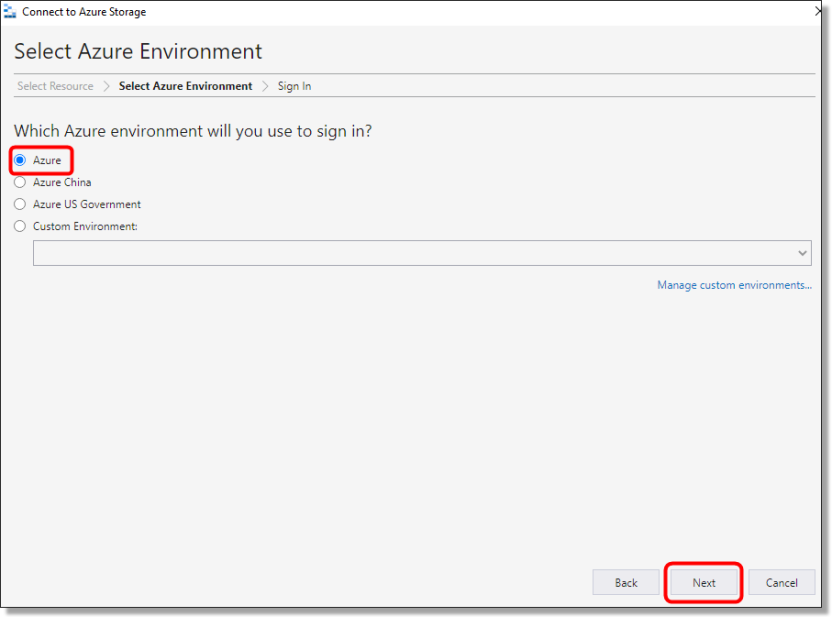
Fig. 3. Select Azure Environment
The system will redirect to a browser window.
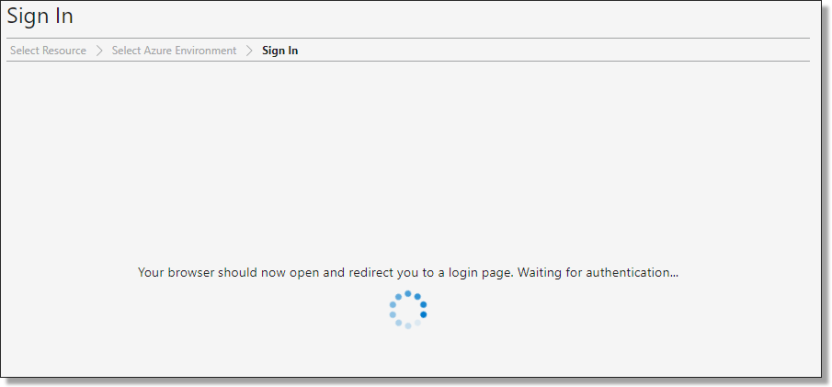
Fig. 4. Browser window loading
Enter your mydata.abs.gov.au username/or select your account.

Fig. 5. Azure account login
Log in, then return to Azure Storage Explorer. You will now have your account added and you can access the SEAD products and project files.

Fig. 6. Successful login
Authentication
The below message appears when you have been timed out of the system:
Follow this path also if you can’t see any of the files/file containers after logging in, your session may have timed out and you need to re-authenticate.
To manage this, select ‘Manage Accounts’ from the reauthentication notification at the top of your screen.

Fig. 1. Reauthentication notification
Then select the profile (person icon) from the menu bar on the left and select 'Reauthenticate now' beneath the account you are reauthenticating.
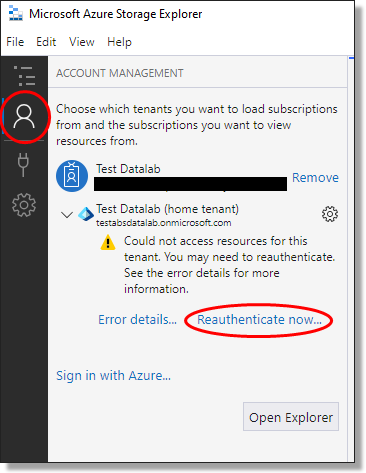
Fig. 2. Reauthenticate now
Follow the prompts for username and password.
Once authenticated, the browser will display the following message:

Fig. 3. Authentication successful
NOTE: In some cases, you may receive a notification stating that the page cannot be reached. If this occurs, close the window and return to Azure Storage Explorer where your account will be active. If it is not active, refresh your view.
Identifying storage accounts
NOTE: It is the responsibility of the SEADpod Project Owner to ensure compliance with the Project Owner’s legal requirements, rules and obligations pertaining to data input and outputs.
Storage Accounts are accessible under the 'DataLab-Prod' subscriptions to authenticated administrators. There may be multiple DataLab subscriptions visible to SEAD Administrators Azure Storage Explorer, each containing different storage accounts. Storage accounts are spread across multiple subscriptions because of load-balancing mechanisms in place to manage Azure limitations. SEAD administrators do not have permission to move projects to specific subscriptions.
There are five types of 'Storage Accounts' in ASE:
- Gateway storage account, prefixed with ‘gateway’. There will be one gateway storage account per SEADpod used to upload data via folder name and destination codes (refer to gateway storage accounts below).
- Product storage account, identified by the storage accounts starting 'prdct'. There will only be one Product storage account per SEADpod. This storage account lists all available products in the SEADpod. Users are not able to write to this drive in their VM.
- Project storage, identified in Azure starting with the ProjectID. There will be one storage account in ASE per Project created in the SEAD portal. The Project storage account allows access to the Projects and Outputs Drive for that project.
- Pod Library drive, is accessible to SEAD data administrators. The contents of this storage account is accessible to all users within their SEADpod.
- Library drive, which is only accessible for loading to by ABS administrators.

Fig. 1. Listed Storage accounts in Azure Storage Explorer (example image)
Gateway storage accounts
Gateway storage accounts scan all ingressed data to block malicious files. Administrators upload through the gateway, and safe files are automatically transferred to the destination account. Malicious files remain quarantined. If this happens contact your ABS system administrators at sead.support@abs.gov.au.
Note: Any files exceeding 50GB will not be scanned and will remain in the gateway container for 24 hours before being deleted.
There is one gateway storage account for each SEADpod. Within the gateway, all file shares and datalake containers for the SEADpod will be listed as a separate folder and the type of file share or datalake container denoted by one of the following destination codes:
- r = product fileshare folder
- a = product “datalake” Azure data lake storage container
- p = project "project" fileshare folder
- o = project "output" fileshare folder
- d = project "datalake" Azure data lake storage container
- x = pod library fileshare folder
To quickly find the right storage account in ASE, use the new “Manage Files” button in the SEAD admin portal. It gives you direct shortcuts to the correct gateway folder, file share, or data lake container.
On the projects interface, select the project you want to upload or manage files for and select the ‘Manage Files’ button.

Fig. 1. 'Manage files' button on the project interface
This will open the projects ASE manager menu which provides accessible shortcuts to the project, output, and data lake container's gateway folder or file shares.
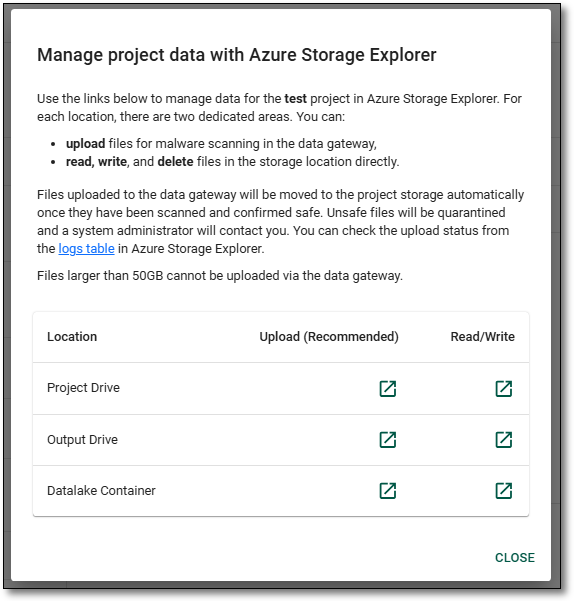
Fig. 2. Manage project data with Azure Storage Explorer
On the Products interface select the Actions button for the product you are wanting to upload or manage files for and select ‘Manage Files’.

Fig. 3. 'Manage files' button on the product interface
This will open the products ASE manager menu which provides accessible shortcuts to the product's file share and data lake container.

Fig. 4. Manage product data with Azure Storage Explorer
The gateway container can be accessed for the relevant product or project by selecting the ‘Upload’ shortcut for the location you are wanting to upload data to. The file shares can also be accessed directly by selecting the relevant ‘Read/Write’ shortcut.
To access the pod library you will need to go through ASE directly as there are currently no direct links available on the SEAD portal. The gateway container for the pod library can be identified as x-podlibrary (highlighted red in the image below). The podlibrary file share is accessible under the ‘prdct’ storage container (highlighted blue).

Fig. 5. Accessing the podlibrary containers in Azure Storage Explorer
Uploading files through the gateway
Firstly, as per usual practice you must create a product shell (refer to ‘Creating Products’) or a project shell (refer to 'Creating new projects’) from the SEAD administrator interface. Creating the required shell from the SEAD web portal will enable an Access Control List (ACL) in ASE. ACL's specify who can access a resource and the actions they are able to perform. To see the newly created shell in ASE, data administrators will have to log out and back in again for access control lists to refresh. Product and project folders created directly in Azure Storage Explorer are not configured with ACL protection and will not be accessible to end users.
After creating your shell, ensure your Azure account is activated (refer to Setting up Azure Storage Explorer) and you have the data administrator role.
Using the 'Manage Files' button found on the ‘Products’ or ‘Projects’ interface within the SEAD portal, then select the desired location’s (file share or data lake container) ‘Upload’ button.
This will prompt you to open Azure Storage Explorer. Select 'Open'. If the pop-up menu does not appear after clicking the shortcut link, check that pop-ups are enabled in your browser settings and are not blocking the popup.

Fig. 1. Open azure Storage Explorer pop-up
Note: It is recommended that you open the Azure Storage Explorer application and authenticate your account before using the shortcuts in the SEAD admin portal. If ASE does not launch after clicking the shortcut, check that you have authenticated to ASE and try again.
When you are directed to the storage account in ASE you will be asked to choose how you would like to open the direct link. You will need to select ‘Navigate to Container’.
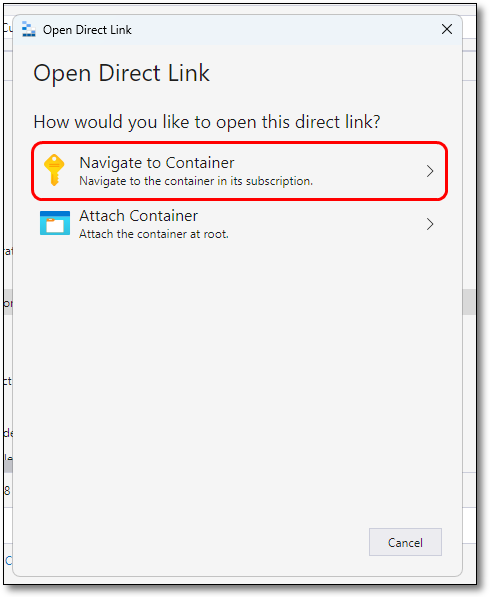
Fig. 2. Navigate to the Azure Storage Explorer container subscription
You will then be directed to the selected gateway folder or file share container.
If accessing the gateway container directly through ASE, open the SEADpod’s gateway container and under the ‘gateway’ storage account and open the ‘Blob Containers’ file share. You will need to locate the Product or Project’s file share from the list of folders. This will be the name of the product or project and the corresponding destination code. Refer to gateway storage accounts for information on the destination codes.
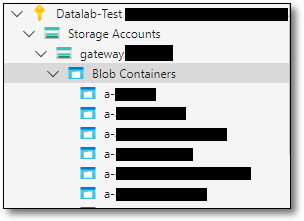
Fig. 3. Accessing the Gateway container in ASE
Tip: Right-click on a storage account and select 'Pin to Quick Access' to allow you to quickly locate the storage account instead of searching through the list of storage accounts.
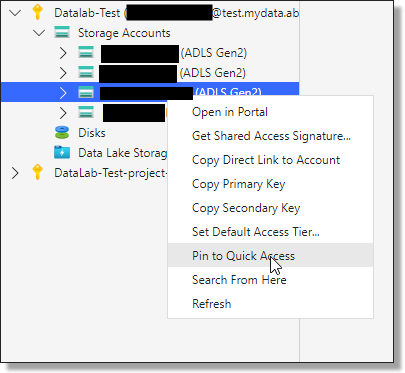
Fig. 4. Pinning Product folder to Quick Access
On the gateway storage account you can select 'view all' which open the full list of gateway folders and corresponding destination codes.
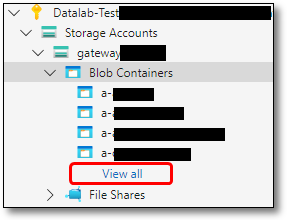
Fig. 5. View all gateway storage account folders
To locate the destination folder, start by inputting the short name in the bar (recommended if the SEADpod has a large number of folders), or scrolling through the list until you find the desired folder.
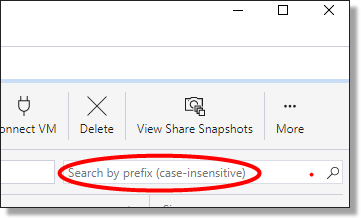
Fig. 6. Product search in Azure Storage Explorer
To add data, either drag and drop the files into the intended gateway folder, or select the ‘Upload’ button, ensuring you have the correct gateway folder selected.
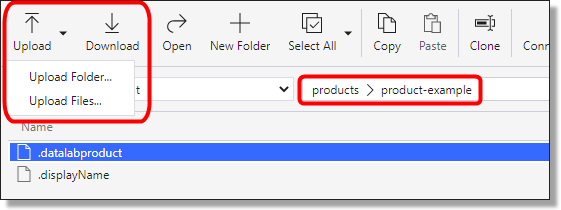
Fig. 7. Uploading data
After selecting Upload Folder or Upload Files, on the following window, Select the three dots to locate the required folders or files.
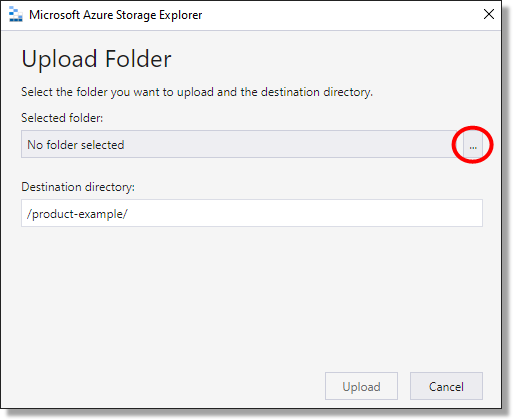
Fig. 8. Upload data continued
Select the product folder or file name and press ‘Select Folder’.
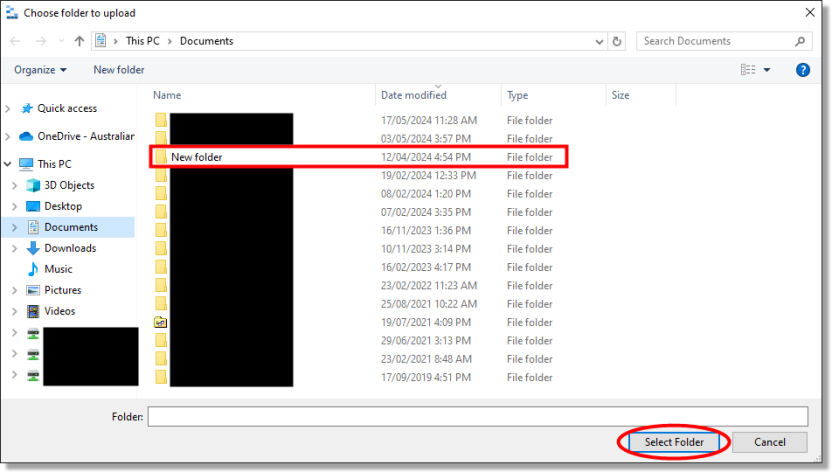
Fig. 9. Upload data continued
On the following window, check the upload paths are correct and at the appropriate file/location level. If correct, select Upload.
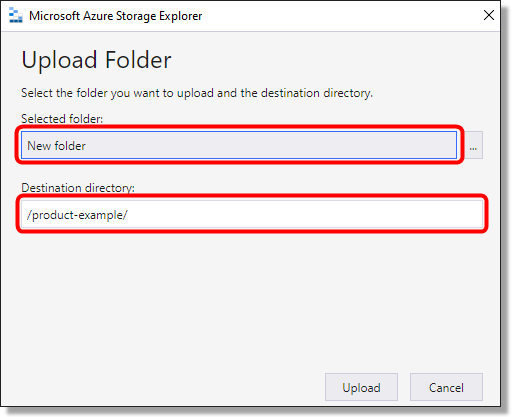
Fig. 10. Upload data continued
NOTE: Only data administrators within your SEADpod can view objects in Azure Storage Explorer. Azure denies authentication to administrators who do not have the data administrator role within the SEADpod.
After being successfully scanned, at the bottom of the screen from your Azure Storage Explorer app, the Activities box will indicate if the upload has been successful. If the upload has failed, retry the above steps.
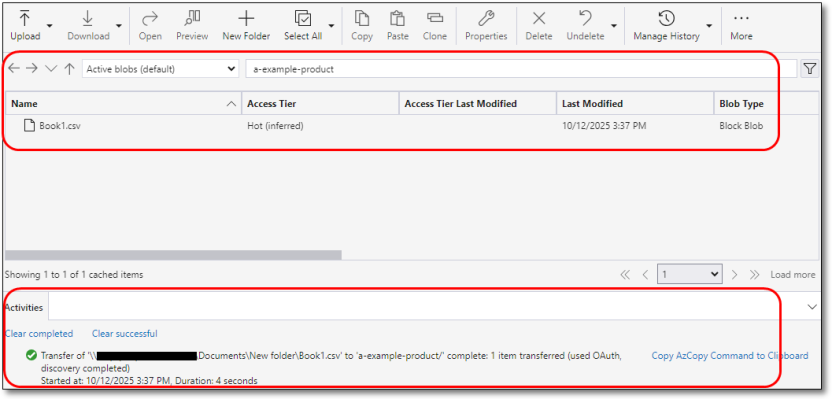
Fig. 11. Checking file upload success
Checking gateway logs
Files that have been uploaded through the gateway container will automatically be transferred to the destination storage account once they have been confirmed safe. To check that this has been successful, under the ‘gateway’ storage account open the ‘Tables’ folder and open the ‘GatewayLogs’ where you will be able to see the upload status of your files.
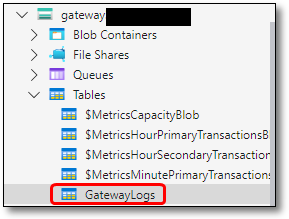
Fig. 1. Accessing gateway logs in Azure Storage Explorer
You are also able to use the ASE manager menu after selecting the 'Manage Files' button, on either the Product or Project page within the portal which contains a shortcut to link to the GatewayLogs table.
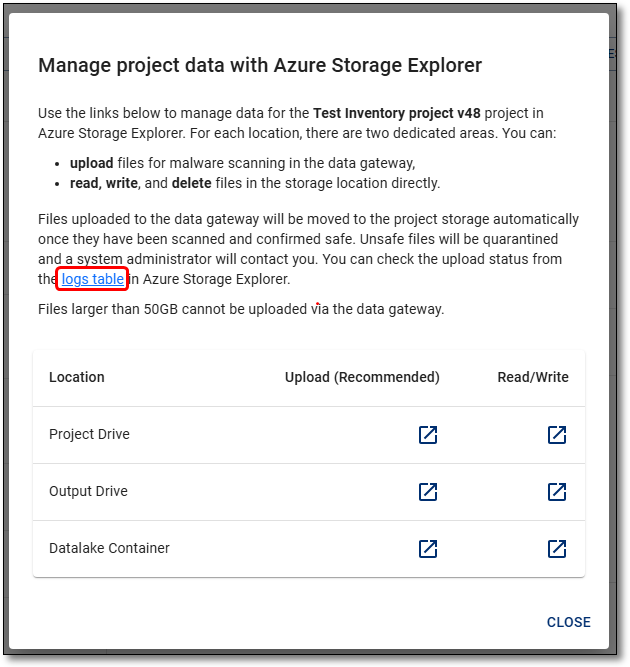
Fig. 2. Gateway logs table shortcut from the SEAD portal
Next, quality check the file upload by ensuring the transfer of the files from the gateway to the destination storage account on the gateway logs table. The gateway logs table contains information on the file upload, including the partition key (folder name and destination code), destination container, file name, information, status (complete, failed, in progress), and time stamp.
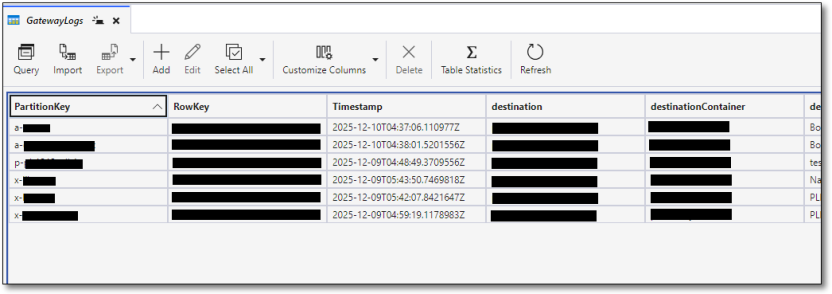
Fig. 3. Gateway logs table in Azure Storage Explorer
Viewing and downloading files
To view the data that is currently available to your end users, or to download/egress data from SEAD, you will need to navigate to the file shares directly, rather than the gateway storage account.
To do this, access the product or projects storage account directly in ASE.
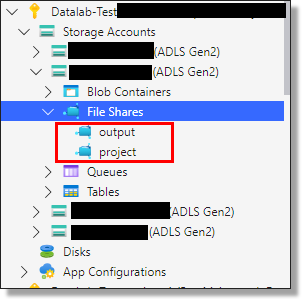
Fig. 1. Locating the Projects and Output folders from the Project storage account directly in ASE
Or, from the ASE managers menu in the SEAD portal, select the desired location’s (file share or data lake container) ‘Read/Write’ shortcut. This will direct you to the selected file share or data lake container where you will be able to see the files currently available to your end users.
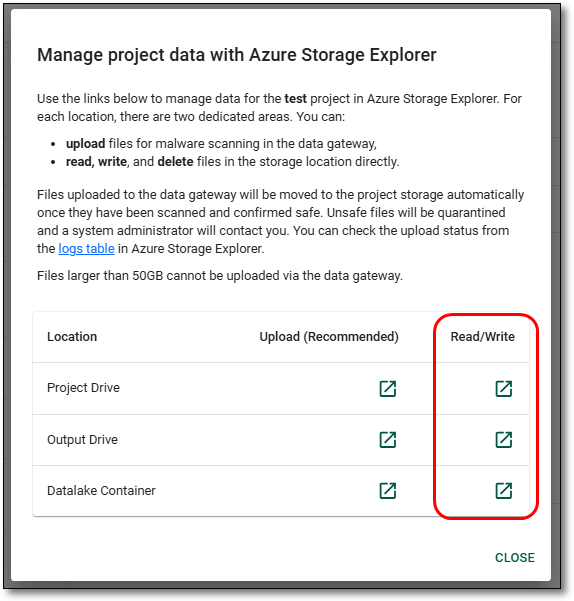
Fig. 2. Manage project data Azure Storage Explorer Read/Write shortcuts.
From here you can download/egress the files out of ASE. Use the download function (beside the upload button) in ASE to download data from ASE to your local organisations data store.
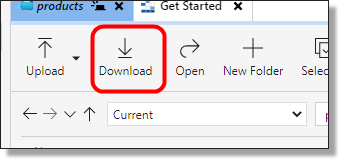
Fig. 3. Download function
NOTES:
- Reminder, SEAD users/researchers are unable to load data or egress it from SEAD, as they do not have access to Azure Storage Explorer. Users have read and write access to any files made available to them in the 'My Products' folder, and Project/Output folders that are linked to their project from their workspace, so they can delete files in these folders.
- If the folder in the Azure Storage Explorer directory is empty, the files meant for upload may not have been loaded. Attempt to check through Azure Storage Explorer, ensure files have actual content (size should not be 0 KB). Also be aware that the size of files uploaded to SEAD are smaller, due to compression. For some files, the CONTENT-MD5 may be blank. This is because CONTENT-MD5 is specifically related to Azure Blob Storage and since the storage in SEAD is Azure Files/file share based, it is unused/blank.
- Blob containers are also accessible in Azure Storage Explorer as an alternative for file shares, primarily used with Azure Databricks enabled VM's.
Restore files from backup
Administrators can restore files that have been backed up within the last 14 days. To do this, navigate to the project share for the relevant project and click on the drop down ‘Current’ or ‘View Share Snapshots’ buttons.
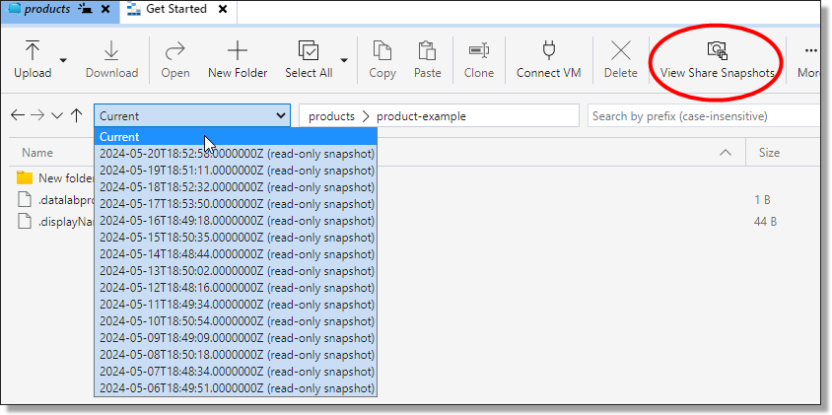
Fig. 1. Project Share Backed Up Files
Here you can view backup snapshots for the last 14 days, the timestamps are in UTC time zone which equates to 5AM the following day AEST. E.g. 2023-05-01T18:47:05.0000000Z equates to 2023-05-02 4:47 AM AEST.
If the file you are restoring still exists in the Current snapshot and you don’t want to overwrite it from the restore point, create a backup folder and copy the file into it.

Fig. 2. Backup Folder
Select the time of the backup to restore, right click the file and select Restore Snapshot.
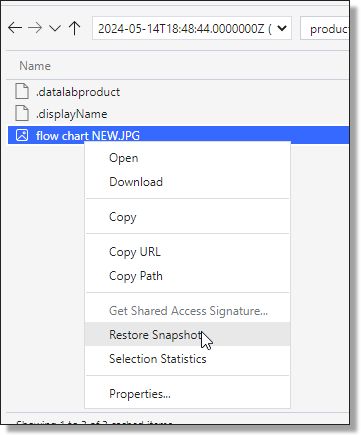
Fig. 3. Restoring a File
Confirm the restore.
NOTE: If you haven’t renamed or moved the Current version of the file into a folder it will be overwritten.
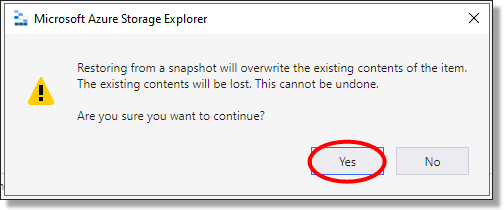
Fig. 4. Confirm the Restore
Verify the restore completed successfully in the activity log.

Fig. 5. Verify Restore
Managing the pod library
Each SEADpod will have access to their own ‘Pod Library’ which will be managed by a Data administrator through Azure Storage Explorer. All files that are added to the Pod Library will be accessible to all end users in the SEADpod, regardless of the project they are on, as an additional network drive (Z:). Users will have read only access to the Pod Library drive in their VM.
The Pod Library is separate from the existing Library drive (L:) which is shared across all SEADpods and is available to all users. The Library drive will continue to be managed by the ABS and will continue to host system documentation and usage instructions.
Unlike the Projects and Products, there are no shortcuts to ASE from within the SEAD portal. To locate the Pod library drive in ASE, the file shares will be located under the product (‘prdct’) storage account. From the file share you will be able to view or delete the contents of the Pod Library. To add files to the Pod Library, in the gateway container the Pod Library destination code and folder name is x-podlibrary.
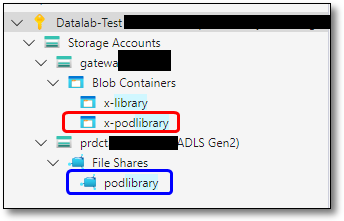
Fig. 1. Accessing the PodLibrary containers in Azure Storage Explorer
The contents of the Pod Library is at the discretion of the SEADpod and your requirements around files being accessible to all projects. Keep in mind the ABS guidance around safe access and management of code, packages, and software being uploaded to SEAD. Refer to code and package load for more information.
Troubleshooting
The ‘Manage File’ links on the admin portal do not connect to ASE
Check that your installation of ASE is version 1.36 at minimum. You can also login directly into ASE from your desktop.
Why can’t I see storage containers in my ASE account
Check that you have ticked all subscription boxes against your login credentials in Account Management settings. You may also need to reauthenticate your ASE credentials, or confirm your proxy settings with your local organisations ICT administrator.
My file is not in the intended location after sending it through the gateway
Check the Gateway Logs to verify the transfer status and location of your file.
My file got sent to quarantine
An ABS system administrator will contact you. If the file is larger than 50GB, you will need to chunk it up before sending it through the gateway again. It is the responsibility of the file owner to ensure that files ingressed are free of malware.
Reporting
Export information available from the SEAD interface
Released
13/05/2024
CSV exports
Downloadable CSV exports are available throughout the Administrator Interface for each of the system objects (Projects, Products, Users etc).
NOTE: Exports are only available in CSV.

Fig. 1. Export button shown throughout object interfaces, at the right of screen
The CSV file will appear on the top right of your screen. Click to open.
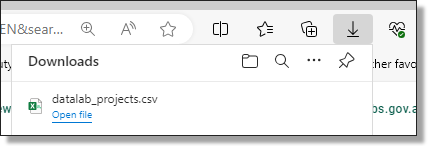
Fig. 2. Downloaded report
What export information is available
Table. 1. Export information
| Export from view | Contains |
| Projects |
|
| |
| |
| |
| |
| |
| |
| |
| |
| |
| |
| |
| |
| Virtual Machines |
|
| |
| |
| |
| |
| |
| |
| |
| |
| |
| Users |
|
| |
| |
| |
| |
| |
| |
| |
| Products |
|
| |
| |
| Packages |
|
| |
Desktop Sessions To apply the formulas during exporting, refer to the code on the right hand side of the table |
needs conversion =DATEVALUE(MID(G4,1,10))+TIMEVALUE(MID(G4,12,8))+(10/24) when in excel you will then need to format the cells · right click menu, Format cells... · pop up box appears, select Time · select first type and press ok |
needs conversion =DATEVALUE(MID(G4,1,10))+TIMEVALUE(MID(G4,12,8))+(10/24) when in excel you will then need to format the cells · right click menu, Format cells... · pop up box appears, select Time · select first type and press ok | |
needs conversion =CONCATENATE(TEXT(INT(D4/1000)/86400,”[hh]:mm:ss”)) *should display correctly so no need to format cells | |
| |
| |
Start and end time display in UTC, to convert to AEST (+10) use: =DATEVALUE(MID(G4,1,10))+TIMEVALUE(MID(G4,12,8))+(10/24) G4 is the cell with the UTC date/time | |
| Organisations |
|
| |
| |
| Action Log |
|
| |
| |
| |
| |
| |
| |
| |
| |
|
Hardware usage dashboard
An integrated hardware usage dashboard is available to SEADpod owners, providing interactive system usage metrics incurred by the SEADpod. The dashboard is an additional tool to help with tracking costs at the pod, project, and user levels. It does not show the total SEADpod charges, or Azure costs that cannot be attributed directly to the SEADpod. The costs displayed on the dashboard are for preview purposes only and should be considered indicative. Final billing may be subject to change. The ABS will continue to monitor the costs incurred by individual SEADpods and will provide regular usage reports to SEAD administrators.
To access the usage dashboard, as a SEADpod owner, navigate to the ‘Hardware Usage’ tab

Fig.1. Hardware usage navigation tab
Once on the interface, you can see spending over time based on the filters, grouping, and granularity you have chosen displayed on the chart which will update dynamically with the filters set.

Time Period: Allows you to select from pre-set start and end dates to view hardware usage for.
Refresh: Allows you to refresh the information on the page.
Export: Download a CSV report of the currently displayed data.
Group by: Categorises the costs into different groupings useful for exporting information and drilling down into costs.
Granularity: Shows the cost at different levels of detail for the time period selected. You have the option of Accumulated, daily, monthly, quarterly and totals, depending on the time period selected.
Filters: Narrow down the costs to match the conditions you have set.
The following filters are available to help track usage:
- Project: Select from the list of projectID's that have incurred costs during the selected time period.
- User: Select from the list of usernames for the user associated with the hardware that has incurred costs during the selected time period.
- Hardware Type: View aggregated SEADpod costs by the type of resource i.e. 'Virtual Machines', 'Storage', or 'Databricks'.
- Hardware Name: Identify the compute resources by the name of the hardware that incurred costs during the selected time period. In the case of VM's this is the virtual machine name, for Databricks this is the workspace name.
- Hardware Subtype: The size or part of the hardware. Provides more detailed information on the hardware types incurring costs. Hardware subtypes have been aggregated for easier reporting.
The pie graph shows the highest consumption objects and will update dynamically depending on how the dashboard has been grouped. If there are more than 10 objects, the remaining objects will be categorised under ‘Other’.
The information will also be displayed as a table and can be extracted using the ‘export’ button at the top of the page. This downloads a CSV file which separate all objects so that each object can be viewed independently.
Please note: The default ‘time period’ is the last 7 days and grouped by the project. Changes to the filters will reset to the default after navigating away from the interface.
Virtual machines
How to view and manage virtual machines, use local disk space and Databricks workspaces
Released
13/05/2024
Note: Virtual Machines (VM) continue to incur running costs if the VM has not been stopped, even when not in use. The ABS recommends users shut down their machine during periods of inactivity to avoid unintended charges. Refer to the VM management options in the SEAD user guide for more details and instructions on shutting down a VM. Disconnecting, or closing your machine window is insufficient to avoid running costs.
Viewing virtual machines
Navigate to the Virtual Machines page by clicking on the tab from the left navigation panel.

Fig. 1. Navigating to Virtual Machines
From the Virtual Machines page, you can view the list of all VMs in SEAD and view their power state, status, type, who they are assigned to and the name of the project they’re associated with. You can also adjust the filters (circled blue) to search for a specific VM based on various criteria or download a report of all the listed VMs by clicking Export (circled red).

Fig. 2. Virtual Machines page
To view a specific VM, click on its hyperlinked name.
Fig. 3. Selecting a Virtual Machine
From that specific VM’s page, you can view information about it in more detail, such as how many days are remaining until its next rebuild, the local disk attached to it and its next scheduled shut down. From this page you can also Start, Stop, Bypass Automatic Shutdown, Resize the VM, or change the VM Type/Version by clicking on the labelled buttons.
NOTE: If a user requires a machine larger than XX-Large, administrators will need to remove the user from their project to destroy their current machine, as the system may not allow the selection directly from the Virtual Machine page. The user should be notified to save all work to the project/output folders. Once the removal process has completed, the administrator will need to update the projects standard VM size to the required VM size and re-add the user to the project.
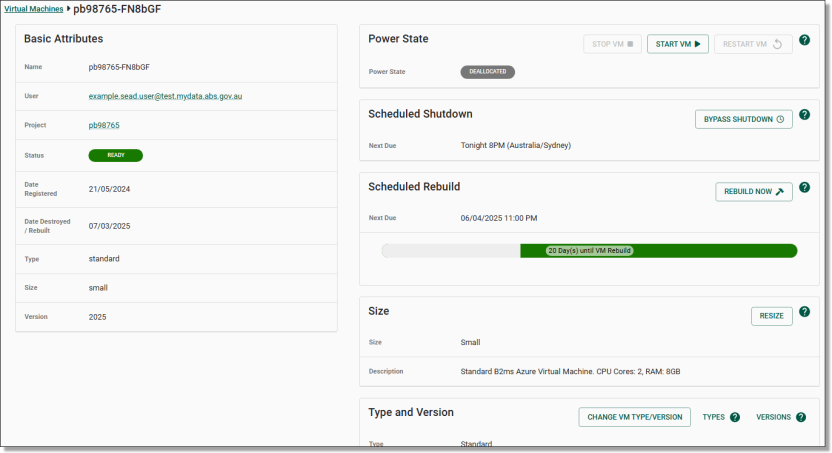
Fig. 4. Virtual Machine specific page
Azure Virtual Desktop
SEAD uses Azure Virtual Desktop (AVD) to launch VMs. To view the methods for how users launch their VMs using AVD, refer to the SEAD user guide.
It is the responsibility of the SEAD partner administrator to organise the relevant access through their IT department to enable users to access the Remote Desktop client version of AVD or the Windows App. For more information on AVD, please refer to Accessing your project workspace on the SEAD user guide.
Virtual machine performance
SEAD administrators can allocate the following machine sizes in the system:
| Name | Windows server | CPU | RAM |
|---|---|---|---|
| Small | Small Windows 10 DSVM | CPU Cores 2 | 8GB |
| Medium | Standard Windows 10 DSVM | CPU Cores 2 | 16GB |
| Large | Standard Windows 10 DSVM | CPU Cores 2-8 | 64GB |
The following larger machines are available; however, charges should be considered with these:
| Name | Windows server | CPU | RAM |
|---|---|---|---|
| X-Large | Standard Windows 10 DSVM | CPU Cores 16 | 128GB |
| XX-Large | Standard Windows 10 DSVM | CPU Cores 32 | 256GB |
| XXX-Large | Standard Windows 10 DSVM | CPU Cores 64 | 504GB |
If users are noticing poor performance, machine size may be a potential reason among others. If system performance issues occur attempt the following with the user:
- Ensure the user has a good, stable internet connection.
- Close and reopen the program in question.
- Confirm project drives have available space, if not attempt to free up space.
- Have the user attempt to restart or rebuild their virtual machine.
- Suggest code or programming segregation.
- Attach a local disk for the user. This is an SSD, and may speed up read/write speeds. Refer to Run jobs offline using local disk space.
Larger machines than those outlined above can be provisioned, these are considered specialised virtual machines capable of supporting machine learning and high-performance computing. You should consider the potentially significant cost implications involved in using these.
| Name | Windows server | CPU | RAM |
|---|---|---|---|
| Large GPU Optimised | Standard Windows 10 DSVM | CPU Cores 8 | 56GB |
| X-Large GPU Optimised | Standard Windows 10 DSVM | CPU Cores 16 | 110GB |
NOTES:
Before resizing a VM, users should be notified to save their work to project/output folders.
Users will continue to incur system costs on their VM until they click ‘Stop VM’ (or until the next scheduled shutdown).
A user connection error indicates a problem with the user’s network i.e. no internet connection, firewall or web proxy is preventing access.
Users are reminded via email about rebuilds 24 hours prior.
Virtual Machine type
Administrators are able to assign different VM types to users in SEAD. Each VM type determines the users access to certain features within SEAD.
Standard VM: By default, users are provisioned with a standard virtual machine, which includes access to all standard software available within the system.
SAS VM: SAS is available in SEAD as a non-standard product. Users with a SAS enabled Virtual Machine have access to all standard software available in SEAD, and SAS.
Discussant VM: This VM type is for SEAD users who do not require analysis functions within their VM as they do not provide access to the Project, Output, or Products network drives.
To allocate a SAS VM, or change VM type
Your organisation or area will have agreed to utilise a predetermined number of SAS licenses in SEAD. SEAD uses a pooled SAS licensing model based on the number of VM's that are in concurrent use, allowing administrators flexible allocation of licenses to their users. Additional SAS licenses can be provisioned, but this will incur additional costs.
SAS VM's are allocated by modifying the users VM type which is located on the VM management page. To access this page, refer to Viewing virtual machines.
This can also be accessed at the user level, navigating to the 'User' page from the navigation panel, click the username hyperlink of the user you want to allocate a SAS VM to, and select the VM name hyperlink.
Fig. 1. Navigating to Users page
Fig. 2. Select user
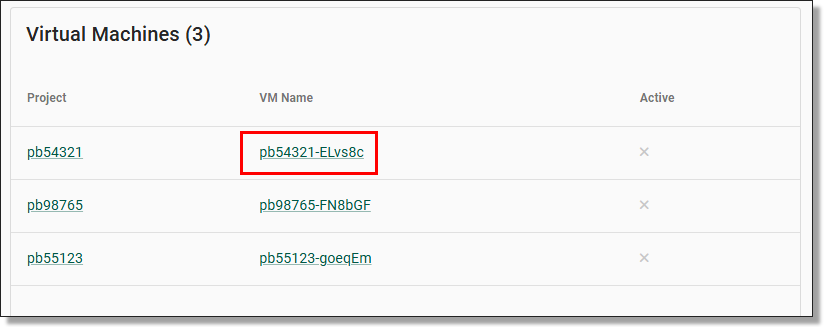
Fig. 3. Select Virtual Machine requiring SAS
Once you are on the Virtual machine management page, the 'type and version' panel, select 'change VM type/version'

Fig.4. Change VM Type/Version
You will have the option of selecting a standard, SAS or discussant VM, select the SAS option and click 'Submit'. Once done, the VM will be complete a full rebuild. Ensure your users have saved all of their work prior to changing the VM type.
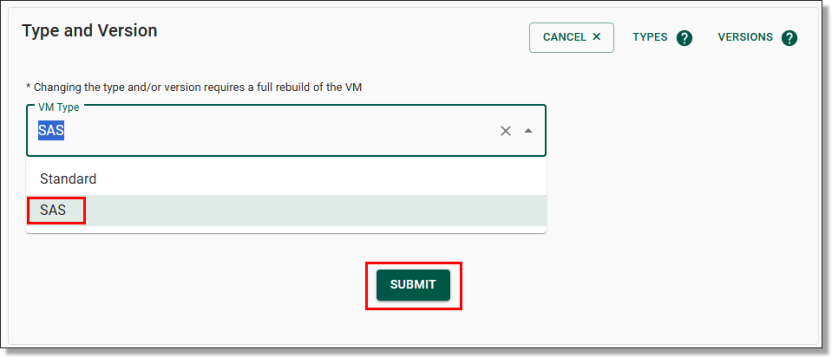
Fig. 5. Selecting a 'SAS' VM
NOTE: Future VM rebuilds will preserve the VM type until a different type is selected. SAS VM's can be deallocated by SEADpod administrators through this same process.
Run jobs offline using local disk space
Users who work across multiple projects can request local disk space through their administrator. This will enable their VM to run jobs offline, however, there is a cost associated with this. Unlike the standard SEAD storage costs where users pay only for the storage they actively use, users will be charged for the amount of local disk space allocated, regardless of whether that storage ends up being used.
For indicative charging please refer to the below table:
| Size | Flat fee per month | Max cost per month |
|---|---|---|
| 32gb | $5.01 | $14.71 |
| 128gb | $20.01 | $52.94 |
| 512gb | $80.02 | $192.32 |
| 1 tb | $160.04 | $345.54 |
The way local disk storage works is datasets are stored on a remote file share. Only the active machine has network access to this location, the inactive VM does not. When running jobs offline, the inactive machine can continue to run a program as it still has access to the data since it is no longer using the remote file share.
To use local disk space, navigate to the Virtual Machine page and select the VM assigned to the user requesting local disk space.

Fig. 1. Selecting a user’s Virtual Machine
From the user's specific VM page, scroll down to ‘Local Disk’ and select the ‘Attach Disk’ button.

Fig. 2. Attach Local Disk button
You will then be asked to select the disk size by expanding the drop menu. Once the disk size has been selected, click the ‘Submit’ button to continue.
NOTE: Be aware that larger disk sizes may incur additional charges.
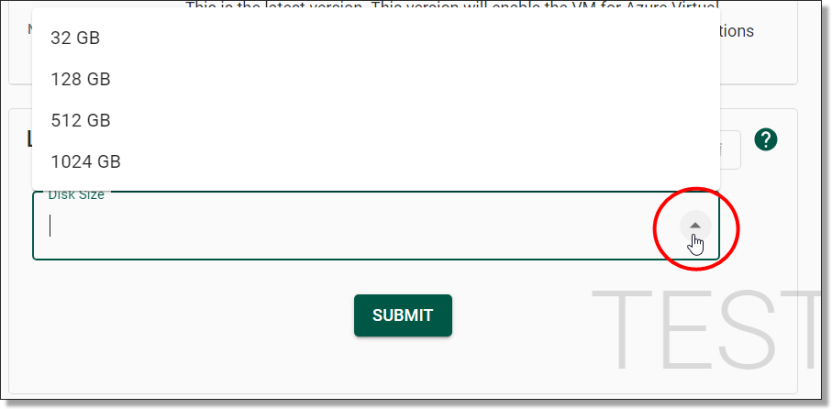
Fig. 3. Disk Size drop menu
You will then be asked to confirm whether you wish to attach a local disk to the VM. Ensure the user has saved their work to project/output folders.
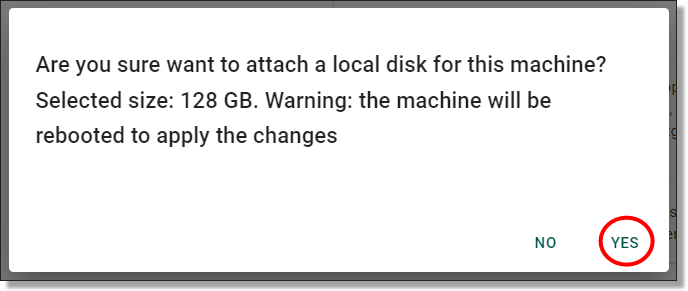
Fig. 4. Confirmation of attaching local disk space
The system will then attach the local disk. You can view the progress of the task via the Action Log.

Fig. 5. Attaching local disk in progress
Databricks
Databricks is a platform available in your SEADpod as a non-standard product for users to undertake data engineering, data science and analytics. Your organisation or area will have agreed to utilise a predetermined number of Databricks workspaces. Like Virtual Machines and storage, administrators can provision more workspaces, but this will incur additional costs. The following information is a basic guide to the capability and provisioning of Databricks in SEAD. There is extensive information about the actual use of Databricks online.
Databricks provides users with an integrated environment to work together on projects, from building and running virtual machine learning tools, to creating interactive dashboards. Databricks also offer a range of tools for data exploration, visualisation and analysis. It can be used to build pipelines for streaming data processing, as well as to create application that can be deployed in the cloud.
Use of Databricks is at the discretion of the business areas managing their projects. Organisations can choose to have Databricks workspaces allocated, however they are not a necessity in an organisations use of SEAD. SEAD has a range of standard tools that are available to users. If users need more storage space or compute power for data processing and analysis beyond what is provided as standard, Databricks is available as an option for SEAD partners to consider.
There is a minimum cost of $2500 to reserve each Databricks workspace. Databricks usage that exceeds the initial $2500 reservation fee will be charged to the SEAD partner during the next invoicing period. The ABS will provide Databricks usage information if applicable, as part of the 6 monthly summary snapshot, or at an agreed interval requested by the SEAD partner.
To enable the Databricks workspace:
- Open the Projects page by clicking on the ‘Projects’ tab from the side navigation panel on the left.
- From the Project page, Click on the hyperlinked project ID to go to the project specific page where you can view the information about it in more detail.
- On the right of your Project page, you will see a Databricks field containing a button that states ‘Enable Databricks’. Click on this button to enable a Databricks workspace for the selected project.
NOTE: Databricks workspaces can be deallocated by SEADpod administrators through this same process.
Fig. 1. Enable Databricks
The SEAD Shared Library has the documentation required for users to setup Databricks. Users will also have access to the Databricks Academy training program, which is an online library of Databricks training guides. To access the Databricks Academy, users will need to register an account at https://customer-academy.databricks.com using their mydata.abs.gov.au email address.
The following Databricks cluster policies will be made available to provisioned Project Owner workspaces, utilising all available worker nodes (maximum 5 workers):
| Instance | Server purpose | Max autoscale workers | CPU | RAM/Databricks Units |
|---|---|---|---|---|
| DS3 v2 | General purpose | 5 | 4 | 14GB/0.75 |
| D13 v2 | Memory optimized | 4 | 8 | 56GB/2 |
| F16s v2 | Compute optimized | 4 | 16 | 32GB/3 |
Cluster policies are rules that govern how clusters are created and managed. Nodes are the individual machines that make up a cluster.
Each node has its own CPU, memory and storage resources. Nodes work together to process data in parallel, allowing for faster processing times.
Additional cluster policies can be made available upon request to the ABS, and will be considered on a case-by-case basis. Administrators can monitor costs from the ‘Cost Analysis’ field within the Project page.
NOTE: The ABS provides additional information on appropriate Databricks cost management for end users in the shared library drive.
Code & package load
How to manage code and packages for ingress to SEAD
Released
13/05/2024
Safely manage code and package requests
Safe management of user code and package requests is essential to maintaining a safe environment. The below provides guidance on the safe access and management of code and package loads by distinguishing the role of SEAD administrators from the ABS, in actioning these requests from users. SEAD users are not able to load code or packages themselves, this responsibility sits with administrators (both from the pod owner agency and ABS) as per SEAD security protocols.
References to ‘code’ throughout this section include libraries, compiled code, packages and their dependencies. Code from the ABS administered Shared Library (library drive) which holds a large volume of approved code from all primary software languages available (R, Python, STATA, SAS) is accessible to all users of the system.
Table 1 shows the ABS endorsed repositories (CRAN, Pypi, ideas) SEAD administrators can load requested packages from. These are endorsed based on their approach to security scanning, moderation, version control, vetting and are recognised as low risk to introducing malware to the system. Any code from these or simple self-written produced code can be loaded by SEAD administrators to project folders through Azure Storage Explorer. Ensure where possible there are no executables or malware present.
In order to maintain system security and integrity, SEAD administrators cannot load code from alternative repositories as outlined in Table 1, or directly from a researcher that has not been published or curated. These requests must be approved by the ABS via the sead.support@abs.gov.au address. Ensure the request contains a valid business case and is consistent with the software request template below.
Table 1. Code Management Responsibilities
| Code/Package Request Origin | Can be accessed/loaded by: | |
|---|---|---|
| SEAD Administrators | ABS | |
| CRAN (R.) | Y | |
| Pypi | Y | |
| ideas (STATA) | Y | |
*Un-endorsed/alternative online repositories (i.e. Github and similar) AND Compiled code provided directly by researchers from an un-endorsed or unrecognised repository. | Y | |
| Basic/simple self-written produced code in text format | Y | |
| R & Python Package Manager (can be accessed by SEAD users, however, is administered by ABS)* | Y | |
| Software, drivers, plugins, executables and miscellaneous file types (macros, C++, .jar, binaries, compiled libraries etc) | Y | |
Software request template
To request additional software, please populate the Software Request Template on the SEAD contact us webpage and return it to sead.support@abs.gov.au.
Each request to ABS will be considered on a case by case basis. Despite the closed network cloud based nature of SEAD, this procedure will ensure efficient, safe and repeatable procedures in undertaking these loads in the case of potentially harmful malware/data contained in the code.
Focusing on the Safe Settings aspect of the Five Safes, the following are seen as appropriate mitigation measures by SEAD administrators against key risks in regard to loading code and code packages:
- Utilising advised package repositories where possible (refer to the above table)
- Appropriate vetting and escalation, and clear roles (ensuring no executables, appropriate dependencies)
- Closed network system (SEADpod), Microsoft, and organisational firewalls
- Compensating Safe People controls
Software is not to be provided/or attempted to be loaded (i.e. Winmerge, Winzip, Excel or other executable file types such .exe files) until a software assessment is undertaken and prioritised amongst existing SEAD development work with the ABS, based on the business justification and benefit to broader user group (timing dependent on available resources). The user/client can be informed an assessment process is required and they will be informed if their software is rolled out.
Project Product Links
How to link or unlink projects and products
Released
13/05/2024
Linking products to projects
To link or unlink a product to a project, you can navigate to the Projects Product Links page by clicking on the ‘Projects Product Link’ tab from the side navigation panel on the left.
Fig. 1. Projects Product Link navigation tab
From the 'Products Project Links' page, you will be able to view a list of products and the projects they are attached to. Click on the hyperlinked Project that you are wanting to add products to. You are able to type in the name of the project to filter the results.

Fig. 2. Project hyperlink to add products
To link products you are also able to navigate to the Projects page by clicking on the ‘Projects’ tab from the side navigation panel on your left.

Fig. 3. Projects navigation tab
Click on the hyperlinked project ID to view the project you’re wanting to link or unlink your product to, then click the ‘LINK/UNLINK PRODUCTS’ button at the top of the page.

Fig. 4. ‘LINK/UNLINK PRODUCTS’ button
Both options will direct you to the linking page where you can view currently linked products, as well as unlinked products available to link. The list on the left is where you can search for and link the desired data product to the current project. To link a product, click on the tick box next to the product name to select it (refer to the green tick box). Once you’ve ticked the product, press the ‘>’ symbol (circled blue) to move it across to the linked products list on the right. Once all desired products are linked, click the green ‘UPDATE’ button at the top centre of the page (circled red). This will prompt a confirmation with a pop up, and a green confirmation message at the top right of the previous screen once confirmed.
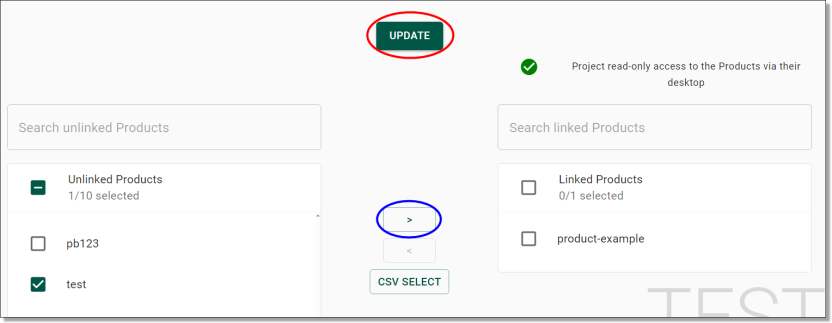
Fig. 5. Linking a product
To unlink a product, click the tick box beside the selected product from the list on the right and click the ‘<’ symbol (refer to green ticked box) to deselect it, then click the green ‘UPDATE’ button at the top centre of the page (circled red).
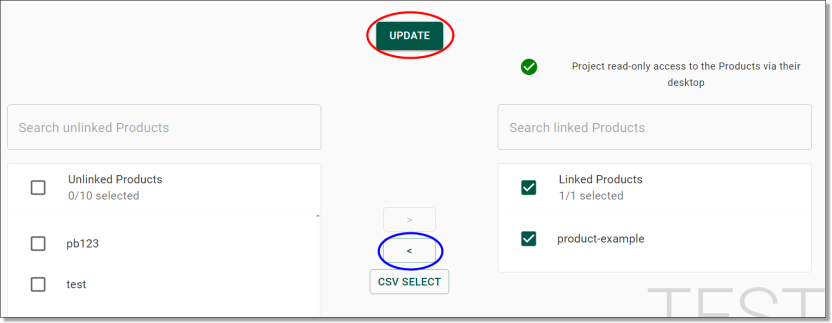
Fig. 6. Unlinking a product
Linking projects to products
To link or unlink a project and a product, you can navigate to the Projects Product Links page by clicking on the ‘Projects Product Link’ tab from the side navigation panel on the left.

Fig. 1. Projects Product Link navigation tab
From the Products Project Links page, you will be able to see a list of products and the projects they are attached to. Click on the hyperlinked product that you are wanting to link projects to. You are able to type in the name of the product to filter the results.
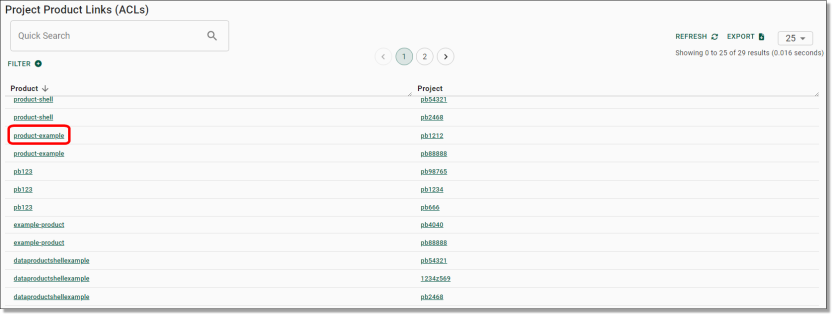
Fig. 2. product hyperlink to add projects
You are also able to navigate to the Products page by clicking on the ‘Products’ tab from the side navigation panel on your left.

Fig. 3. Products navigation tab
To update the linked projects, locate the product from the 'Products' page then click the Actions icon (three dots) on the same row as the product you are wanting to edit and select 'Update linked projects'.

Fig. 4. Update Linked projects action button
This will direct you to the linking page where you can view currently linked projects, as well as unlinked projects available to link. The list on the left is where you can search for and link the desired project to the current product. To link a project, click on the tick box next to the project name to select it (refer to the green tick box) Once you’ve ticked the project, press the ‘>’ symbol (circled blue) to move it across to the linked projects list on the right. Once all desired projects are linked, click the green ‘UPDATE’ button at the top centre of the page (circled red). This will prompt a confirmation with a pop up, and a green confirmation message at the top right of the previous screen once confirmed.

Fig. 5. Linking a project
To unlink a project, click the tick box beside the selected project from the list on the right and click the ‘<’ symbol (refer to green ticked box) to deselect it, then click the green ‘UPDATE’ button at the top centre of the page (circled red).
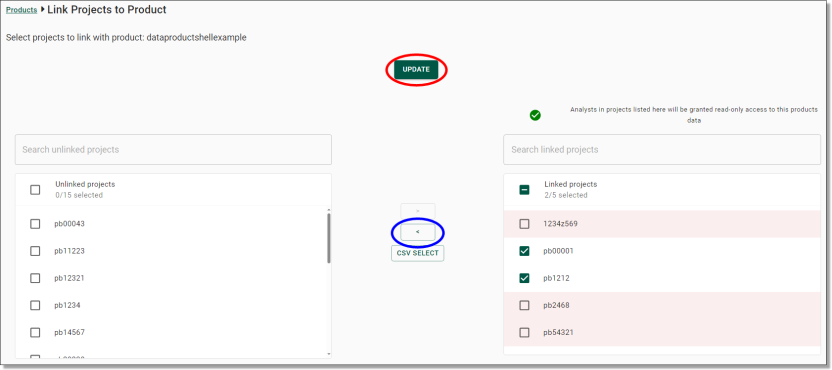
Fig. 6. Unlinking a project
Pod owner actions
How to create banner messages and manage administrators. Available to pod owners only
Released
13/05/2024
Banner messages and administrator management are only accessible to SEADpod owners. Provisioned administrators will not be able to view or action the following from within SEAD.
Managing banner messages
Pod owner administrators can publish a banner message which is immediately viewable across internal SEADpod owner, administrator and user interfaces. Banner messages are often used to communicate urgent or important messages and can be amended or published as frequently as necessary. To publish a banner message, navigate to the message icon from the side navigation panel.
Note: Banner messages are only visible in the SEAD portal and will not appear in the Windows Remote Desktop client or Windows App.
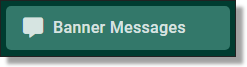
Fig. 1. Navigating to the banner message tab
From the Banner Messages page, type the message you would like to publish in the text bar, then press ‘SUBMIT’.
NOTE: Banner messages can contain up to 400 characters.

Fig. 2. Banner message text bar
Once you have submitted the banner message, you will be asked to confirm the action, click ‘Yes’ to proceed.
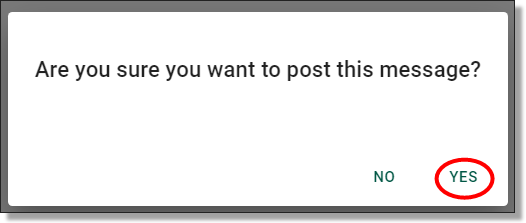
Fig. 3. Banner message publishing confirmation
Once the action initiation is shown as successful, the message banner will appear immediately across all internal SEADpod interfaces within your own SEADpod and is viewable from all pages.
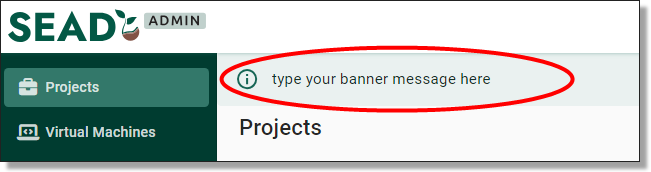
Fig. 4. Published banner message
To clear your banner message, navigate back to the Banner Messages page and click the ‘CLEAR BANNER’ button.
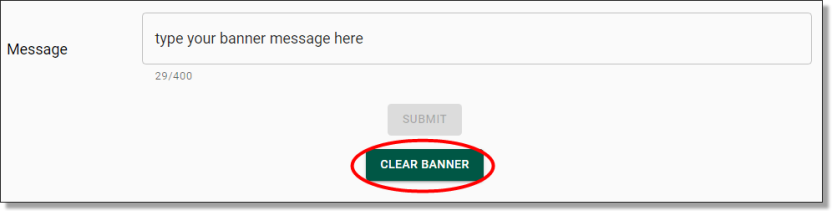
Fig. 5. CLEAR BANNER button
You will be asked to confirm this action, select ‘Yes’ to proceed. Once the action initiation is shown as successful, the banner message will immediately be removed from all internal interfaces within your SEADpod.
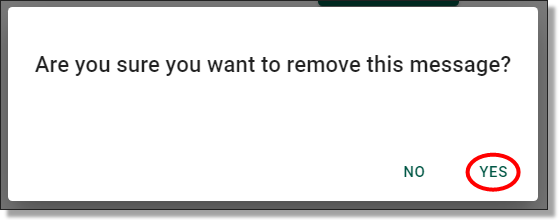
Fig. 6. Clear banner confirmation
Create Administrator
The administrators tab shows a list of current administrators for the SEADpod as well as their current administrator roles.
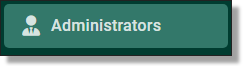
Fig.1. Navigating administrators tab
As a pod owner, you can create new administrators in SEAD. Start by clicking on the ‘NEW ADMINISTRATOR’ button presented at the top of the Administrators page.
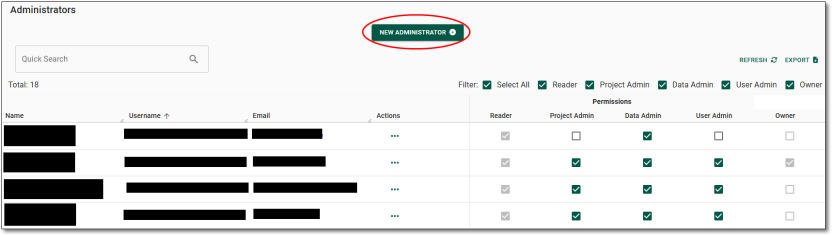
Fig. 2. 'NEW ADMINSITRATORS' button
You will be redirected to the Administrator registration form. All fields are required to be populated. You will also be able to select the user admin roles. NOTE: If the user email address already exists in the system, you will be unable to create them as an administrator.
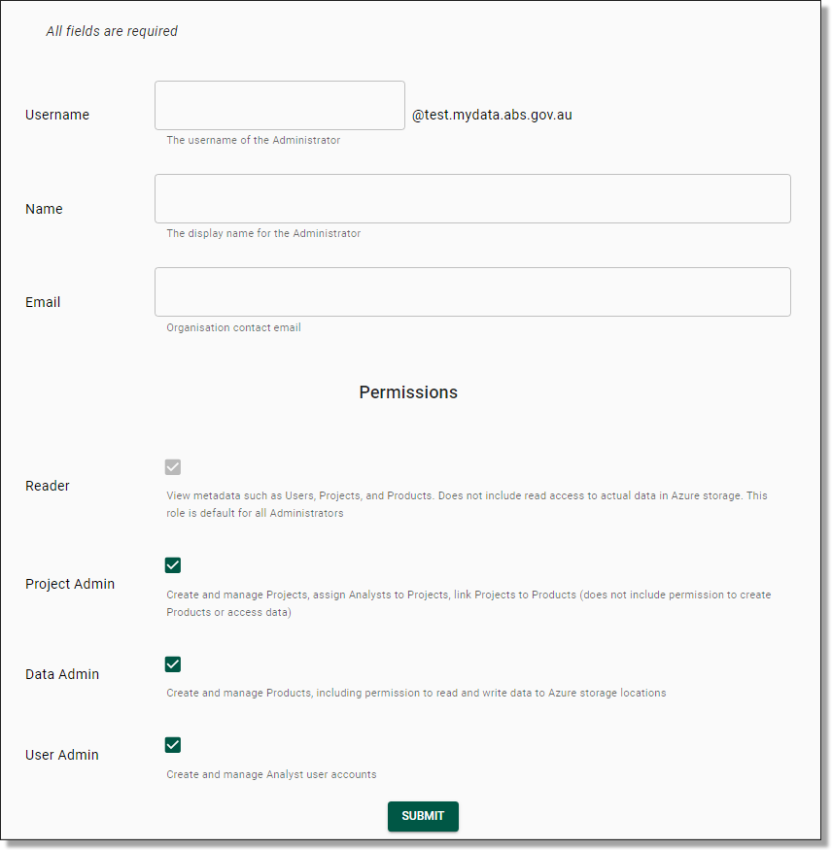
Fig. 3. New administrator form
Once you have pressed ‘Submit’, you will be asked to confirm that you wish to create a new administrator. If creating a new administrator is your intention, proceed by clicking ‘Yes’.
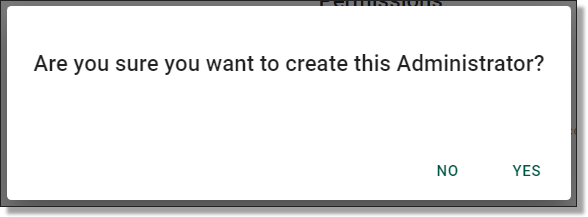
Fig. 4. New administrator confirmation
After confirming that you are intending to create a new administrator, you will be met with a pop-up notification advising that the admin creation is in progress and the administrators login details will be emailed to them via automated system notification. The administrator will shortly receive an email which contains their SEAD username and a temporary single use password that they will need to change on their initial login.
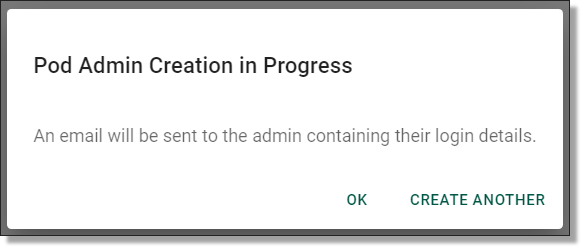
Fig. 5. New admin creation in progress pop-up
Delete administrator
As a pod owner you can delete an administrator. This will remove their access to the SEAD environment and the user interface. Administrators can be recreated at any time. To delete an administrator account, navigate to the Administrators page by selecting the ‘Administrators’ tab from the side navigation panel. If the administrator is not immediately available, type their name into the search bar. Once you have located the administrator, select the Actions menu and select 'Delete'.
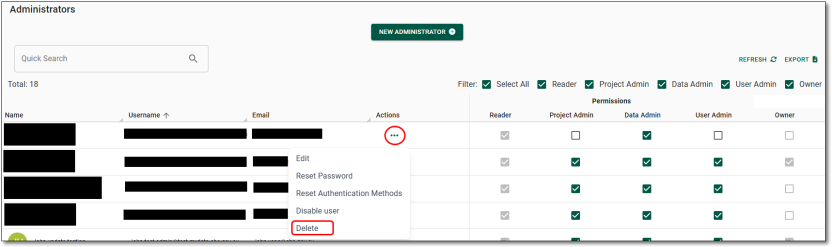
Fig. 1. Delete administrator account button
You will then be met with a pop-up asking if you wish to confirm deleting the administrator
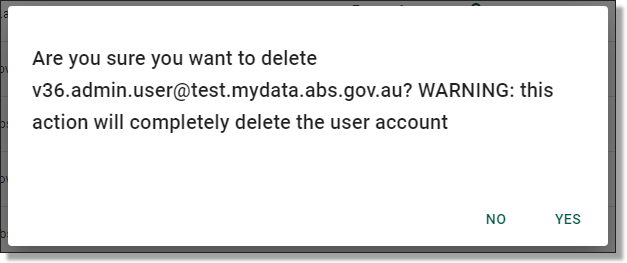
Fig. 2. Delete administrator account confirmation
Selecting 'Yes' will provide a confirmation that the administrator has been deleted.
Edit administrator
The details of an existing administrator can be edited. To edit these details, navigate to the Administrators page by selecting the ‘Administrators’ tab from the side navigation panel. If the user is not immediately available, type their name into the search bar. Once you have located the administrator account, select the Actions menu and select 'Edit'.
Fig. 1. Edit administrator account button
Clicking on the Edit button will redirect you to the Update Administrator page. All fields can be modified with the exception of the username. Make your updates, then click ‘Submit’.
Fig. 2. Edit administrator account form
Once you’ve pressed ‘Submit’, you will be asked to confirm that you wish to update the administrator. If this is your intention, proceed by clicking ‘Yes’.
Fig. 3. Edit administrator confirmation
Reset administrator password
Pod Owners can reset passwords for SEAD administrators. Start by navigating to the administrators tab from the side navigation panel. If the user is not immediately available, type their name into the search bar. Once you have located the administrator account, select the Actions menu and select 'Reset password'.
Fig. 1. Reset administrator password button
Clicking on ‘Reset Password’ will prompt a confirmation window, click ‘Yes’ to proceed.
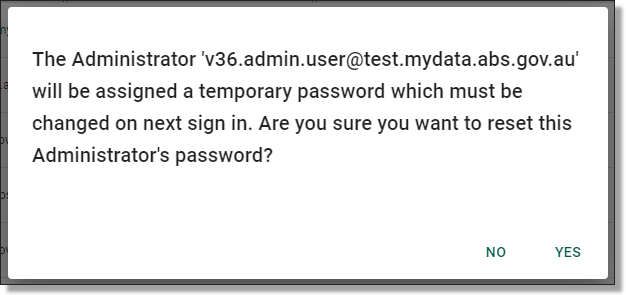
Fig. 2. Reset administrator password confirmation
You will then be met with a pop-up advising the password has been reset. An automated email will be sent the administrator's email containing a temporary password which will need to be changed the next time they sign in.
NOTE: The temporary password is valid for 90 days

Fig. 3. Administrator password has been reset notification
Reset administrator MFA
Pod Owners can reset the multi-factor authentication (MFA) for SEAD administrators. Start by navigating to the administrators tab from the side navigation panel. If the user is not immediately available, type their name into the search bar. Once you have located the administrator account, select the Actions menu and select 'Reset Authentication Methods'.
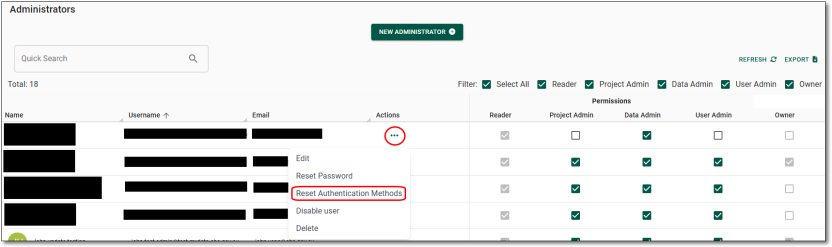
Fig. 1. Reset administrator MFA button
Clicking on ‘Reset authentication methods will prompt a confirmation window, click ‘Yes’ to proceed.
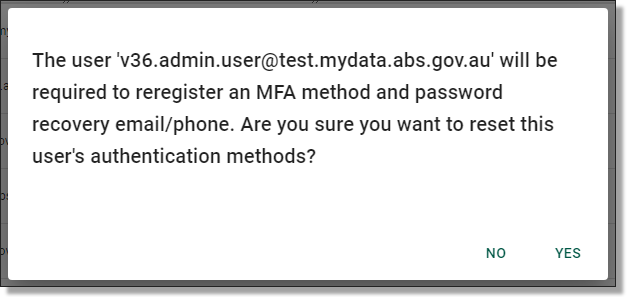
Fig. 2. Reset administrator MFA confirmation
The Pod Owner will not be required to forward on any additional information to the administrator once the MFA has been reset. It is up to the administrator to then go through the steps for setting up their MFA on their next log in.
Enable administrator
Administrator accounts, including other Pod owner accounts that have been disabled by a Pod owner, or automatically disabled following 45 days of inactivity, will need to be enabled by a Pod owner.
To enable a disabled account, navigate to the Administrators page by selecting the ‘Administrators’ tab from the side navigation panel. Once you have located the administrator account, select the Actions menu and select ‘Enable user’.

Fig. 1. Enable administrator account button
Once you’ve clicked on ‘Enable user’, you will be asked to confirm that you wish to enable the administrator. If enabling the administrator is your intention, proceed by clicking ‘Yes’.
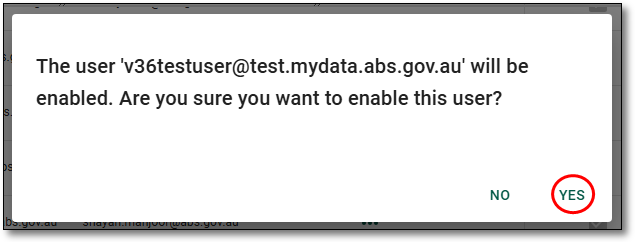
Fig. 2. Enable administrator account confirmation
You will be presented with a notification banner on the top right of the screen advising if the task was completed successfully. This can also be viewed from the Action Log.
Disable administrator
As a Pod owner, you can disable administrators accounts. This removes their access to the SEAD environment and the administrator’s interface, while retaining the account information. Disabled accounts can be enabled later when needed. Your administrator list should be curated regularly to ensure roles are relevant and accurate.
To disable an administrator’s account, navigate to the Administrators page by selecting the ‘Administrators’ tab from the side navigation panel. Once you have located the relevant administrator, select the Actions menu and select ‘Disable user’.
Fig. 1. Disable administrator account button
Once you have clicked ‘Disable user’, you will be asked to confirm that you wish to disable the administrator. If disabling the administrator is your intention, proceed by clicking ‘Yes’.
Fig. 2. Disable administrator account confirmation
You will be presented with a notification banner on the top right of your screen advising if the task was completed successfully. This can also be viewed from the Action Log.
Frequently asked questions
Find answers to common questions about the SEAD administrators role
Released
13/05/2024
For any user specific troubleshooting, including for any issues with logging in, virtual machines, and any other common issues, we recommend that users are referring to the SEAD User troubleshooting webpage.
For common questions about SEAD and its operations, users should refer to the SEAD Frequently asked questions webpage. These resources are intended to resolve any typical queries you may have.
Should you need further assistance, please reach out to us at sead.support@abs.gov.au via email.