User guide
How to access SEAD, navigate the portal, launch your remote workspace and manage your account
Logging into the SEAD portal
SEAD conditions of use
By accessing SEAD, you are confirming you are authorised to do so, and acknowledge you have read and agree to comply with the conditions of use.
Log into the SEAD portal to access information and settings related to your profile, project, and launch your virtual machine (VM).
Note: For security reasons, user accounts will be automatically disabled after 45 days of inactivity and access to your virtual machine(s) will be suspended. The project and all associated data remain unaffected. Notifications are sent by email 14 days and 3 days prior to the account being locked. You will need to log in to the SEAD portal within the 45 days to reset this timer. To reactivate a disabled account, contact your SEAD administrator.
New users
Multi-factor authentication
SEAD uses multi-factor authentication to provide a secure login environment.
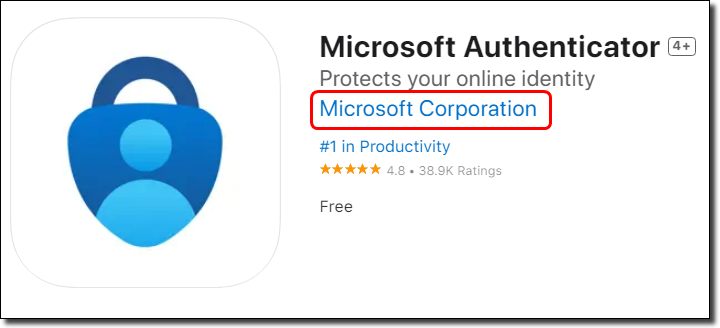
You will need to download the Microsoft Authenticator application to your smart phone from the App Store (for iOS) or Google Play (for Android) to fulfil the login sequence.
Make sure that the authenticator is published by Microsoft, as SEAD only supports Microsoft Authenticator.
Logging in
- To access the SEAD portal, go to https://sead.abs.gov.au
- The first time you log in, you will be required to enter the username and password contained in the email delivered by the system when your account is created.
Note: All SEAD accounts use the @mydata.abs.gov.au domain format.

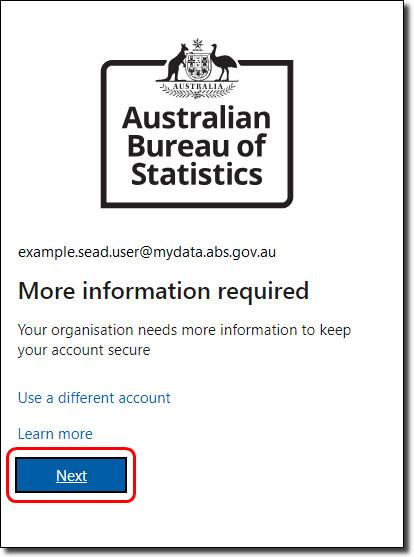
- You will be presented with a ‘More information required’ request, click ‘Next’.
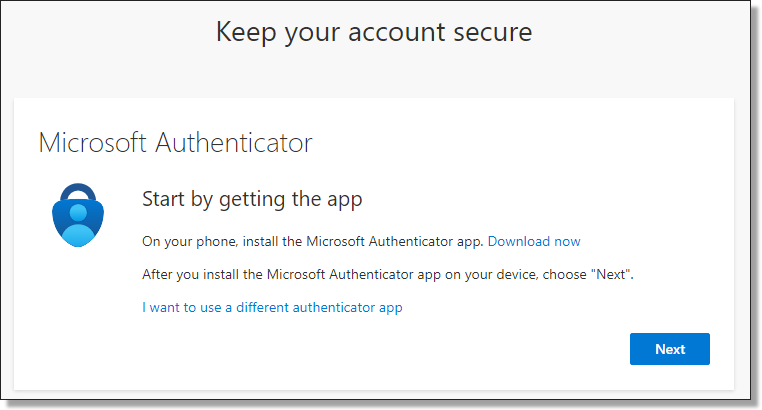
- The following screen will ask you to download the Microsoft Authenticator application. If you have already downloaded the application as advised above, proceed by clicking 'Next'.
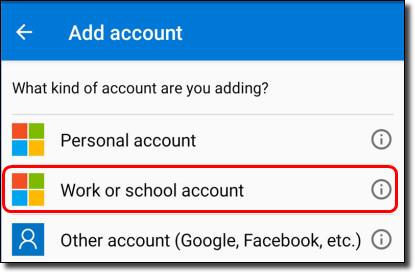
- You will then be guided to open your Microsoft Authenticator application and add a ‘Work or school account’.
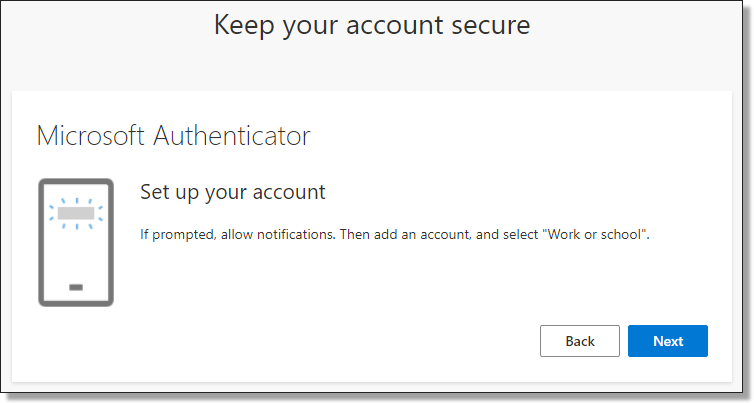
- Once you have selected a 'Work or school account', click ‘Next’ from your browser.
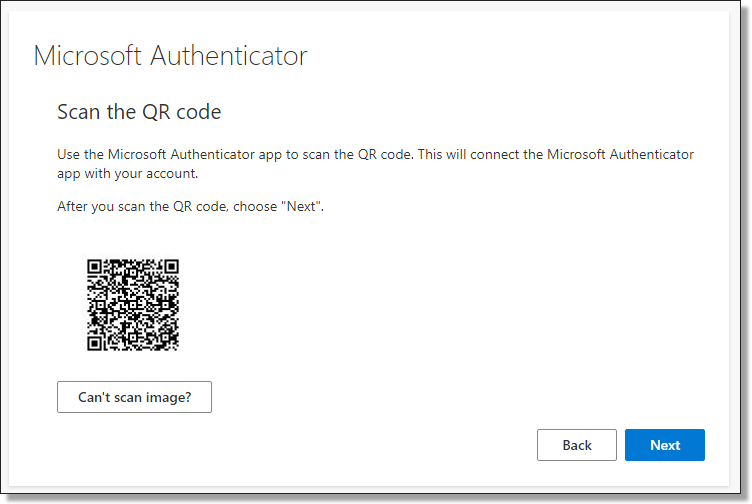
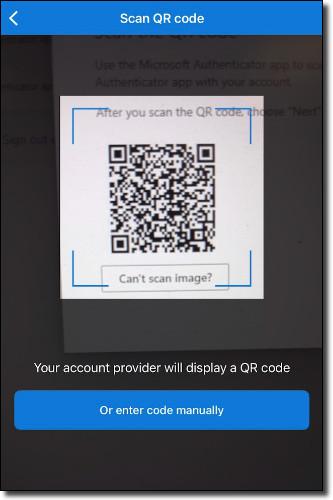
- The following screen presents a QR code to scan using your Microsoft Authenticator application. Initiate the scanning function by clicking 'Scan the QR code' from your application, then hover your phone camera over the QR code shown on your browser screen.
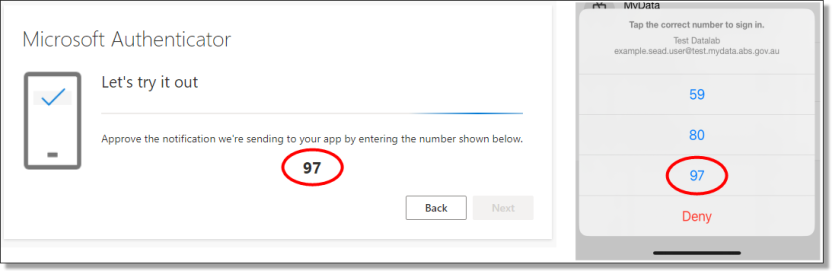
- Once scanning is complete, click ‘Next’ on your browser screen. You will be asked to select the security number shown on your browser screen into your Microsoft Authenticator application, once complete, click ‘Next’.
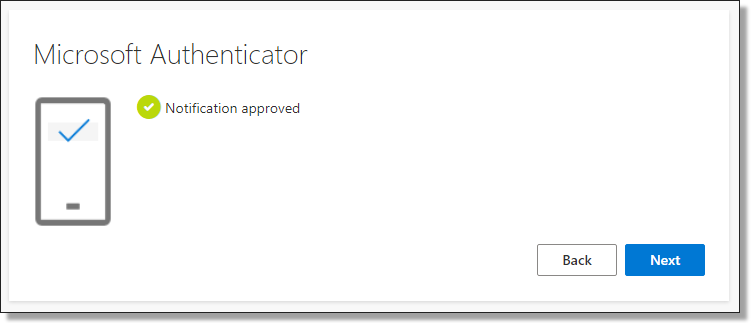
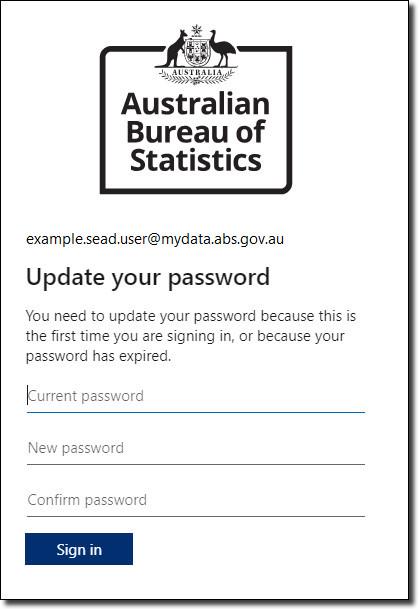
- After entering the security number and receiving approval from your Microsoft Authenticator application, you will see a ‘Notification Approved’ confirmation on your browser. Click ‘Next’ then 'Done' to proceed to updating your password

- Once you have returned to the sign in page, you will be asked to set up a new password for your account. Your password cannot contain your user ID. It must be a minimum of 8 characters and contain at least three of the following:
- Upper-case letters A – Z,
- Lower-case letters a - z,
- Numbers,
- Special characters @ # $ % ^ & * - _ ! + = [ ] { } | \ : ' , . ? / ` ~ " ( ) ;
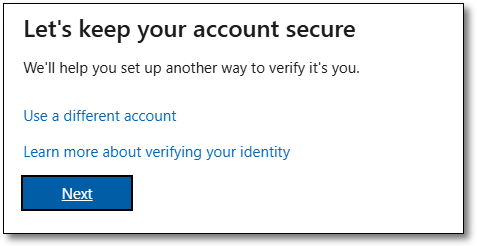
- After updating your password when logging in for the first time, or after having your authentication methods reset you will be prompted to add a second verification method.
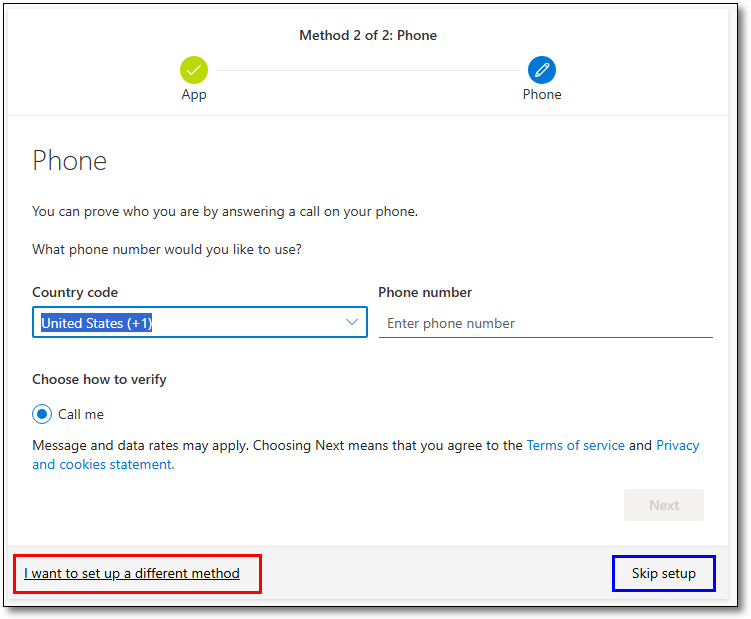
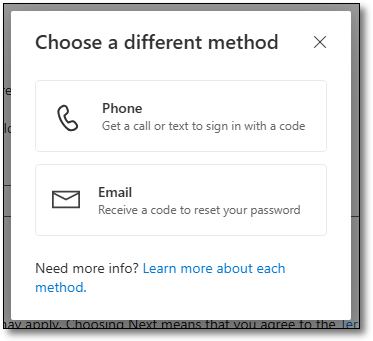
The default method is a phone call with automated prompts for you to follow. If you prefer to use a different method, select ‘I want to set up a different method’. From here you can choose either a phone call or text message with a sign in code, or Email. You can skip the setup of a second verification method, however you will be prompted to complete it every time you log in to the SEAD portal.
- To proceed with default method, enter your country code and phone number and select ‘Next’.
- You will receive a phone call to your mobile device using the phone number entered. Answer the call and follow the prompts provided. Your browser will update with the status of the verification.
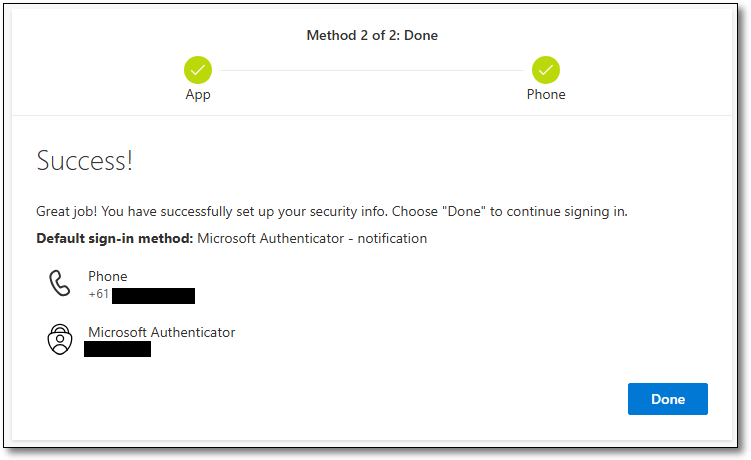
- After successfully verifying your mobile device your browser will update with 'Call answered. Your phone was registered successfully'. Click 'Next' to proceed.
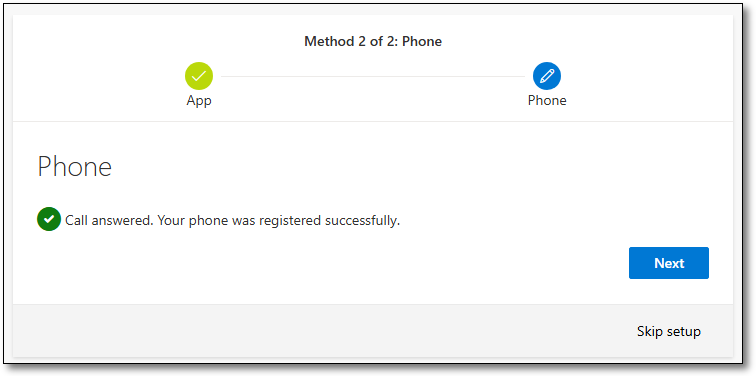
- You will then receive a 'success' page, confirming the details were successfully registered. Select ‘Done’ to proceed to the SEAD portal.
Returning users
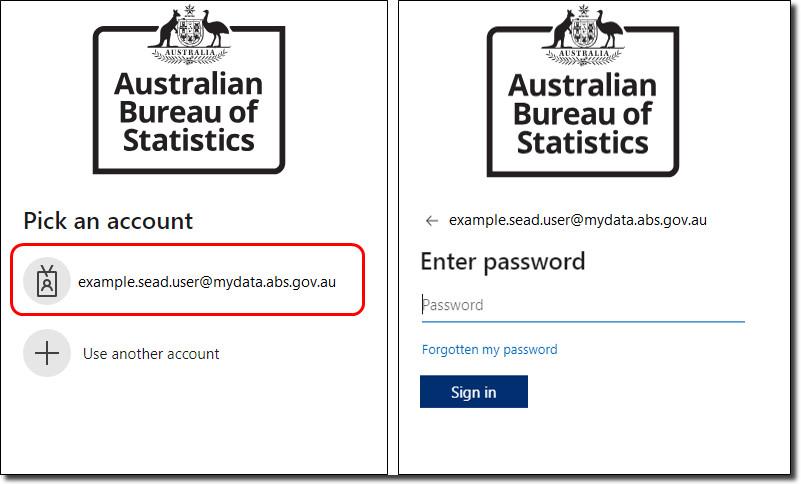
- To access the SEAD portal, go to https://sead.abs.gov.au
- For returning users, your account will already be available to select. All SEAD accounts use the @mydata.abs.gov.au domain format. Click on your account, then enter your password to sign in.
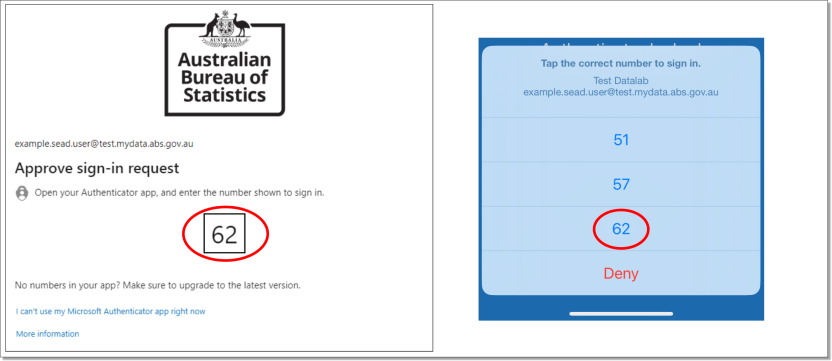
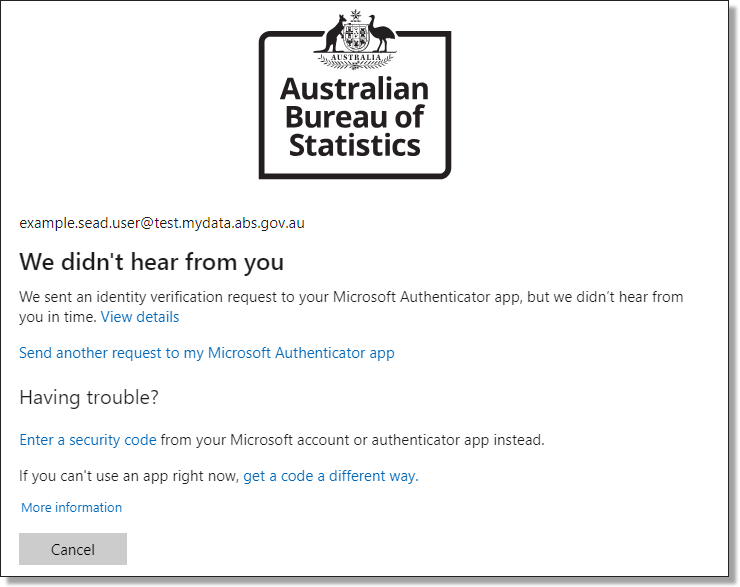
- Once you have entered your credentials and hit ‘Sign in’, you will receive a notification from the Microsoft Authenticator application on your phone asking you to perform a “number match”. Enter the numbers shown on your browser screen into the authenticator application to proceed.
- If you do not approve within the time limit, click ‘Send another request to my Microsoft Authenticator app’. If the request expires, re-enter your SEAD email and password in the SEAD log in screen.
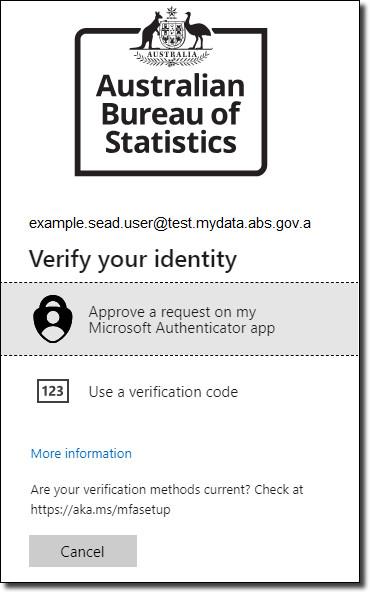
- You can also change the way you approve the sign in request by selecting 'I can’t use my Microsoft Authenticator app right now'.
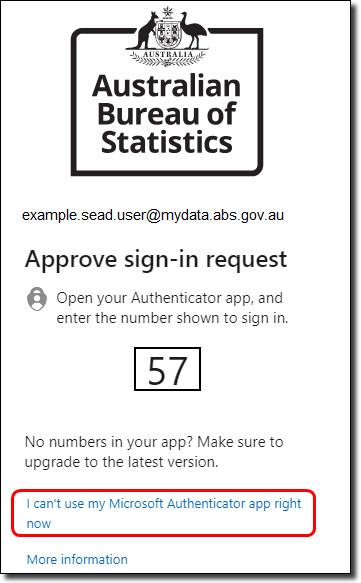
- You then have two options:
- Approve a request on your phone app.
- Use a verification code from your phone app.
- After you have authenticated your login in Microsoft Authenticator, you are logged into the SEAD portal.
Recommended browsers
The SEAD portal and workspace is presented in a web browser. The latest version of the following web browsers are recommended:
- Chrome
- Microsoft Edge
- Firefox
- Safari
Internet Explorer is not recommended.
Note: Mobile devices are not supported/enabled for SEAD.
Forgotten your password
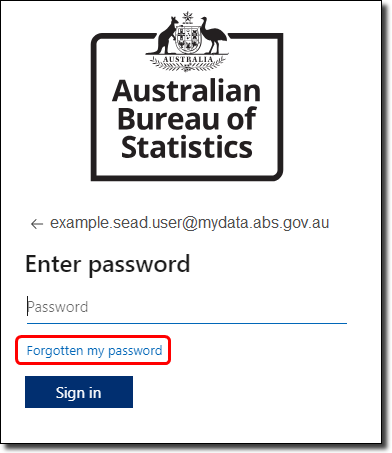
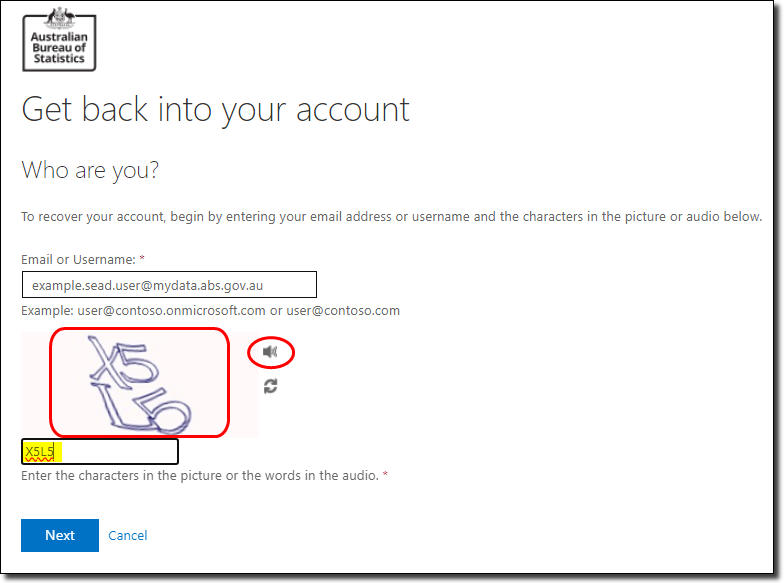
If you have forgotten your password, click the 'Forgotten my password' link on the username entry screen.
On the following screen, you will be asked to enter the characters in the picture. You have the option to hear the characters in the picture if you click on the speaker icon (circled). Your user ID is populated for you.
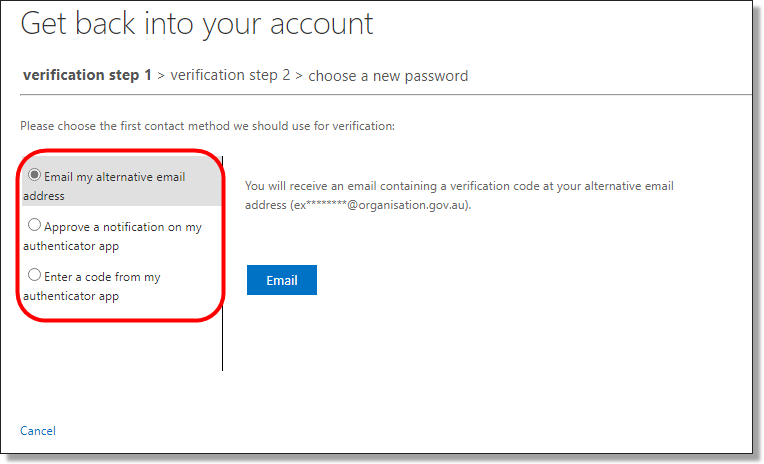
The next screen takes you to Step One of verifying your account. Choose from the options in the left-hand column.
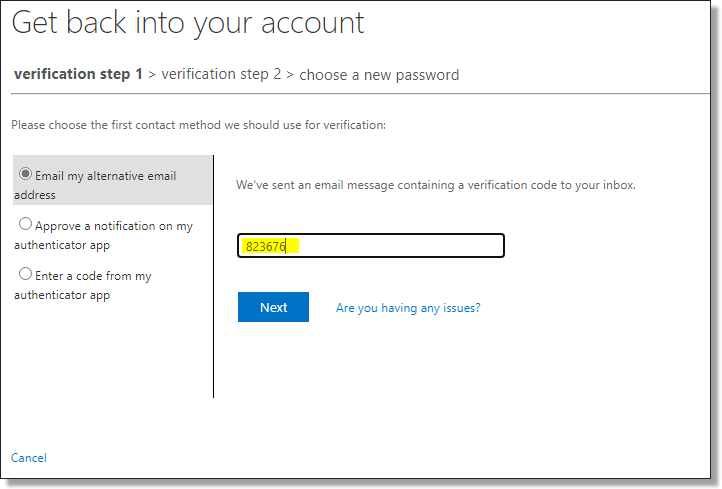
Enter the verification code you received via email, or using the codes via the Microsoft Authenticator app.
Enter your new password, ensuring it has a minimum of 8 characters and contains at least three of the following:
- upper-case letters A – Z
- lower-case letters a - z
- numbers
- special characters @ # $ % ^ & * - _ ! + = [ ] { } | \ : ' , . ? / ` ~ " ( ) ;
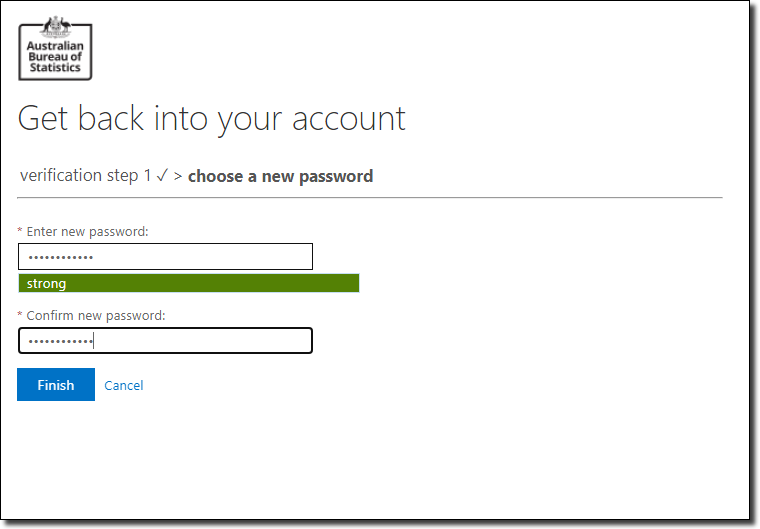
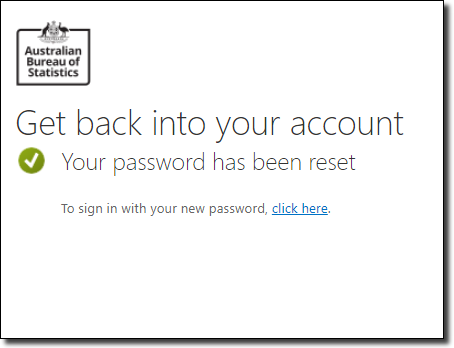
The following screen is displayed once your password has been reset. Select the ‘click here’ link to sign in with your new password.
Navigating the SEAD portal
How to navigate the web portal, manage your project workspaces, and administer your account
SEAD web portal interface
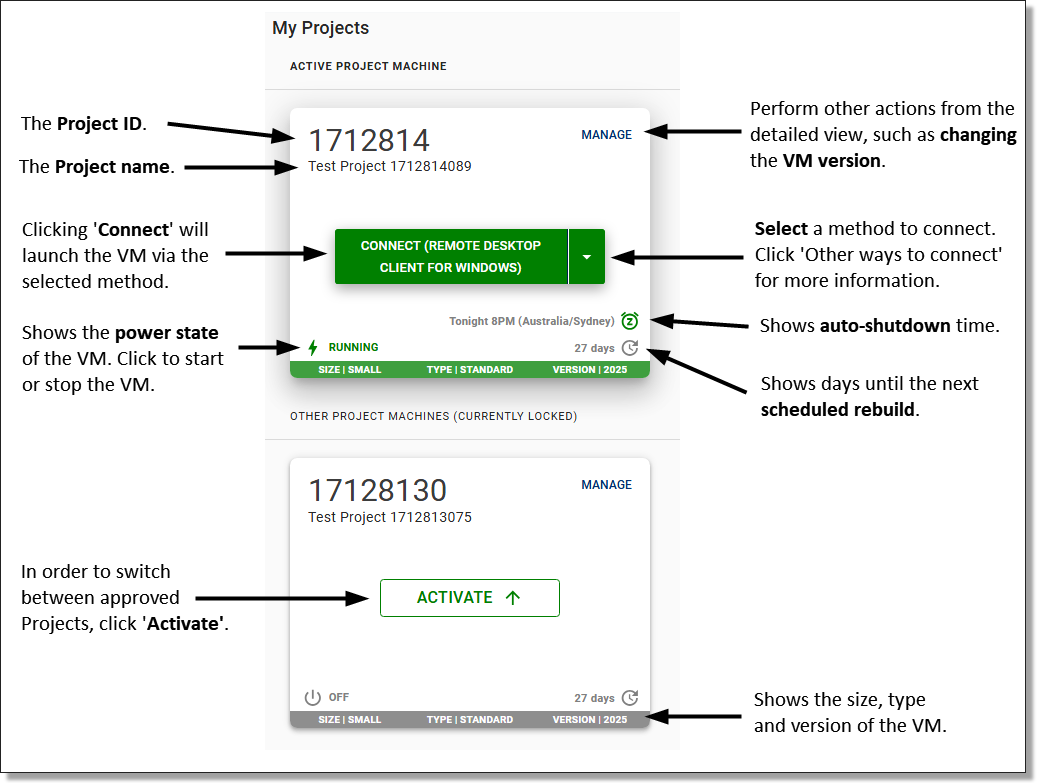
The SEAD portal is where you will find information about your SEAD Account, Projects and Virtual Machines (VMs). This interface allows you to self-manage functions of your account, like changing between VMs.

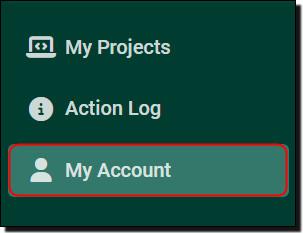
The 'Navigation Panel' allows users to access the My Projects page, which contains their active and locked VM's, the Action log and Account details.
The 'Information centre and account details' contains links to the SEAD conditions of Use, SEAD web page and Privacy Notice. The 'What's New' section contains system updates relevant to end users.
'Active virtual machine' shows the accessible VM for users. Only one VM can be active at a time.
'Locked virtual machines' is for users who have been added to multiple projects and allow users to change their active VM depending on which project they are wanting to access.
The 'Help centre' contains information on how to access the virtual machine itself.
The SEAD portal displays information across three tabs:
My Projects
From this tab you can activate, start and launch the VM associated with your project.
My Account
Use this tab to view your personal contact information and basic account settings.
Action Log
Keeps a record of your portal actions. This can help you manage your sessions and provides useful information if you encounter problems with the system. It includes:
- starting your VM
- stopping your VM
- switching between active VMs
- restarting your VM
- rebuilding your VM
Navigation panel
The left navigator menu contains shortcuts that can be used to navigate between pages. Click the arrow to collapse or expand the navigator menu.

Global links
The links at the top right are available from all pages of the portal:
What’s New
This acts as a global information centre for the DataLab and SEAD, showcasing information about new features and updates.
About
Directs you to the SEAD web content.
Privacy
Directs you to the SEAD privacy notice.
User ID
Displays your details, including your name, user name and user role. This is also where you log out of the SEAD portal.
Always abide by the SEAD Conditions of Use
The SEAD conditions of use will help you understand your obligations and management responsibilities to handle microdata safely. It is important that this page is read carefully.
Important messages banner
This banner appears at the top of your SEAD portal window when your SEAD administrators have an important message for your consideration or action. Banner messages are only visible in the SEAD portal and will not appear in the Windows Remote Desktop client or Windows App.
Functions in my projects
The 'My Projects' page of the SEAD user portal makes it easy to launch and switch between your project VMs.
You must now connect to your Virtual Machine (VM) using Azure Virtual Desktop (AVD).
In the 'Manage' menu of your VM tile, you will be able to switch your VM to the latest version.
Users may choose to access the VM by installing either the Windows App for Windows or MacOS, or the Remote Desktop Client (MSI).
Virtual machine management options
In the 'Manage' menu you will be able to switch your VM version to a new version if there is one available.
Users require the Windows App for Windows or MacOS, or the Remote Desktop Client for Windows (MSI) to access their VM. Connecting via the Windows App web client or the Remote desktop web client are disabled and no longer available for connecting to your VM.
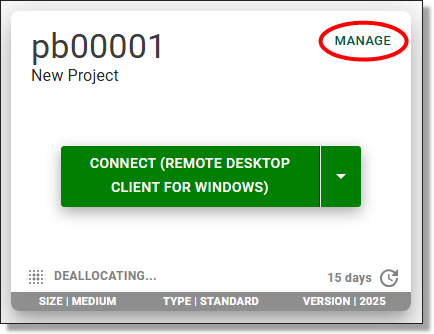
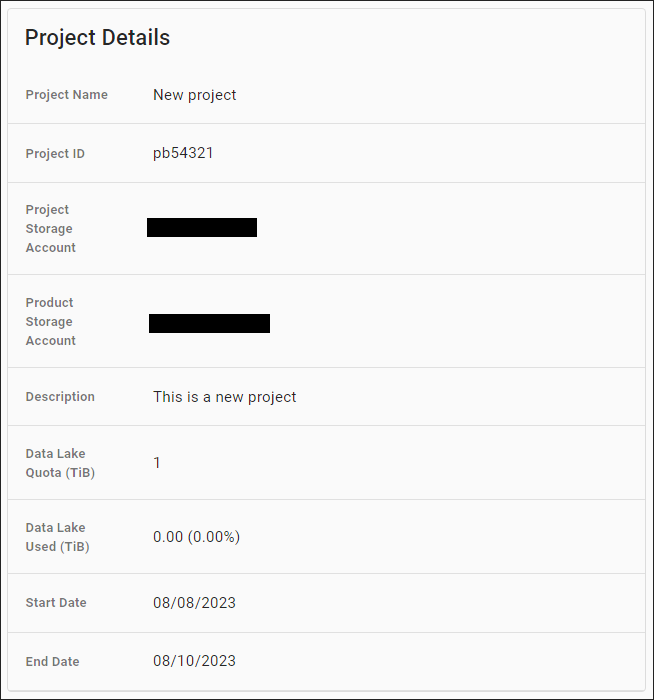
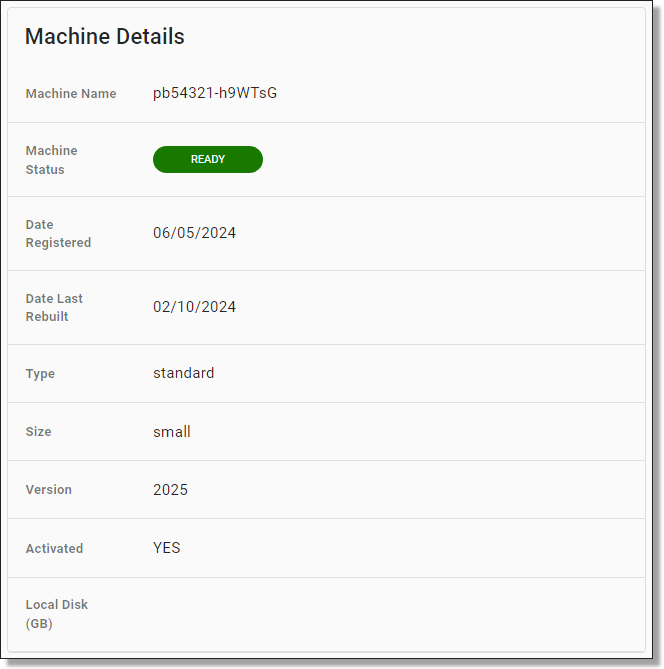
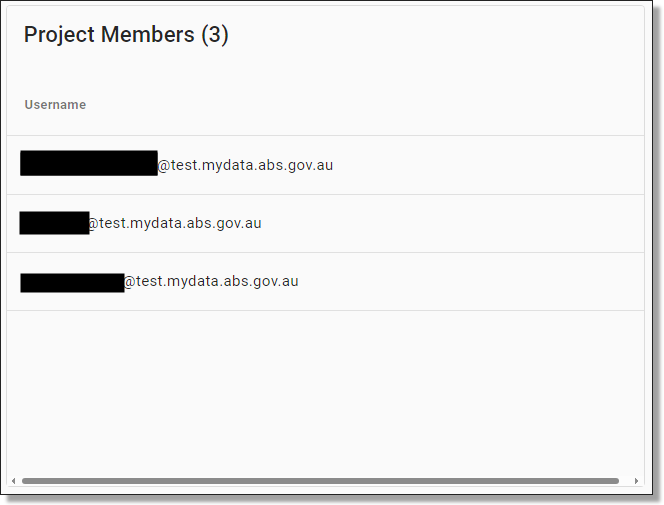
On the VM management page, you will be presented with details about your project, project members and machine.
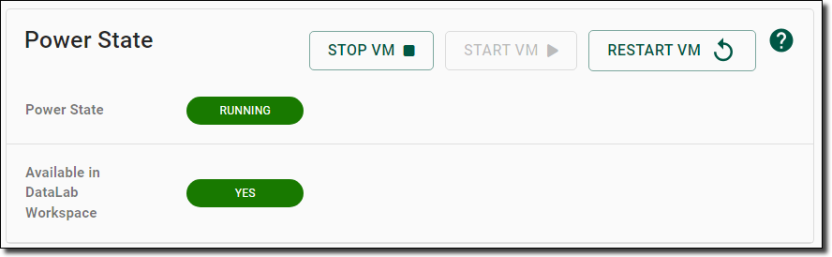
The VM management page also showcases your VM power state which allows you to start, stop, or restart the VM. This can be helpful if swapping between VMs or having difficulties seeing your machine in the Azure Virtual Desktop workspace.
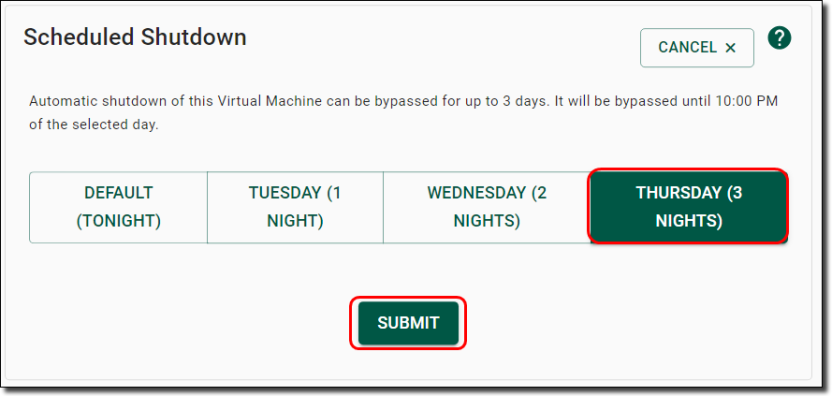
You can also view the scheduled shutdown for your VM. VMs are automatically shutdown every night at 8pm local time. If you have a program running that you expect to run past 8pm, you can choose to extend your session for up to 3 days by selecting 'Bypass shutdown'.

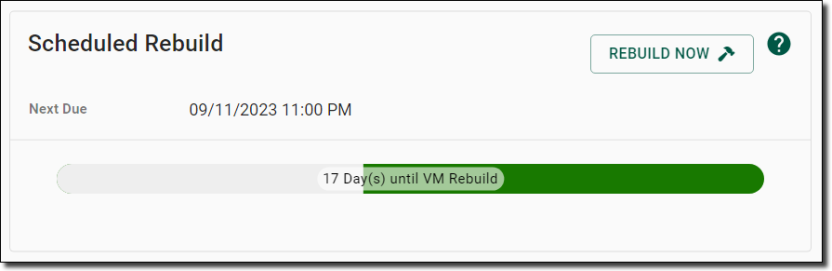
You can also view the date of your next scheduled rebuild. A date and numbered count down is displayed on the coloured bar, with time adjusted to your local area. The coloured bar changes, starting with green, moving to orange and finally red as you get closer to the rebuild date.
VMs are automatically destroyed and rebuilt every 14 days for security and maintenance purposes. You cannot extend this time, however, you can choose to rebuild before the scheduled time by selecting ‘Rebuild Now’. After rebuilding, the countdown resets to 14 days and allows you to bypass the nightly shutdown.
Note: If you try to bypass a shutdown when your machine is scheduled for a rebuild, the system will deny the action and will instead offer to ‘Rebuild Now’.
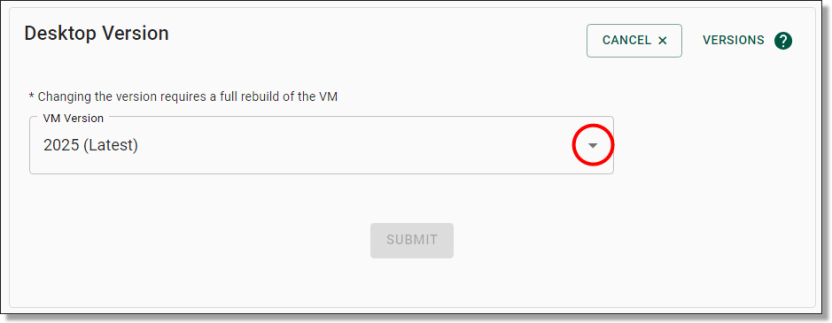
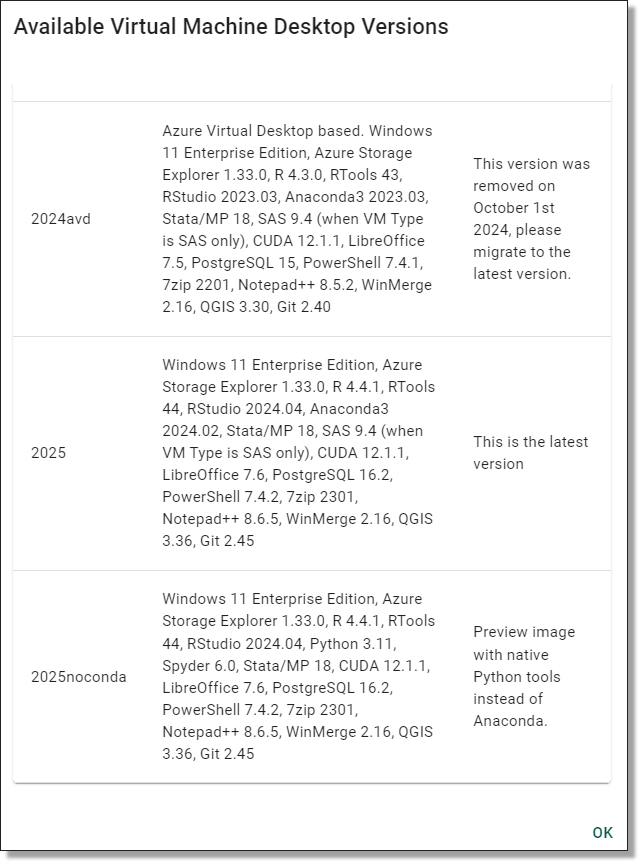
You can update your desktop version annually as new desktop versions become available. Generally a new VM version is provided once annually, with updated versions of software. Click on 'Change VM Version' to view or update your desktop version.
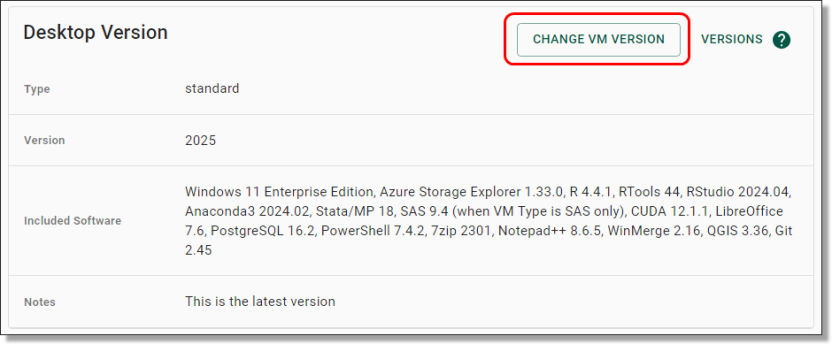
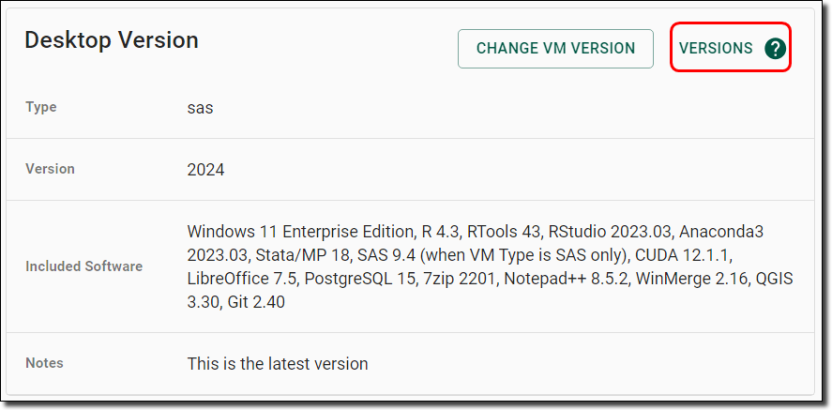
To compare the software of your current version to the latest version, click on 'Versions'.
Functions in my account
The 'My Account' page of the SEAD user portal allows you to view your basic user attributes, such as your name and email address. If your details require updating, contact your SEAD administrator.
From this page, you can manage your account settings for receiving email reminders. These notifications inform you about your VM’s scheduled shutdown, which occurs at 8pm if you’ve used the VM that day. Additionally, you’ll receive a reminder before your 14 day VM rebuild. You can adjust this setting anytime by clicking 'Edit'.

Accessing your project workspace
How to activate and launch your project workspace
Launch your project workspace
To enter your SEAD project workspace you need to:
Activate your virtual machine
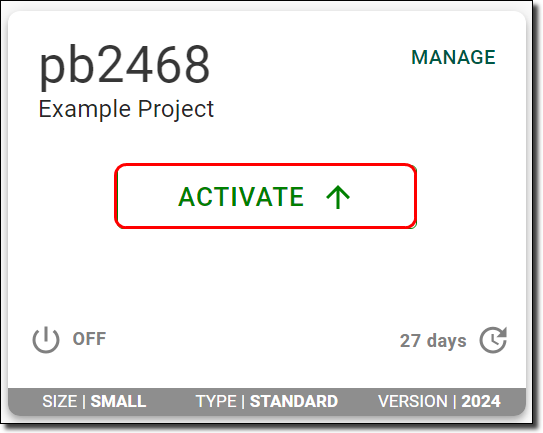
Each project Virtual Machine (VM) is displayed on individual tiles, with your “Active” VM appearing at the top above those that are “Locked”. For more information about your VMs, refer to Functions in my projects.

Each project has a separate VM and you can only access one project VM at a time. If your machine is already available to launch, skip to Launch your virtual machine.
- If not, click the ‘Activate' button as shown below and wait until the ‘Connect’ button appears.
- If your machine shows a status other than ‘Connect’ or ‘Activate’ you must rebuild the VM first. Refer to Virtual machine management options for more information.
Click on the ‘Activate’ button of the VM you want to launch.
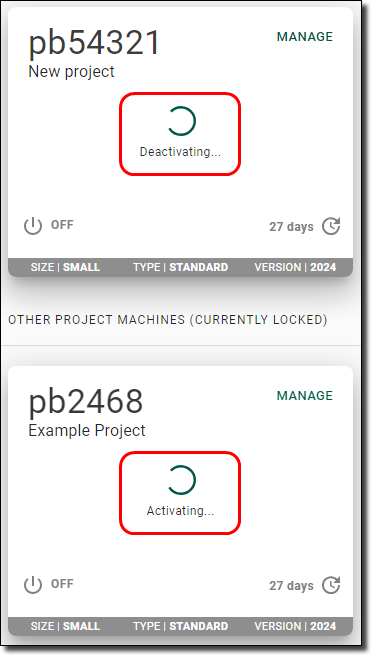
If you have a VM for another project that is currently active, this logs you out of your other session. If you have a program running in your workspace using another VM, this will stop the program. You can only run multiple VMs if you have requested to use offline local disk space.
Launch your virtual machine
Before launching your VM, you can choose your preferred connection. You are required to install the Windows App (for Windows or MacOS) or Remote Desktop client (Windows users only), or have your organisation do so to be able to connect to your VM. All browser-based applications, including Azure Virtual Desktop web client and the Windows App web client are disabled and no longer available for connecting to your virtual machine.
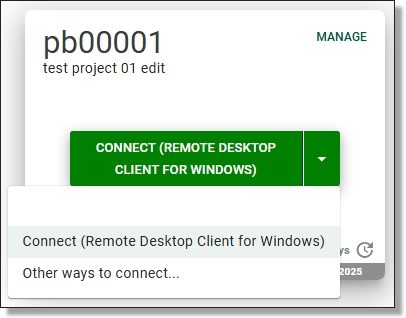
Connect using Remote Desktop Client for Windows
If you are connecting to the 'Remote Desktop Client' version of AVD, contact your SEAD administrators to ensure that your IT department has enabled the correct networking addresses.
If you intend to use the 'Remote Desktop client' on your organisation's workspace, your internal IT department will need to make it available to you.
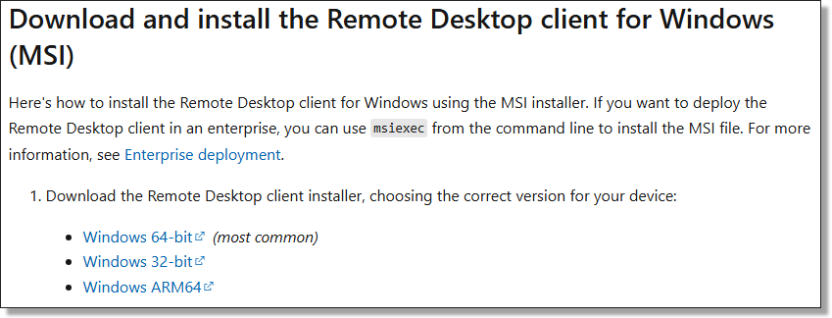
The latest version of 'Remote Desktop client (MSI)' for Windows, is available on the Microsoft website. Ensure you download and install the correct version for your device.
Note: The Remote Desktop Client will reach end of support on March 27, 2026. Transition to the Windows App to ensure continued access to SEAD.
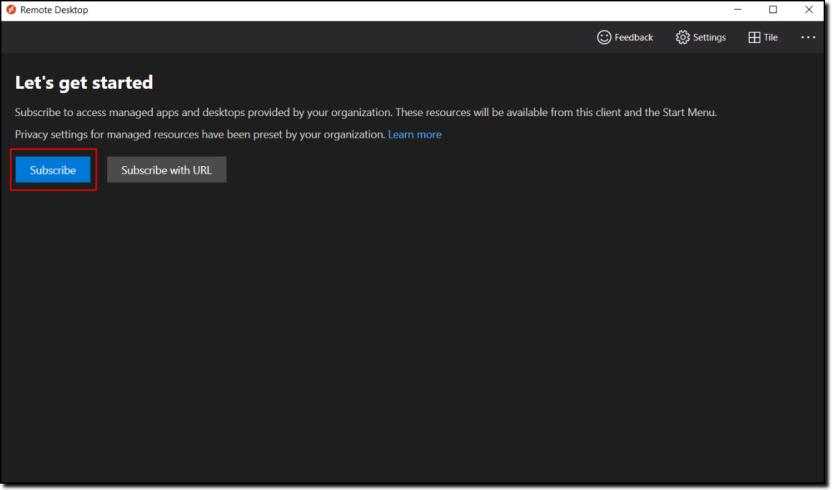
Once you have been provided access by your organisations IT department, or have downloaded, installed and opened the application, click ‘Subscribe’ as shown below.
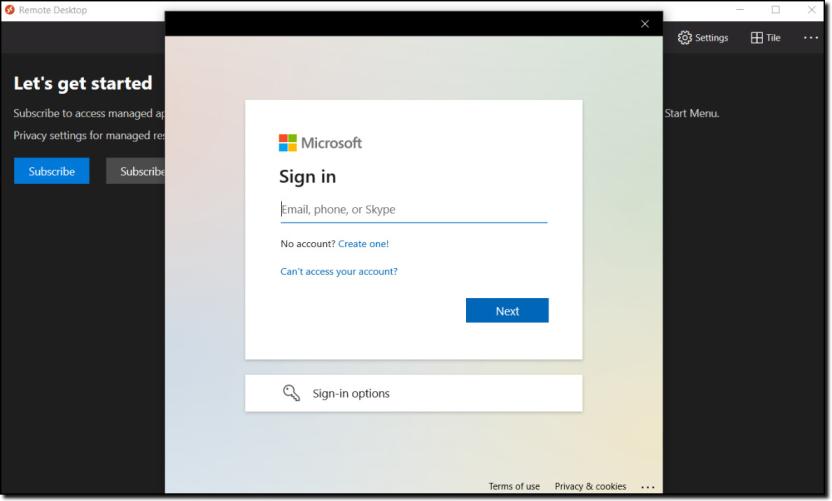
You will then be shown a new window that allows you to log into your SEAD account using your SEAD credentials.
Upon a successful login, you will be shown all your available VMs. If you can’t see the VM that you want, it may be dormant and would require a rebuild. Rebuilds need to be completed through the SEAD web portal.
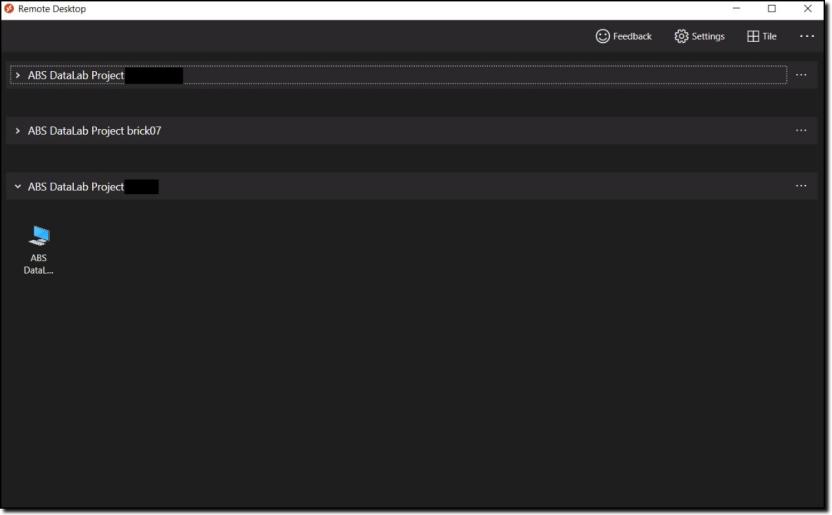
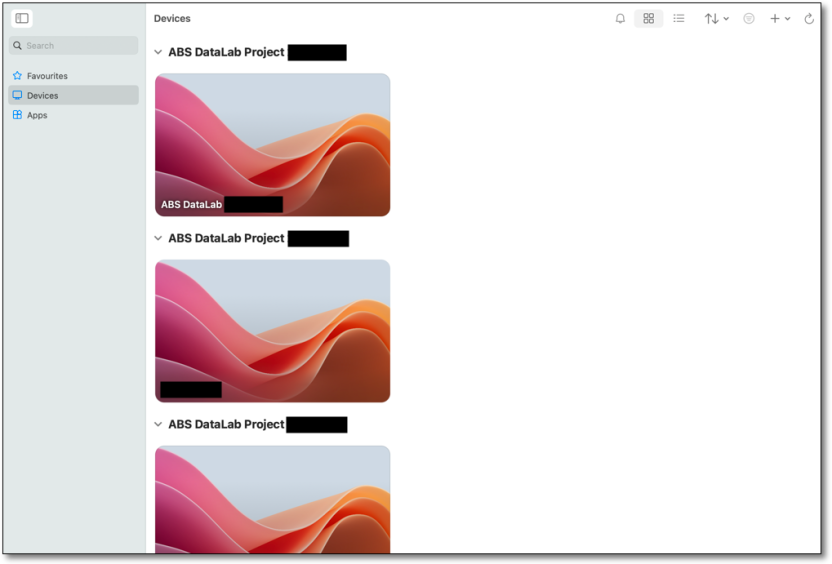
If you have access to multiple projects you may be shown multiple tabs, one for each project as shown in the image below.
Note: If you wish to use multi-display, right click on your VM icon, click ‘Settings’, and turn off ‘Use default settings’. You should now see options for how you would like to display your VM.
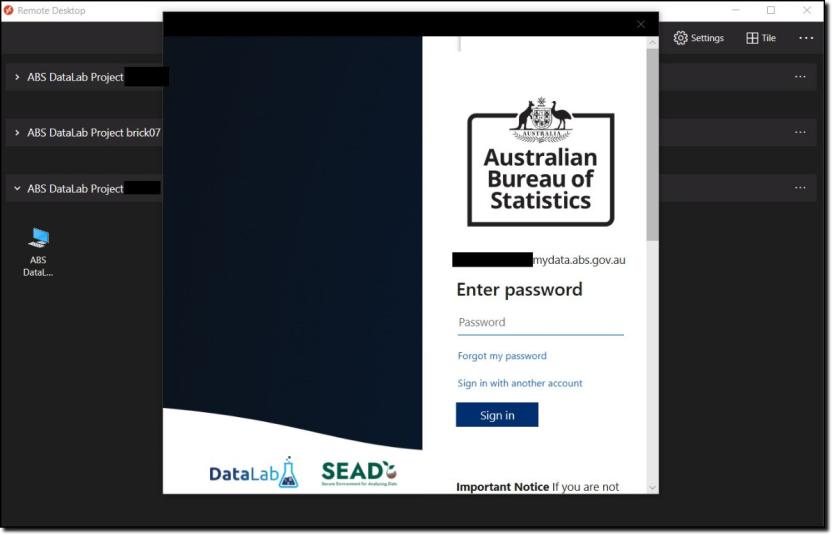
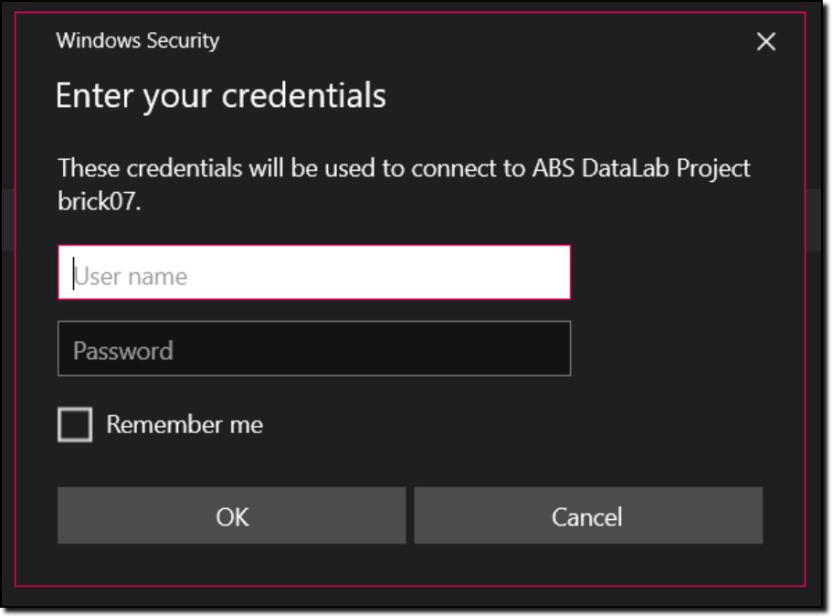
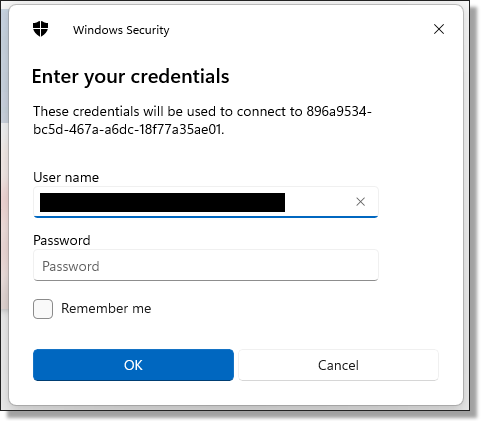
Click into one of the computer icons and you will be taken to a login screen to reconfirm your identity, before access is granted to enter your VM. This may not appear if you have recently entered your credentials, through a similar window.
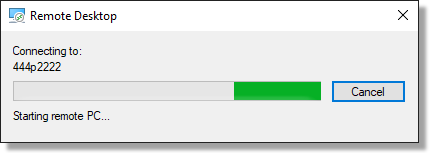
The below loading bar should briefly appear.
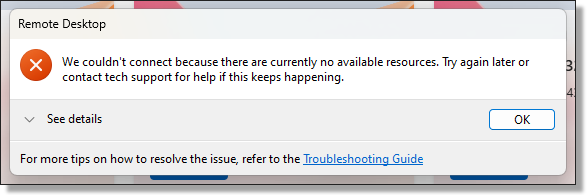
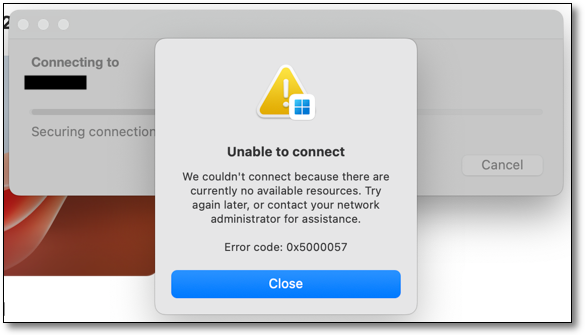
If, instead of the second login prompt, you receive a message as shown in the below image, then either your machine is not the active machine or it is not using the version ‘2025’ or similar. If your desktop session does not start, repeat step 1 to Activate your virtual machine from the SEAD web portal, and check that the version at the bottom of your VM says ‘2025’ or similar.
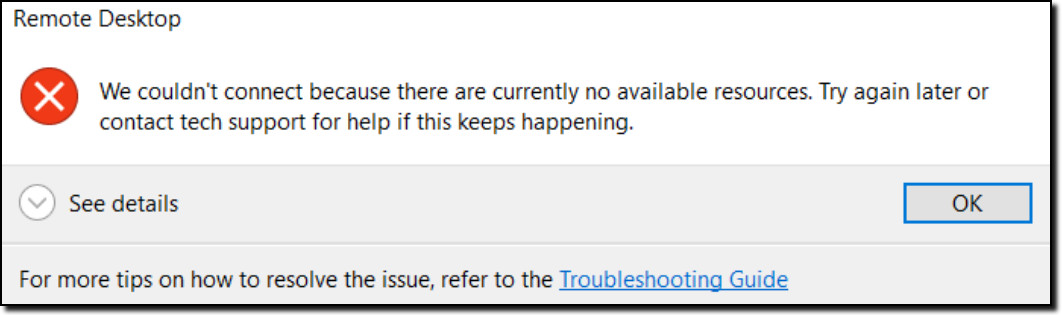
Error message that reads:
"We couldn't connect because there are currently no available resources. Try again later or contact tech support for help if this keeps happening."
You will then be presented with another login screen for the VM itself.
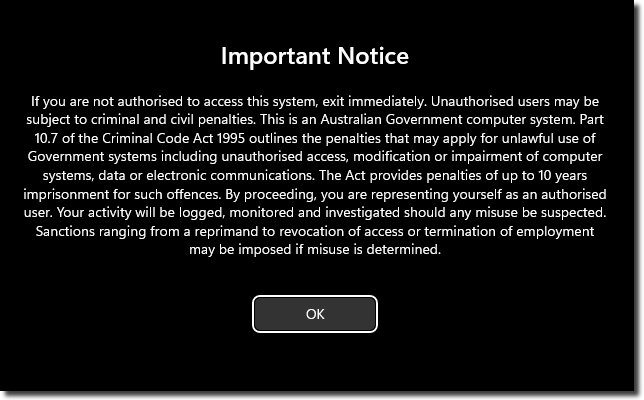
By logging in you agree to these conditions:

Important Notice
If you are not authorised to access this system, exit immediately. Unauthorised users may be subject to criminal and civil penalties.
This is an Australian Government computer system. Part 10.7 of the Criminal Code Act 1995 outlines the penalties that may apply for unlawful use of Government systems including unauthorised access, modification or impairment of computer systems, data or electronic communications. The Act provides penalties of up to 10 years imprisonment for such offences. By proceeding, you are representing yourself as an authorised user and acknowledge you have read and agree to comply with the Responsible Use of ABS Microdata User Guide. Your activity will be logged, monitored and investigated should any misuse be suspected.
Sanctions ranging from a reprimand to revocation of access or termination of employment may be imposed if misuse is determined.
You will then have a new window open on your computer displaying your VM workspace.

For more information on navigating the workspace, refer to Navigating your project workspace.
Note: VMs continue to incur running costs if the VM has not been stopped, even when not in use. The ABS recommends users shut down their machine during periods of inactivity to avoid unintended charges. Disconnecting, or closing your machine window, is insufficient. VMs are required to be shut down completely as per the VM management options to avoid continued running costs.
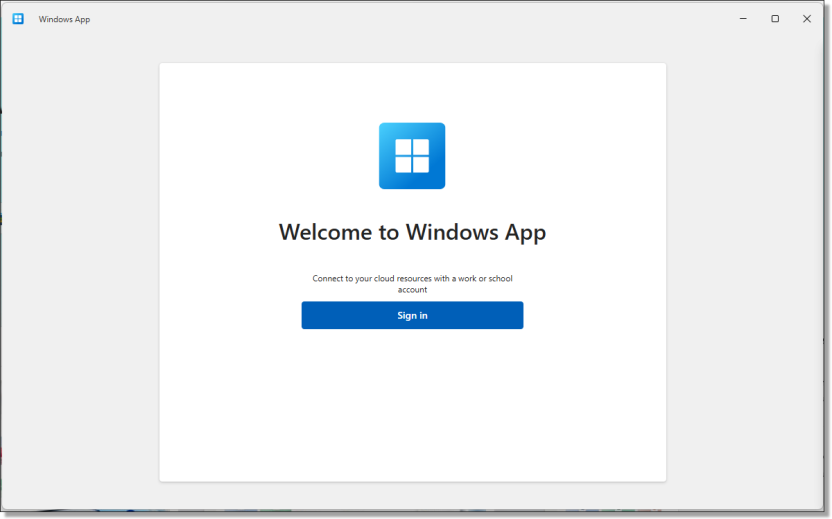
Connect using Windows App for Windows
Download the Microsoft Windows App from the Microsoft Windows App Store.
Note: If you intend to use the Windows App on your organisation's workspace, you will need to contact your local IT department to make it available to you.
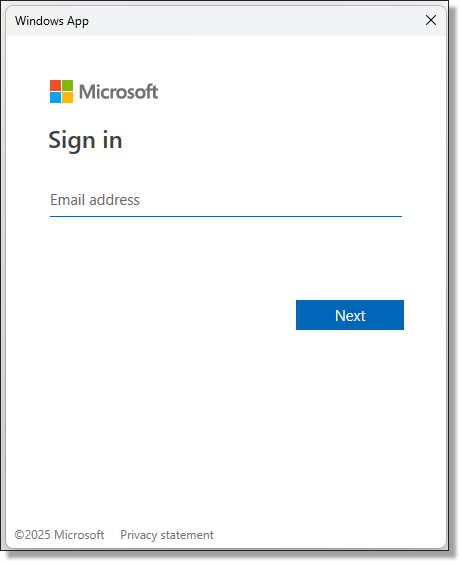
Once you have been provided access by your organisations IT department, or have downloaded, installed and opened the application, select sign in.
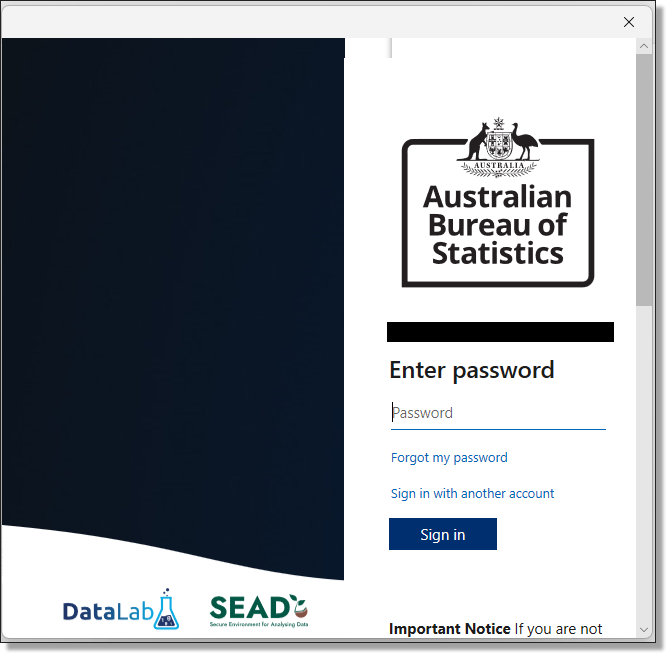
Sign in using your SEAD username. Once your Username has been entered, you will be navigated to the ABS SEAD branded log in screen to enter your password.
Once you've successfully logged in, you will be able to see all of your available VM's. If you can’t see the VM that you want, it may be dormant and would require a rebuild. You will be required to connect to the SEAD web portal to activate or rebuild your VM.
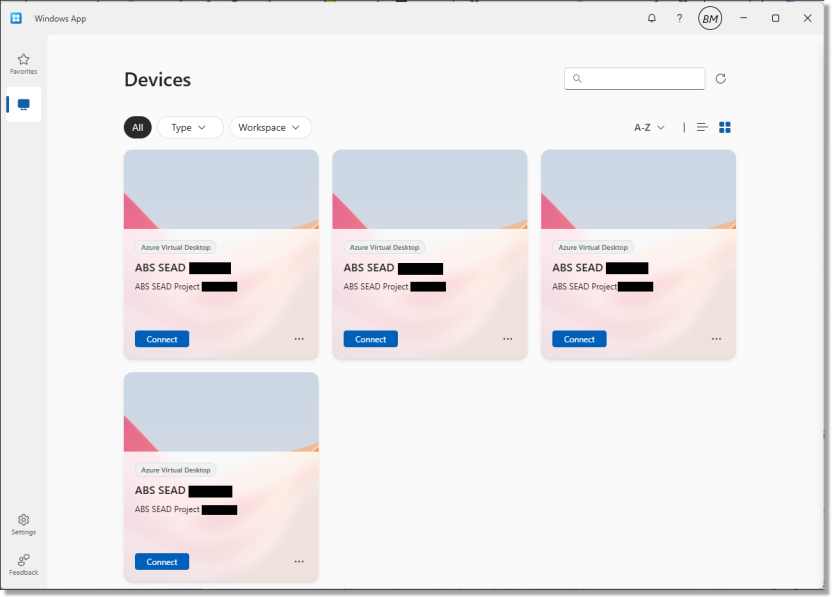
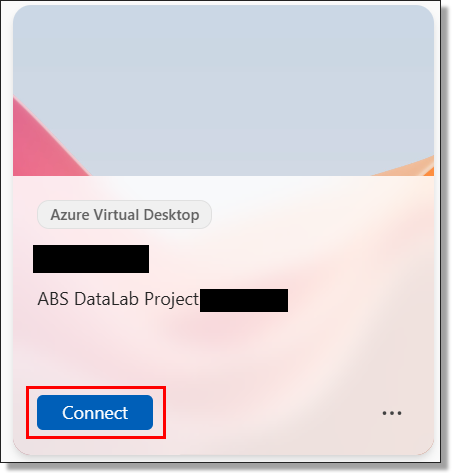
Select 'Connect' on the device tile you want to access, noting only the Active VM as displayed on the SEAD web portal will allow you to progress into your workspace.
At this point, you may be required to enter your SEAD credentials again to launch the VM, if you have not logged in recently.
When attempting to connect to your VM you may encounter the following error. If so, please confirm from the SEAD web portal that the VM you are trying to launch is 'Active' and does not require a rebuild.
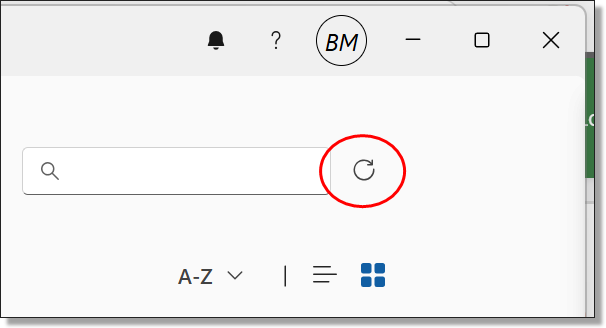
If changes have been made to the VM in the SEAD web portal, you may need to refresh the available resources in the Windows App for changes to take effect.
After successfully Connecting to the VM you will then be presented with another login screen for the VM itself. Again, you may be required to enter your SEAD credentials.
By logging in you agree to these conditions outlined on the important notice:
Important Notice
If you are not authorised to access this system, exit immediately. Unauthorised users may be subject to criminal and civil penalties.
This is an Australian Government computer system. Part 10.7 of the Criminal Code Act 1995 outlines the penalties that may apply for unlawful use of Government systems including unauthorised access, modification or impairment of computer systems, data or electronic communications. The Act provides penalties of up to 10 years imprisonment for such offences. By proceeding, you are representing yourself as an authorised user and acknowledge you have read and agree to comply with the Responsible Use of ABS Microdata User Guide. Your activity will be logged, monitored and investigated should any misuse be suspected.
Sanctions ranging from a reprimand to revocation of access or termination of employment may be imposed if misuse is determined.
You will then have a new window open on your computer displaying your VM workspace.
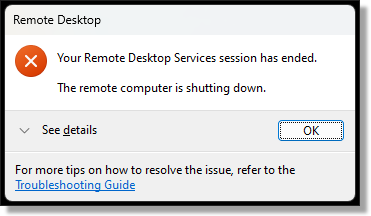
Upon shutting down your VM you will receive the following confirmation message. Ensure that you shut down your VM once your analysis is complete to avoid running costs.

Connect using Windows App for MacOS
Download the Microsoft Windows App from the MacOS App Store.
Use of SEAD on MacOS is only supported through the Windows App for Mac. Contact your SEAD administrators to ensure that your IT department has enabled the correct networking addresses.
If the Windows App for Mac isn’t already available in your organisation’s workspace, your IT team may need to enable it.
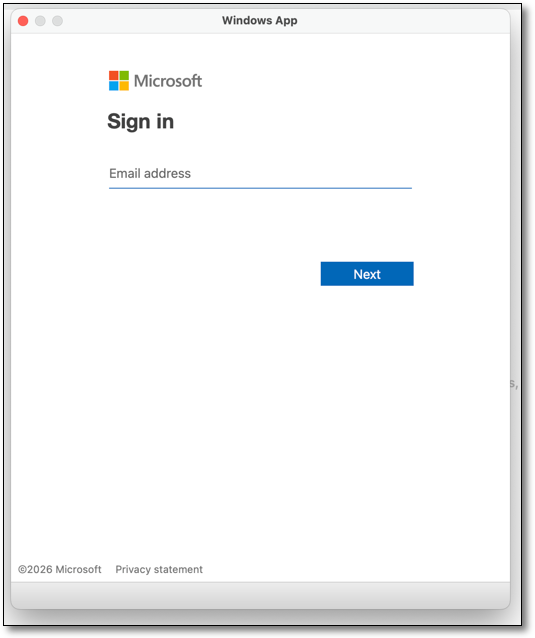
Once you have access, open the app, select the + icon in the top right, choose ‘Add Work or School Account’, and sign in with your SEAD credentials.
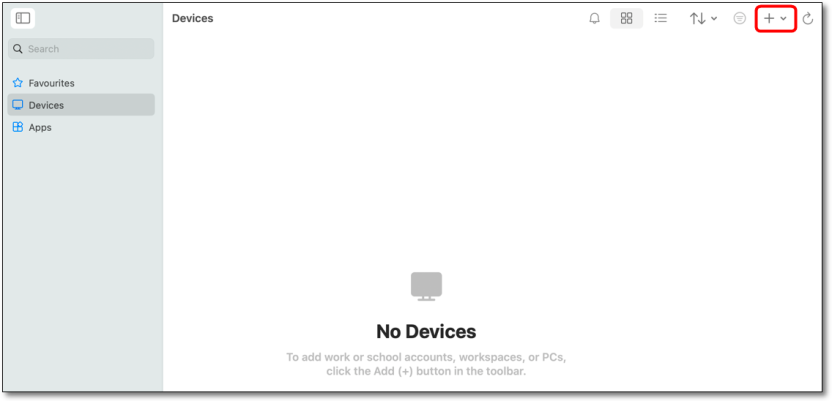
Once you've successfully logged in, you will be able to see all of your available VMs from the Devices page. If you can’t see the VM that you want to access, it may be dormant and would require a rebuild. You will be required to access the SEAD web portal to activate or rebuild your VM as this cannot be managed through the Windows App.
Double-click on the tile for the VM that you want to access, noting only the 'active' VM as displayed in the SEAD web portal will allow you to launch your workspace.
At this point, you may be required to enter your SEAD credentials again to launch the VM, if you have not logged in recently.
When attempting to connect to your VM you may encounter the following error. If this occurs, check the SEAD web portal to ensure that the VM you are trying to launch is 'active' and does not require a rebuild.
If changes have been made to the VM in the SEAD web portal, you may need to refresh the available resources in the Windows App for changes to take effect.
After successfully Connecting to the VM you will then be presented with another login screen for the VM itself. Again, you will be required to enter your SEAD credentials.

By logging in to SEAD you agree to these conditions outlined on the important notice:
Important Notice
If you are not authorised to access this system, exit immediately. Unauthorised users may be subject to criminal and civil penalties.
This is an Australian Government computer system. Part 10.7 of the Criminal Code Act 1995 outlines the penalties that may apply for unlawful use of Government systems including unauthorised access, modification or impairment of computer systems, data or electronic communications. The Act provides penalties of up to 10 years imprisonment for such offences. By proceeding, you are representing yourself as an authorised user and acknowledge you have read and agree to comply with the Responsible Use of ABS Microdata User Guide. Your activity will be logged, monitored and investigated should any misuse be suspected.
Sanctions ranging from a reprimand to revocation of access or termination of employment may be imposed if misuse is determined.
You will then have a new window open on your computer displaying your VM workspace.
Upon shutting down your VM you will receive the following confirmation message. Ensure that you shut down your VM once your analysis is complete to avoid running costs.
For more information on using the workspace refer to Navigating your project workspace.
Navigating your project workspace
Understand your file explorer, file shares, and learn how to safely disconnect from your workspace
SEAD file explorer
You can use your SEAD workspace in a similar way to using other secure networked systems, where you can securely see, use and share data files, analysis and output with the other members of your project team.
Open File Explorer and click on This PC to see the network drives you have access to.
Library
L: Drive: All researchers can see all files in the Library drive. This drive is managed by the ABS and contains support information, such as statistical language documentation, ANZSIC classification and general access guides for non-standard products. Files cannot be saved to this drive.
PodLibrary
Z: Drive: All researchers can see files in the PodLibrary drive. This drive and its content is managed by your SEAD administrators. Files cannot be saved to this drive.
Output
O: Drive: Any output you want your SEAD administrators to clear should be saved to this drive. Only members of your team can see this drive. Information is backed up nightly and retained for 14 days. Information in this folder remains unaffected by a rebuild.
Project
P: Drive: A shared space for your team to work in and store all their project files, as well as set up and run Python and R scripts. Only members of your team can see this drive. Information is backed up nightly and retained for 14 days. Information in this folder remains unaffected by a rebuild. The default storage is 1TB. You will need to review and delete unnecessary files as your project files grow over time. If necessary, an increase to this storage can be requested via your administrators. There may be a cost for additional storage.
Products
R: Drive: Access data files that have been approved for your project. However, it is best to use the 'My Data Products' shortcut on your desktop as this shows you only the datasets you have been approved to access, rather than all dataset short names. Files cannot be saved to this drive.
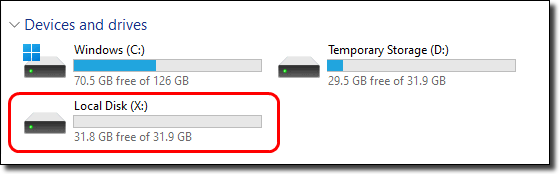
LocalDisk
X: Drive: If you have been granted local disk space, this can be used to run jobs on offline virtual machines (desktops). You may want to request this option if you have multiple projects that you are actively involved in. This drive can also be used to run scripts and create new Python virtual environments. There may be a cost associated with attaching local disk space to your virtual machine (VM). The local disk will only be present if it has been allocated to your VM. To request local disk space contact your SEAD administrator.
Drives C
C: Drive: can be utilised to run scripts and creating new Python virtual environments, not facilitated through either Jupyter Notebook, JupyterLab or Spyder. Noting the C drive is also destroyed with each 14 day rebuild. Avoid using this drive for saving files or file storage- there is limited space, no ability to increase the storage capacity, and files will not be retained or archived. If more storage is required a local disk can be requested for your VM.
Drive D
D: Drive: can be utilised for running scripts and improved compute performance compared to Project and C drives. Noting the D drive is also destroyed with each shutdown (nightly or otherwise) or rebuild. Avoid using this drive for saving files or file storage, this is not backed up outside of your VM session and data cannot be recovered if lost.
Drive A
Is not to be used. Information saved here is either destroyed with each nightly shutdown and 14 day rebuild, or has restricted access. Attempting to read or write from Drive A will invoke a group policy error due to access controls. If required to use local storage, please use the C drive or consult your project lead to request local disk space.
Notes:
Do not store files in folders outside of the Project and Output drives: Other members of your project cannot see files if you store them in other drives. Files stored outside of the Project and Output drives are destroyed every 14 days as part of SEAD security protocols and data cannot be recovered from if lost.
Refreshing your network drives: If your network drives do not appear in File Explorer, you can click the 'Refresh Network' shortcut on the desktop. A confirmation message appears when this has been successfully refreshed.

Accessing your data files and products
To access the data files for your project, use the 'My Data Products' shortcut on your desktop.
The My Data Products folder displays only the products approved for your project.

Selecting the 'Products' drive shows you the short name of all data loaded to the SEADpod. However, if you try to open a file that is not approved for your project you are denied access and receive an error.

NOTE: If you are using Azure Data Lake containers with Databricks, Azure Storage Explorer is available as an alternative to AzCopy to manage and transfer your files between your file share drives (output, project, etc) and blob storage. Refer to the 'Azure Storage Explorer User Guide' in the shared library drive.
NOTE: The Databricks project data lake storage does not currently have back up due to implementation restrictions, therefore we highly recommend regularly copying your files from the project data lake storage to your project file share storage (your P:/ drive).
Sign out or disconnect from your workspace
To close your session while keeping your analysis running, you have two options: sign out or disconnect from the VM. If you’ve enabled the ‘Bypass’ option in the VM management settings, your programs will continue running until 8PM. Otherwise, the shutdown will occur at a later date, still at 8PM.
To sign out of your workspace, click the button with your initials located at the top right corner of the window, and then choose ‘Sign Out’.
To disconnect from your session, click on the Start menu, then select the power symbol. An option labelled ‘Disconnect’ will appear. Click it to immediately disconnect from the session.

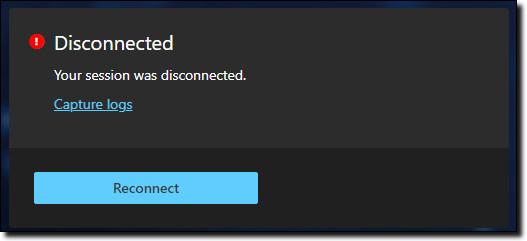
If you want to close your session and end all programs you have running, simply shut down your session.
To shut down your session, click on the Start menu, then select the power symbol. An option labelled ‘Shut down’ will appear. Selecting this will immediately shut down your session.
NOTE: Any unsaved work will be lost.
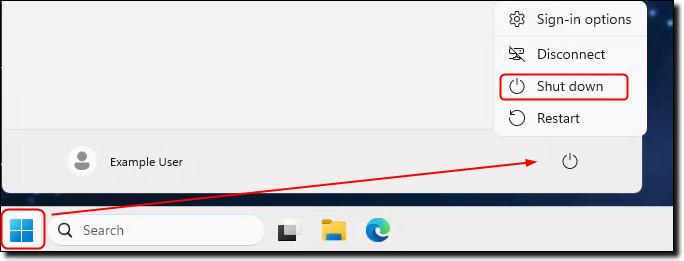
Restarting the VM can be used for basic troubleshooting if experiencing issues in the VM. This will restart the VM with any unsaved work being lost and any analysis currently being run will not continue.
How to run jobs offline
Explore how utilising local disk space can benefit analysts working across multiple projects
Running jobs offline using local disk space
If you are an analyst who works across multiple projects, you can request local disk space. This will enable your virtual machine (VM) to run jobs offline, noting the 30 day rebuild still applies.
Datasets are stored on a remote file share. Only the active machine has network access to this location. Your locked VMs do not. To run offline jobs, you need to request local disk space via your administrators to be attached to your machine. There may be a cost associated with this.
When running jobs offline, the inactive machine can continue to run your program as it still has access to the data since it is no longer using the remote file share. However, working like this does not allow your project team to see your analysis or output. You should always move your output back to your Project or Output drives where your project team can access and review the output.
To use local disk space:
- request access to a local disk for your project through your SEAD administrator
- copy the data products you need to the local disk
- Execute your script from the local disk and and start the job
- in your program, save your output to the local disk
- exit your VM and return to the SEAD portal to activate another machine
- after you have finished running your analysis offline (local disk) move your analysis and output back to your Project drive
Local disks can be used to execute processes, pending request to your administrator to attach the disk and provides local fast storage for more compute capacity. Please note the important functionality of this drive for intermediate compute and temporary storage purposes, rather than ongoing file storage.
Note: The X:\ drive is temporary storage and any data stored will be deleted on rebuild, deletion of the VM, or project closure whichever comes first. X:\ drives are not backed up outside of the VM, and data cannot be recovered from the drive if lost. Due to this, the ABS still recommends saving all data in the project drives.
Requesting code and packages
How to access, request or move code, code libraries and packages to your project
How to access code and packages
There are various recommended means for you to access, request or move code, code libraries and packages to your project in order to undertake your analysis in SEAD. You can access code through the following:
- the ABS administered shared library (library drive) which holds a large volume of approved code from all primary software languages available (R, Python, STATA, SAS) and accompanying documentation
- the Posit Package Manager (shortcut on the workspace desktop providing access to Python and R packages)
- a request to your SEAD administrators for loading basic/simple self-written code in text format
- a request to your SEAD administrators for loading from these recommended repositories:
Managing your R and Python packages
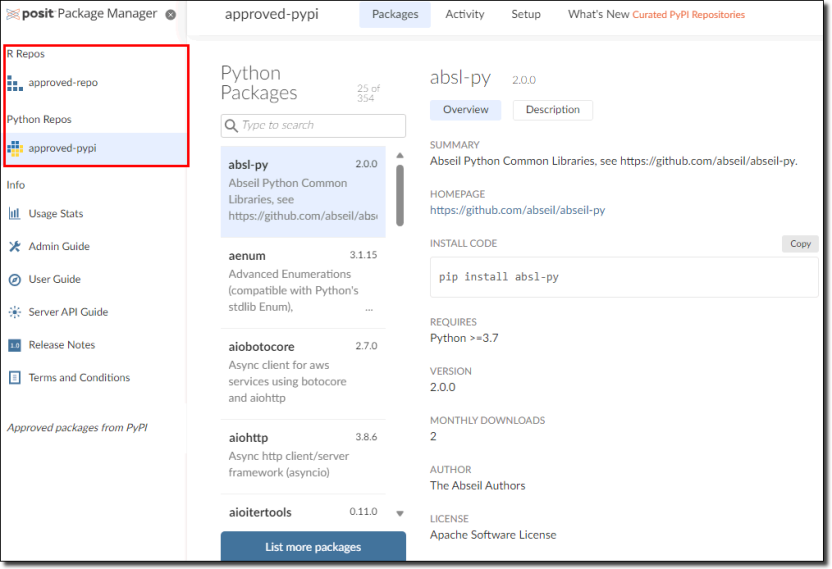
If you are working with a specific set of R and/or Python packages, you can now manage these using the Package Manager shortcut on your desktop.
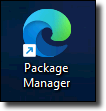
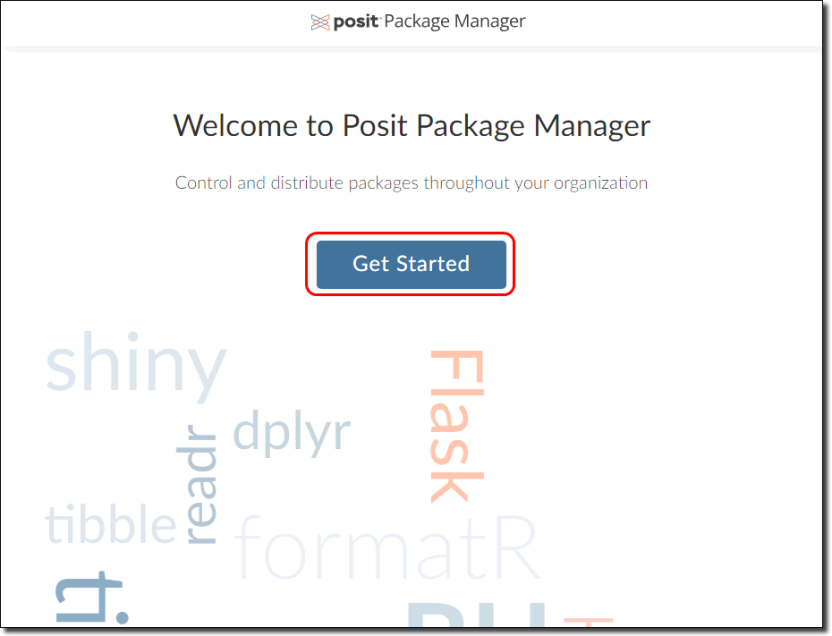
In the Package Manager, click 'Get Started' to navigate to the available packages. You can use this tool to search for packages (in the left column) and install the packages you want to use for your project. If the packages you need are not listed, you can request them using the Contact us page.
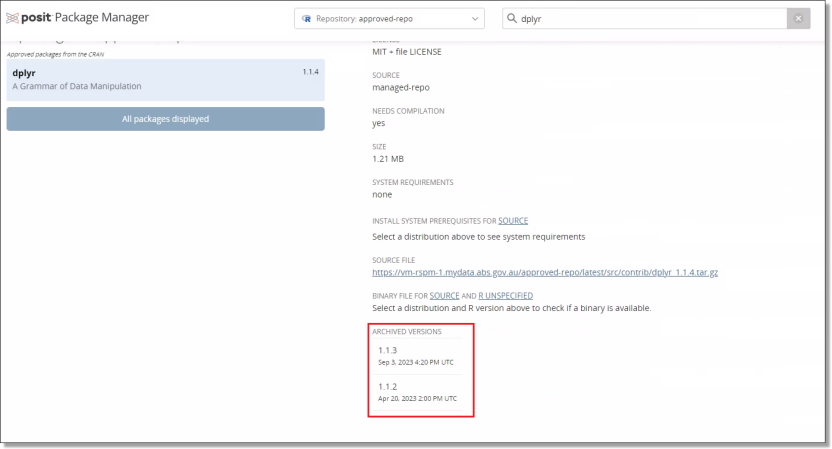
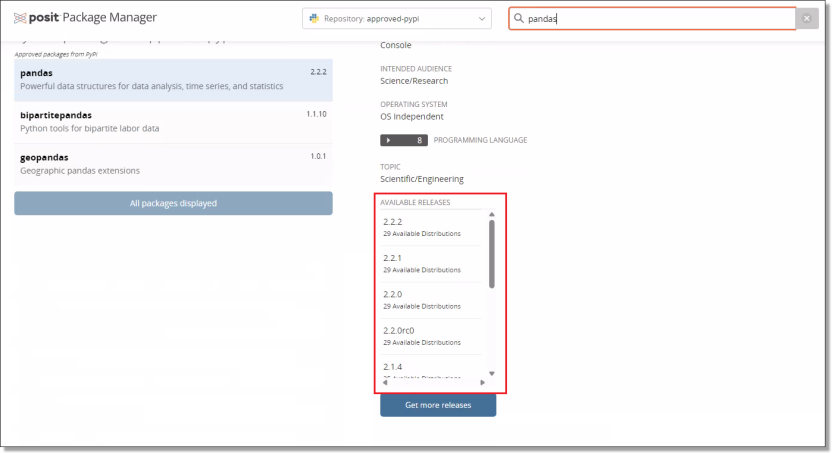
Accessing earlier versions of R and Python Packages from Posit
The following describes how to access different, older, versions of packages from Posit depending on the language. If you require a new package, newer or older version of a package from CRAN for R or PyPi for Python, please submit a request for packages to your SEAD administrator in the first instance. Packages not from CRAN or PyPi will not be available through Posit and these will be subject to a separate security screening processing before they are approved for access in the DataLab if the process is successful.
To access different package versions in R
These files can be downloaded from Posit using your chosen R environment through the ‘devtools’ package e.g., ‘devtools::install_version(“your package”, version=“your package version”)’. You will be able to see the available package version for R at the bottom of the Posit page for that package. An example for the ‘dplyr’ package can be seen below.
To access different package versions in Python
Accessing older python package versions can be done when installing the package through ‘pip’ e.g., ‘pip install pandas==2.1.0’. The available versions of each of the python packages can also be seen at the bottom of the relevant Posit page. An example for the ‘pandas’ package can be seen below.
LabLink (BETA)
LabLink allows SEAD users to work collaboratively within their VMs
What is LabLink
LabLink is a new video conferencing tool developed by the ABS for SEAD, now available in its trial (BETA) phase to all users. It is designed to help researchers collaborate securely within their Virtual Machines (VMs), even when working from different physical locations. There are no additional costs involved for projects using LabLink.
LabLink has the following key features:
- Secure Access: Only researchers approved on the same project can join LabLink meetings. External access (outside SEAD) is not permitted.
- Audio and Video enabled: Researchers can communicate with other project users clearly and in real-time.
- Screen sharing: Share your desktop or a selected window with other meeting users.
- Familiar Interface: LabLink works similarly to popular tools like Microsoft Teams and Zoom. You can launch it from the desktop shortcut inside your VM.
Please note the following disabled features for data security:
- Speech transcription
- File sharing
- Meeting recordings
- Instant messaging
Using Lablink
Users can launch LabLink via the desktop icon or at meet.mydata.abs.gov.au in Microsoft Edge within their VM. Both options open the LabLink landing page to join and manage meetings. The page includes a “Help Info” button for common questions, and a LabLink User Guide is available in the Shared Library to support access and troubleshooting. Users will need to coordinate the details of their meetings outside of their VM as the sharing of meeting links has been disabled.
By using LabLink, end users agree to comply with the SEAD security policies and conditions of use.
LabLink will remain in BETA while we continue to improve its performance. For feedback or support, contact: sead.support@abs.gov.au
Databricks
Databricks is available to SEAD users as a non-standard product
What is Databricks
Databricks is a cloud-based Big Data processing platform which provides users with an integrated environment to collaborate on projects and offers a range of tools for data exploration, visualisation and analysis. Within the Databricks environment, users can:
- build pipelines for streaming data processing
- build and run machine learning tools
- create interactive dashboards
- take advantage of scalable distributed computing capability
Users will also have access to the Databricks Academy training subscription (an online library of Databricks training guides), in addition to instruction materials on how to setup the Databricks workspace provided in the library drive.
How to allocate a Databricks workspace to a project
To allocate a Databricks workspace to your project, you will need to submit a request to your SEAD administrator. Once your project is allocated a Databricks workspace, it can be accessed from within your Virtual Machine (VM) using the installed Edge or Firefox browsers.
Cost consumption
As Databricks uses separate compute power, projects requesting access to Databricks should consider if they need to continue to maintain their existing VM sizes. The option of scaling down the size of existing VMs provides users the opportunity to save on project costs.
What are the cluster policy arrangements?
Users can be provisioned with the following cluster policy options:
| Instance | Server Purpose | Max Autoscale workers | vCPU(s) | RAM/ | Databricks Units |
|---|---|---|---|---|---|
| DS3 v2 | General Purpose | 5 | 4 | 14GB | 0.75 |
| D13 v2 | Memory optimised | 4 | 8 | 56GB | 2 |
| F16s v2 | Compute optimised | 4 | 16 | 32GB | 3 |
Databricks cluster policies will restrict the type and number of workers you can provision for a cluster. If an existing policy does not fit your requirements, you can request a new policy via the ABS. All information regarding this can be found in the library drive.
To ensure the security and integrity of SEAD, partners will not have administrative access to the Databricks workspace and some usage restrictions may apply. Administration will be exclusively managed by the ABS.
NOTE: The ABS provides information on appropriate Databricks cost management to end users within the shared library (L: Drive).
User troubleshooting
Basic troubleshooting for issues with logging in, virtual machines, errors and running out of space, code and software
Authentication
I’m having trouble with my multi-factor authentication
There are many different authentication applications, ensure the one you have downloaded is published by Microsoft (not Google or otherwise) as SEAD only supports Microsoft Authenticator.
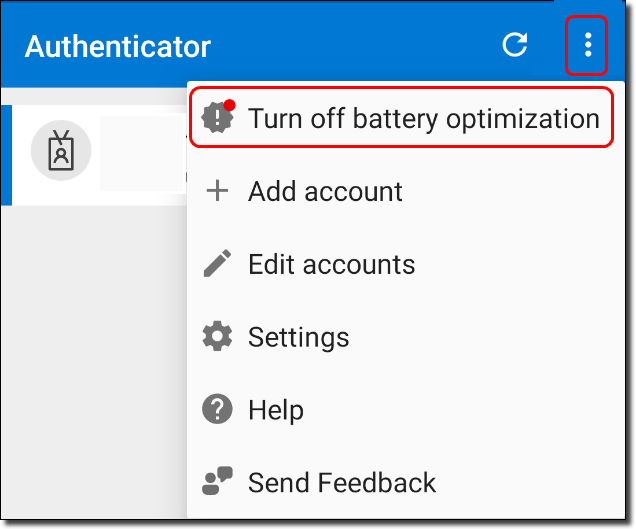
If you have verified you are utilising the correct application, but you are not receiving prompts to authenticate on your mobile device. You should check your battery optimisation is turned OFF by following these steps (applicable to Android phones only):
- Open Microsoft Authenticator and refer to the top right-hand corner, if there is a red dot above the three white dots, press this and then select 'Allow' to turn the battery optimisation off. Then try logging in again on the SEAD landing page.
If you receive the ‘error communicating with server’ message on your mobile device:
- If your device is connected to the home Wi-Fi, turn your phone over to mobile data and try logging in again.
If switching to a new phone/tablet device:
- The operating system of some mobile devices may not interact as expected with Microsoft Authenticator (namely the iOS 16, and some older versions of Android), in this case, try setup another phone or tablet device. In the case that you still have your old phone it may help if the old account is removed from the Microsoft Authenticator application on the previous device.
Other troubleshooting steps you can follow if you are having issues authenticating are:
- Ensuring your phone is connected to the internet. You can also try to switch from WiFi to mobile data through your phone, to ensure a good connection to your PC/laptop.
- From your phones settings menu, ensure push notification are enabled
- Restarting your phone
- Ensuring your have the latest Microsoft Authenticator app version installed
- Clear your phones cache. On iPhone you will need to delete and reinstall the app. For Android navigate to the App storage settings, select 'Storage' and tap 'Clear cache'.
- Ensure your phone is on the latest OS version
Logging in
I can't log in
- Your account may have been disabled. Accounts inactive for 45 days are automatically disabled to maintain security. If your account has been disabled, you will need to contact your SEAD system administrator for assistance.
- If you have entered your username or password using copy and paste, you may have accidentally included hidden characters or a space.
- Your organisation firewall may be blocking access. Try accessing SEAD while disconnected from your organisation's network.
- SEAD only supports use of the Microsoft Authenticator application.
- If you have changed your mobile phone you may need to reset your Microsoft multi-factor authentication. Contact your SEAD administrator to action this.
- If you need to reset your password this must be done via the 'Forgot my password' link in the initial SEAD sign in screen.
- Clear your browser cache.
- Try a different browser. ABS recommends use of either Google Chrome or Edge.
Has my organisation authenticated my access to SEAD
SEAD is enabled by cloud infrastructure, which may be blocked by some organisations’ firewall settings.
ABS cannot make changes to external organisations' infrastructure. If you are connecting to the 'Remote Desktop Client' version of AVD, contact your SEAD administrators to ensure that your IT department has enabled the correct networking addresses.
If you intend to use the 'Remote Desktop client' on your organisation's workspace, your internal IT department will need to make it available to you.
The latest version of 'Remote Desktop client (MSI)' for Windows, ensuring you select the 'MSI' version is available here and for Macintosh is available here.
How long does my temporary password last
The temporary password issued to you by your SEAD administrator lasts for 90 days.
If you have forgotten your temporary password, you can self-service a password reset by following these instructions.
My password expired while my virtual machine was running
Your session will continue to run until a shutdown is required (either nightly shutdown or 14 day rebuild). However, you can still reset your password while your session is running.
Virtual machines
My virtual machine is not launching
- You must activate, then launch the VM. Follow the process and wait for each step to complete before progressing.
- Check your internet connection. If you have a weak or intermittent connection, this can affect launching your VM.
- Try launching the VM outside of your organisation's online environment. Some institutions’ or government departments’ firewall or other security settings may be preventing access to the SEAD portal and/or launching of the VM. Attempting to connect outside your agency’s online environment may assist in forming the VM connection.
- Restart your VM. As with restarting a computer, restarting your VM can sometimes resolve problems with launching your machine successfully. Wait 10 minutes to ensure the reboot of the machine is complete before attempting to launch again.
- Rebuild your VM by navigating to your VM management options by pressing the 'Manage' button on the corner of your VM tile in the portal.
- If you are still having trouble, alert your SEAD administrator.
I want to use multiple monitors (multi-display) when accessing SEAD
To use multiple displays when using SEAD, on the Remote Desktop client (MSI) or the Windows App, you will need to adjust the display settings.
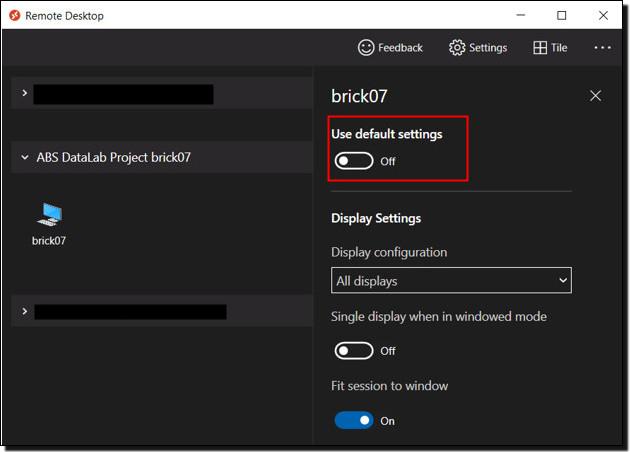
On the Remote Desktop client, right click on the machine you want to access and click ‘settings’, then turn off ‘Use default settings’ to see the display settings.
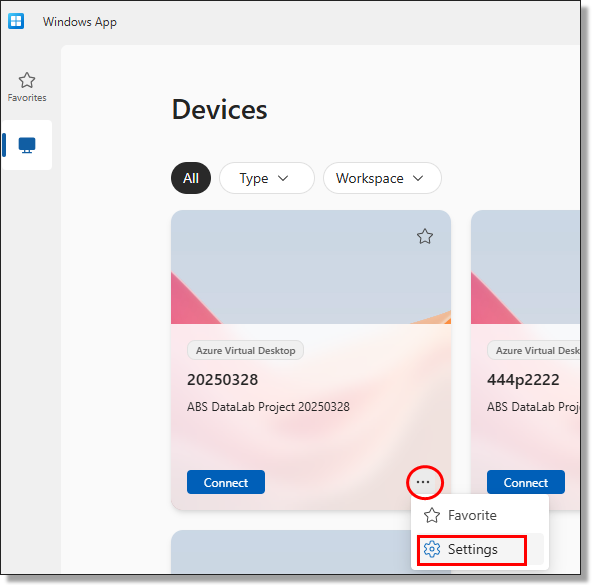
On the Windows App, right click on the machine you want to access and click 'more options', then turn off ‘Use default settings’ to see the display settings.
I am having issues with my VM screen size or issues with scaling the screen resolution
When launching your VM through the web portal using the 'Connect' button, the VM window may open but with issues relating to the screen resolution. You can try launching your VM directly from the Remote Desktop Client or Windows App. Refer to Accessing your project workspace, then connect ‘Remote Desktop for Windows’ section.
If required, you can modify the display settings for the VM you’re wanting to launch. From the Remote Desktop Client or Windows App, open the display settings and turn ‘use default settings’ off. This will allow you to see what display settings are enabled. Ensure the ‘Fit session to window’ option is enabled.
There are no desktop clients available for Linux users, how do I access my VM
Currently Microsoft does not offer an AVD client for Linux users. Because of this, we are unable to provide support for Linux users looking to access SEAD. While other options for connecting to the SEAD using Linux may exist, for example setting up a Windows VM on your Linux computer, then connecting to your DataLab VM using the Windows App or Remote Desktop Client, we cannot guarantee its reliability.
Where do I save the work I have done on a virtual machine that is scheduled to be destroyed
Save your work to your Project or Output drives to ensure that your analysis is not lost, this also ensures other team members on your project have access to your work. Information saved outside of these drives is destroyed when your machine is rebuilt every 14 days.
I can't see my project's products
Try logging out of and stopping your VM, then begin the Start VM process again. If that does not work, rebuild your VM by navigating to your VM management options, refresh your session or clear your cache/browser history. If issues persist, contact your SEAD administrator.
I'm experiencing performance issues within my SEAD workspace
System performance issues can occur for many different reasons and every issue requires a unique approach to troubleshoot. Many issues can be resolved by attempting one of the following:
- ensure you have a good internet connection
- close and reopen the program you are using, and close any other programs or processes that may be consuming system memory
- confirm your project drive has available space, if not attempt to free up space
- refresh your network drives using the icon on the workspace desktop
- attempt to shutdown or rebuild your VM
Errors and running out of space
One of my network drives in the analysis environment is missing
If you cannot see the Library, Project and Output network drives in File Explorer, go to the desktop and double-click the 'Refresh Network Drives' icon.

I got an error while working with data in SAS/Stata/R/Python
Stata error example:

"op. sys. refuses to provide memory: Stata's data-storage memory manager has already allocated 77792m bytes and it just attempted to allocate another 32m bytes. The operating system said no. Perhaps you are running another memory-consuming task and the command will work later when the task completes. Perhaps you are on a multiuser system that is especially busy and the command will work later when activity quiets down. Perhaps a system administrator has put a limit on what you can allocate; see help memory. Or perhaps that's all the memory your computer can allocate to Stata. Apart from Stata, only a bunch of files on adobe were open while the append was being run and am not using a multi-user system."
If you encounter the above image, this means you have exceeded the memory for your VM.
1. Use an alternative method/program to manipulate or process the dataset. Some processes/programs/methods for working with large datasets are more memory-intensive than others. Try some alternative method to see if it is less system intensive.
- Most statistical software tools are able to filter data as it is imported. If your analysis only needs variables a, b and c from a dataset containing 30 variables, then selecting, filtering or importing only these variables uses less memory.
- If you cannot do this in your software, consider creating a subsetted data file using another tool, such as Python, as the first step of preparing your data for analysis.
- If you are unsure of alternative methods, we recommend discussing with other researchers in your project team who are more familiar with your chosen statistical software. The ABS does not provide advice or training on using the analytical tools provided to you in SEAD.
2. Contact your SEAD administrator to request a larger machine. Larger machines incur higher running costs. With user charging, your administrator may need to consult with your organisation to confirm incurring additional expenses for your project before applying for a larger machine.
Why am I getting an error when I attempt to unzip files using the 7zip tool in SEAD
If you are receiving an error when attempting to unzip a file using 7zip, this may be because the default is set to ‘7zG’ and not ‘7zFM’. To confirm whether this is the case, attempt the following steps:
- create a zipped file
- choose Open With -> another app
- from there go to “choose another app on your PC”
- select 7Zip
- select 7zFM
- hit apply and select always
I am running out of space in my Project drive
Clean up the drive contents, review and delete redundant files to free up space. Additional space can be requested of your organisations SEAD administrators.
Code and software
How do I edit the SAS configuration file
Users with SAS installed now have the ability to edit the SAS configuration file located at “C:\Program Files\SASHome\SASFoundation\9.4\nls\en\sasv9.cfg”. This file governs various software settings and parameters, enhancing customisation options. Noting any changes will need to be repeated following machine rebuilds, as the C drive is destroyed on rebuild. To modify the SAS config file, follow these steps:
- Access the file at the provided directory, using SAS or a text editor.
- Proceed to make the necessary changes, in order to tailor the configuration.
- Save the file (and a backup version on your P: drive, to reinstate following machine rebuilds), then test the software for desired outcomes. Exercise caution, as improper edits may lead to unexpected behaviour.
SEAD users can access a pre-written SAS configuration script that enhances SAS efficiency within SEAD. This includes the "VM_COMPLETE_SETUP.bat" script and supporting resources to streamline the setup process following machine rebuilds. Please refer to the resources located in the Shared Library Drive (L: Drive).
I am having trouble launching Jupyter Notebook or JupyterLab
When launching Jupyter Notebook or JuypterLab from Powershell or command prompt, these may be referencing the incorrect directory resulting in an error message. To overcome this, enter the following command into Powershell or the Command prompt:
- To launch Jupyter Notebook, enter: 'python -m notebook'
- To launch JupyterLab, enter: 'python -m Jupyterlab'
I have some code for one project that I want to use in another project - how do I arrange this
You can request input clearance for data, code or files to be loaded to your project, from either another project, or other sources that you hold. To do this contact your organisation's SEAD administrators.
What can I do if my code will run longer than 8pm tonight
You can extend your session to bypass the nightly shutdown, by one, two or three nights.
How do I maintain package installations through VM rebuilds
By default, packages are installed onto the C drive which gets wiped every time the VM rebuilds. To have packages which persist through rebuilds, we recommend changing the file path to have packages installed on either the Project drive (P:) or a local disk (if attached). Files saved to these drives are retained over rebuilds.
How can I optimise SAS within SEAD
SAS configuration inside SEAD is tied to the size of your VM. Alternatively, the addition of local disk space (see Running jobs offline using local disk space) can improve run times. Users can also work more on a local disk and then write to the Projects drive when finished, but beware of the costs involved with attaching a local disk space. A 1TB disk can cost between a minimum of $116 to $299 a month depending on usage transactions that would be cost recovered.
Can I enable larger data storage for the PostgreSQL data directory
Following recent enhancements, PostgreSQL's data directory relocation is now automated to X:\psql\data when a local disk is attached, facilitating expanded storage capacity for data. This feature streamlines the process of accommodating larger datasets. To enable local disc please contact your SEAD administrator.
How do I see what R and/or Python packages I have available and how do I manage these
Use the Posit Package Manager shortcut on the SEAD virtual machine desktop to check the range of R packages available to you. See Requesting code and packages for more information.
The Python package I have been using is no longer available in Posit
Python packages and their dependencies are regularly scanned for known vulnerabilities. Any package versions that exceed the ABS vulnerability threshold will not be available in Posit. If this occurs, check if there are alternative versions of the packages available. In most cases other versions of the package will be available to address known vulnerabilities. If you require assistance, please contact your administrators.
Double clicking to open a PDF is not working
Due to a default setting in Microsoft, the system automatically uses Microsoft Edge to open any PDF file. You can open the PDF file by right-clicking on the file, selecting Open with > Adobe Reader. This launches the file using Adobe Acrobat Reader.
The code I am trying to run in RStudio is processing slowly
You can check for any background processes that can be turned off for RStudio. For example, turning off the “show diagnostics for R” may improve the performance. To do this, go to tools, then global options, and click on 'code'. Under diagnostics untick "show diagnostics for R", then select Apply and Okay.
I am not able to create a new cluster in Databricks
When creating a new compute cluster in Databricks there is a known issue with the new ‘Simple’ compute creation form in Databricks. Ensure that the Simple form setting is switched to ‘Simple form: OFF’ when creating a cluster. This will enable you to create a new cluster using the standard compute creation form.